
Updated on 17th November 2023 to reflect the latest changes in the Semantic Kernel APIs:
- All the Azure OpenAI extension methods have been renamed from Azure to AzureOpenAI. For example,
WithAzureChatCompletionService()is nowWithAzureOpenAIChatCompletionService().- The method to import an OpenAI plugin into the kernel has been renamed from
ImportPluginFunctionsAsync()toImportOpenAIPluginFunctionsAsync(). Please be aware that there’s also a new method to import directly an OpenAPI definition calledImportOpenApiPluginFunctionsAsync(). As you can see, the two names are very similar, so make sure to use the right one.
In the posts I have published so far, we covered two types of plugins: semantic functions (to execute a prompt) and native plugins (to execute native code). Semantic Kernel supports a third way to create plugins, even if it isn’t entirely different from the one we have seen in the last post. We’re still talking, in fact, about a plugin capable of executing native code. However, this time the plugin won’t be hosted locally in the project, but it will run on a server, and it will follow the specifications of OpenAI plugins.
The advantage of this approach is that OpenAI plugins implement a standard approach and they are supported by multiple platforms: Semantic Kernel, of course, but also ChatGPT or Microsoft 365 Copilot. This means that, if you create a plugin for Semantic Kernel, you can reuse it in other platforms, without having to rewrite it. Or that if you have already developed and published an OpenAI plugin, you can reuse it as it is in Semantic Kernel.
In this post, we’re going to take the native plugin we built in the previous post (the one that allows retrieving the population of the United States in a given year) and we’re going to convert it to an OpenAI plugin. Then, we’re going to consume it in our Semantic Kernel command line application.
Creating an OpenAI plugin
An OpenAI plugin is, in the end, just a REST API, with two specific features:
- You must have a manifest file, which describes the purpose of the plugin.
- You must expose its definition using the OpenAPI format. Thanks to this definition, the platform which consumes the plugin can understand which features and methods are available.
I know it’s a bit confusing, but OpenAI and OpenAPI are two different things :-) OpenAI is the company behind ChatGPT and some of the most used LLMs in the market, like GPT3.5 and GPT4, while OpenAPI is a standard to describe REST APIs, which is independent from the language and the platform used to build them.
For the purpose of this post, I’m going to build the REST API using an Azure Function, which is the cheapest and easiest way to build an API and make it available on a remote host (even if, for the sake of testing, we won’t need to publish it, it can run also on a local server).
I’m going to build a .NET 7.0 based function, using the isolated model (which means that the function runs in an isolated worker model, which enables the function to be independent from the version of .NET installed on the host and also to support other runtimes, like Python). You can use Visual Studio or Visual Studio Code, it’s up to you to use the editor you prefer: the code we’re going to write is exactly the same.
The first step, before writing the code, is to install the NuGet package called Microsoft.Azure.Functions.Worker.Extensions.OpenApi. This package will greatly simplify the generation of an OpenAPI definition, which is required by the OpenAI to consume the plugin. Once the package is installed, move to the Program.cs file and add the following code:
| |
Compared to the standard initialization, we have added the extension method ConfigureOpenApi().
Now we can write the code of the function, by implementing the Run() method in the function class:
| |
The code is very similar to the one we have seen in the previous post, with the only difference that it’s encapsulated inside the function execution. As such, we have:
- A
HttpTriggerattribute, which specifies that the function is triggered by an HTTP request. We also specify that this API supports only GET requests. - A
HttpRequestDataparameter, which represents the request. - A parameter called
year, which is prefixed by the[FromQuery]attribute. Thanks to it, we will have direct access in code to the value of the query string parameter calledyear.
The rest of the code is the same as the one we have seen in the previous post: we use the DataUSA API to retrieve the population data, then we filter it out for the requested year and we send it back to the caller, using a HttpResponseData object. Note that we’re not returning a string, but we’re writing it to the response using the WriteStringAsync() method. This is because the function must return an HTTP response, which is the standard way to communicate with a REST API.
If we press F5 in Visual Studio or Visual Studio Code, we’re going to launch the function through the Azure Function Core Tools, which enables the function to run on our local machine. Inside the terminal, we’ll see the endpoint which is exposing our REST API. The following screenshot shows the output in Visual Studio Code:
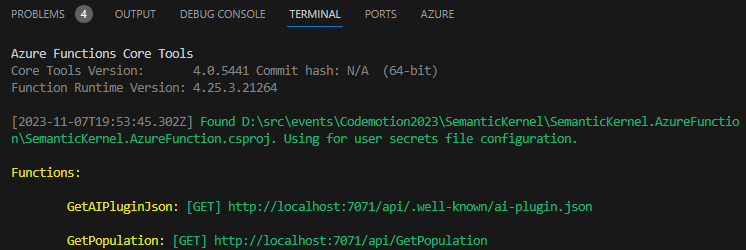
We can see that the function is running on port 7071, so we can test it by opening a browser and navigating to http://localhost:7071/api/GetPopulation and adding a query string parameter called year, like http://localhost:7071/api/GetPopulation?year=2015. If you did everything correctly, the output will be the same we have seen when we were using the native function in the previous post:
| |
Adding the OpenAPI definition
With our REST API functional, the next step is to produce the OpenAPI definition that explains how the APIs work. The Microsoft.Azure.Functions.Worker.Extensions.OpenApi NuGet package we installed earlier greatly simplifies this process. We can generate the necessary documentation with some attribute decorations on our function:
| |
The first attribute we use is OpenApiOperation, which defines that this method represent an API endpoint. It has a specific identifier (the operationId) and, more importantly, a Description property, which is very important because it’s used by OpenAI to understand what the API does.
The second attribute is OpenApiParameter, which is used to specify that the API accepts an input parameter with the following characteristics:
- It’s called year (the value of the
nameproperty). - It’s a query string parameter (the value of the
Inproperty is set toParameterLocation.Query). - It’s required (the
Requiredproperty is set totrue) - It’s a string (the
Typeproperty is set totypeof(string)) - It contains the year (provided through the
Descriptionproperty). Also in this case, this property is very important because it helps OpenAI to understand what the parameter is used for.
Finally, we have the OpenApiResponseWithBody attribute, which is used to specify that the API returns a response with the following characteristics:
- It returns a 200 status code (the value of the
statusCodeproperty). - It returns a
text/plaincontent type (the value of thecontentTypeproperty). - It returns a string (the value of the
bodyTypeproperty). - It returns the population number (provided through the
Descriptionproperty).
Now that we have provided all the information to describe our API, thanks to the OpenAPI extension the Azure Function will automatically generate for us the OpenAPI definition and a website based on Swagger, which enables developer to explore and interact with the API. To see it in action, we can press F5 again and, when the function starts, you will see that there are a few additional endpoints listed in the terminal:

If you open the RenderSwaggerUI endpoint, you will see a website that will allow you test the API in an interactive way:
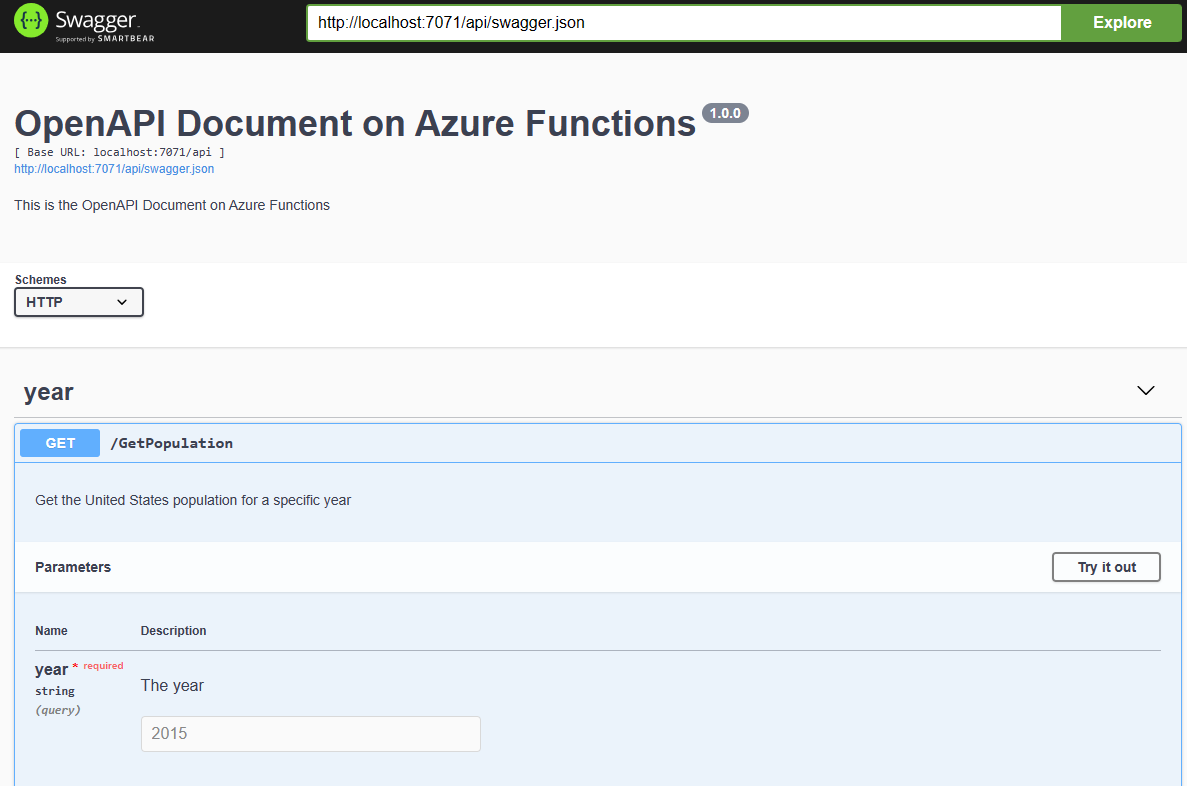
This website is generated starting from the OpenAPI definition, which you can see by opening in a browser the endpoint labelled as RenderSwaggerDocument, which looks like http://localhost:7071/api/swagger.{extension}. As you can notice, there’s an extension placeholder because OpenAPI supports definitions both in JSON and YAML so, based on the extension you use, you will get a different output. This is, for example, the YAML definition:
| |
Adding the OpenAI manifest
Now that we have an OpenAPI definition, we need to generate an OpenAI manifest to turn this function into a plugin. The OpenAI documentation describes where it should be located and how it looks like.
Let’s start from the first requirement. The manifest must be a JSON file called ai-plugin.json and it must be located in the following endpoint of your server:
| |
Inside the JSON, we must include a few properties to describe the purpose of the plugin and where to find the OpenAPI definition. The following is the manifest for our plugin:
| |
The most important properties are the following ones:
name (forModel/forHuman): this is the name of the plugin, which will be used by the platform to identify it. TheforModelproperty is used by the platform, while theforHumanproperty is used to display the name of the plugin to the user.description (forModel/forHuman): this is the explanation of what the plugin does. It’s really important to provide a good description (especially in theforModelvariant of the property), because this information will be used by OpenAI to understand if your plugin can be used to execute a given prompt.api, which includes the information about how our API looks like. In this case, we’re using the OpenAPI type, which means that we’re going to provide the URL of the OpenAPI definition. We have included a placeholder, called{uri}, which we’re going to replace at runtime with the real URL. This way, we don’t have to change the manifest based on where the function is running (locally or on a remote server).
Since we’re using an Azure Function, we have an extra step to take. Being based on the serverless model, we can’t host and serve a static file like a JSON manifest, so we need to expose it through an API endpoint. As such, we’re going to add a new endpoint to our function, which will read the manifest file, it will replace the url placeholder and it will return it a string.
Let’s start by creating a folder in our project called manifest and, inside it, let’s create a file called ai-plugin.json. Then copy and paste the JSON definition I have previously included.
Now let’s create the endpoint: add a new file to the project called AIPluginJson.cs, which will contain the following implementation:
| |
This is a new endpoint for our function, so we need to decorate it with the [Function] attribute and give it a name (GetAIPluginJson). The signature of the Run method is similar to the one we have used for the other API endpoint, since also in this case we’re using the HttpTrigger attribute to specify that the endpoint is triggered by an HTTP request. However, there’s a difference: this time we’re using the Route property to specify that the endpoint is exposed at the .well-known/ai-plugin.json endpoint. This is the location where the OpenAI platform will look for the manifest file.
The function implementation does two things:
- It reads the content of the manifest file which we have previously created. Since this isn’t a regular web app, we can’t use relative paths, but we need to get the path starting from the location of the Function assembly.
- It uses the
HttpRequestDataobject to retrieve the current URL and it replaces the{url}placeholder with it.
If we launch again the function locally, we should see another endpoint being listed in the terminal:

By opening the endpoint in the browser, you should see the same manifest we have described before, just with the correct URL instead of the placeholder.
Now we have a fully compliant OpenAI plugin! If you have been accepted into the developers waitlist, you are able to test it with ChatGPT. However, for the moment, let’s focus on Semantic Kernel.
Using the OpenAI plugin with Semantic Kernel
Now it comes the easy part! The plugin in fact, works in the same way we have seen in the previous post, when we were using a native plugin. The only difference is that, this time, we’re going to use the ImportPluginFunctionsAsync() method instead of the ImportFunctions() one:
| |
First we define a constant with the URL of the manifest endpoint, then we import it into the kernel by calling the ImportPluginFunctionAsync() method, passing as parameters the name of the plugin and the manifest URL.
Then, we use the plugin in the same way we did in the previous post: we use the GetFunction() method to retrieve a reference to the GetPopulation function, we create a ContextVariables dictionary with the input (the year) and then we pass both of them to the RunAsync() method of the kernel.
The only difference compared to what we did last time is that, since we’re using an OpenAI plugin, the result we get back is a RestApiOperationResponse object, which contains the HTTP response returned by the plugin, and not a plain string. As such, to retrieve the result, we must retrieve the content of the response by using the Content property.
If you run the code, you should see the same result we have seen in the previous post:
| |
However, this time, the response isn’t coming from an internal plugin, but from an API published on a server, that can be easily reused with other platforms like ChatGPT and Microsoft 365 Copilot.
Wrapping up
In this post, we have moved our native function into an OpenAI plugin. From an outcome perspective, the result is the same, but it makes our solution even more interoperable, since it enables us to reuse our logic in multiple platforms. So far, however, we have only seen a basic usage of plugins, which it has some benefits (easier to scale and reuse, interoperability, etc.) but it’s still limited to a single function. In the next post, we’re going to see how we can use plugins to create a more complex solution, which can be used to execute multiple prompts in a single call.
You’ll find the sample used in this post in the usual repository. In this case, there are two projects which are relevant for this post:
- SemanticKernel.AzureFunction, which is the Azure Function used to expose the API to get the number of the US population given a specific year.
- SemanticKernel.OpenAIPlugin, which is the command line application that makes use of this function.
Happy coding!