
If you have read the posts I’ve published so far about Semantic Kernel, you know the importance of plugins. Thanks to them, you can extend the kernel with functions and features offered by 3rd party services that can be automatically managed by using function calling and planners. You can just import them in the kernel, define the task you want to accomplish and let Semantic Kernel and the LLM figure out which plugins should be used. In the previous articles, however, we have seen only custom plugins, which we have created from scratch. In this post, we’ll take a look at the built-in plugins that are developed by the Semantic Kernel team. These plugins are not only useful to accomplish some common tasks, but they are also a good learning experience because they provide more complex integrations, which requires to introduce concepts like authentication.
In this article, we’re going to see two of the most interesting available plugins: Bing and Microsoft Graph.
The Bing plugin
If you have worked with LLMs, you’ll know that one of their limitations is that they are trained with a huge set of public data that, at some point, was frozen in time. This means that if, for example, you ask who is the current prime minister of a country, the LLM will answer with the information it had at the time the model was created, which might be not valid anymore. This is not a problem if you’re using the LLM to generate text, but it might became an issue if you’re using it to answer questions about topics that can easily change over time. The Bing plugin can help you overcoming this limitation, since it provides a function which uses the Bing Search APIs to find content on the web given a search query. By importing the plugin into the kernel and using function calling or planners to automatically orchestrate the execution, Semantic Kernel can automatically generate a search query and use the results from the web search to answer the question of the user with fresh information.
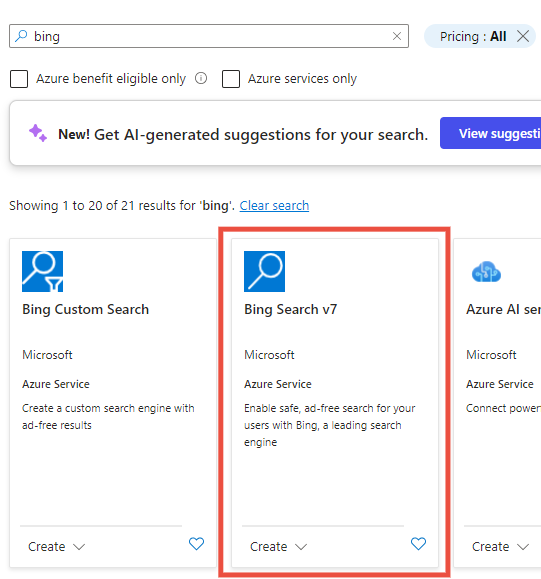
Let’s see a concrete example in action. The first step is to install the plugin, which is stored in a dedicated NuGet package called Microsoft.SemanticKernel.Plugins.Web. Before starting to write some code, however, we need the API key required to use the Bing Search APIs, which you can get from the Azure portal. Once you’re logged in with your subscription, click on Create a resource and, using the internal search, search for the service called Bing Search v7 and choose Create:
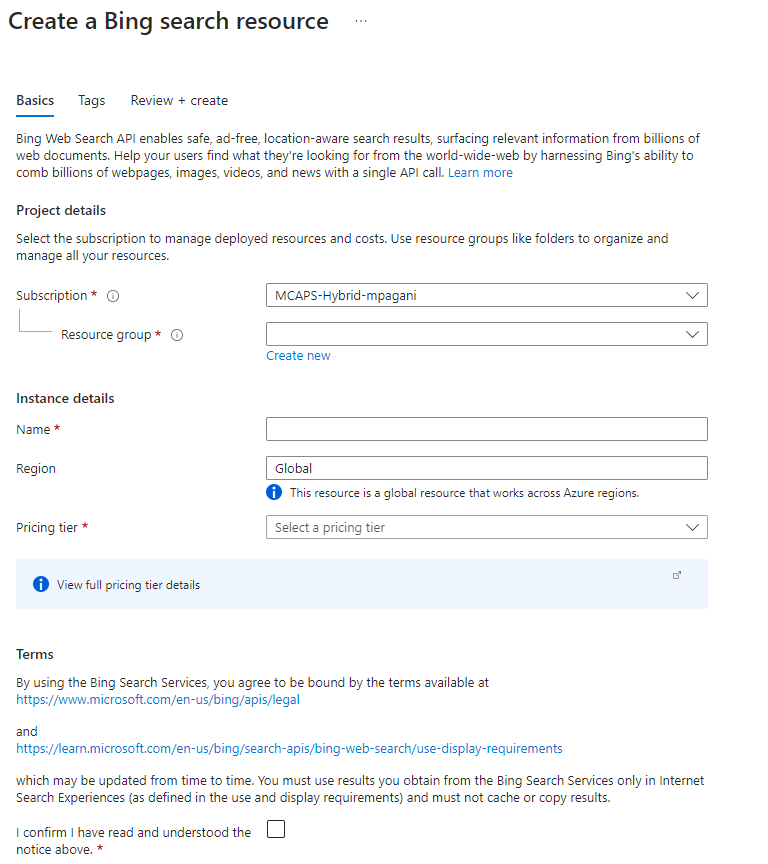
The next step is to initialize the service, which doesn’t offer many customizations: just the name and the pricing tier. Due to its own nature, the service is global and it can’t be deployed to a specific region.
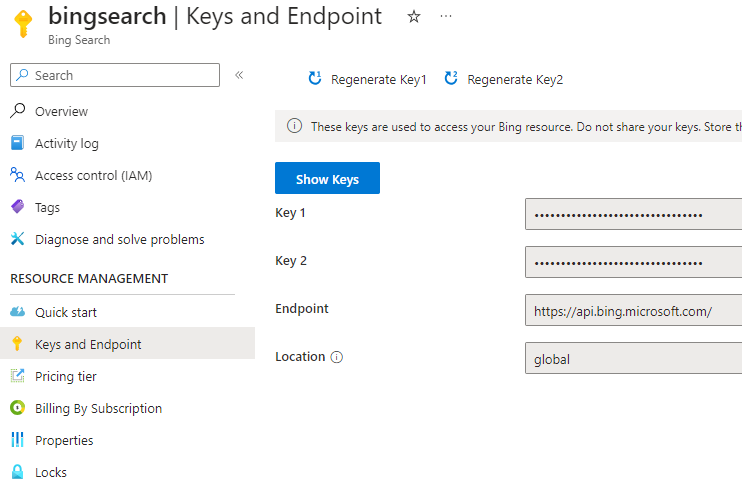
Once you have created the service, all you have to do is open it and go to the Keys and Endpoint section, where you can find the API key you need:
Now we can start writing some code! First, let’s initialize the kernel in the usual way:
| |
You can notice how, compared to the samples in the previous posts, we have a new placeholder for the Bing API key. Just make sure to include the one you have retrieved from the Azure portal.
This is just an example to keep the code simple. In a real application, you should store the API key in a safe location, like using user secrets or Azure Key Vault.
As next step, we need to add the plugin into the kernel. This time, however, we can’t use the ImportPluginFromType<T>() method we have learned to use in this post because the plugin requires a bit of configuration before being able to use it. This is the code we need to use to initialize it:
| |
First, we need to wrap our code into a #pragma directive, since the Bing plugin is marked as experimental. Without this directive, the build would fail.
Inside the directive, we create a new instance of the BingConnector class, which is the class that is used to call the Bing APIs. The constructor of this class requires the API key we have retrieved from the Azure portal. Then, we create a new instance of the WebSearchEnginePlugin class, which is the class that wraps the Bing connector into a plugin. The constructor of this class requires the connector we have just created. Finally, we import the plugin into the kernel using the ImportPluginFromObject() method, which requires the plugin instance and a name for the plugin. The name is used to identify the plugin in the kernel and it’s used when we want to call a function included in the plugin.
Now we can use this plugin like we did with all the custom ones we have built so far, like the UnitedStatesPlugin one. Let’s define a prompt and let’s use the function calling capabilities we have learned about to let the Semantic Kernel call the plugin for us:
| |
Before executing this code, let’s comment the line of code which imports the plugin into the kernel, so that we can test what happens when the plugin is not available, so that Semantic Kernel must rely only on the internal knowledge of the LLM.:
| |
You will get an answer like the following one:
| |
As you can see, the LLM doesn’t have any knowledge about Semantic Kernel, since the SDK was created after April 2023, which is the cutoff date of the model I’m using for this test (which is GPT-4). Now let’s uncomment the line of code which imports the plugin and let’s execute the code again. This time, you will get a different answer:
| |
This is a good answer and a clear example of how the Bing plugin can be used to overcome the limitations of the LLMs. If you want to review in more details the usage of the Bing plugin, you can switch from automatic function calling to manual function calling, as we have explained in the previous post, by using the following code:
| |
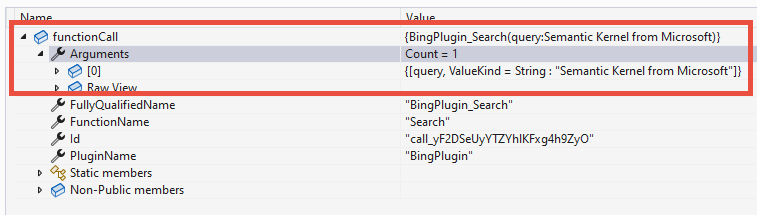
By using the manual approach, we can see that Semantic Kernel has identified that, in order to satisfy the ask we provided, it needs to use the Search function included in the Bing plugin passing, as arguments, the keyword Semantic Kernel from Microsoft:
The Microsoft Graph plugin
Let’s take a look now at another very useful plugin, which you can use to build applications that are able to interact with the Microsoft 365 ecosystem. The Microsoft Graph is a REST API ecosystem that allows you to interact with the data stored in Microsoft 365, like the user’s calendar, the user’s email, the user’s contacts, and so on. The Microsoft Graph plugin allows you to use the Microsoft Graph APIs from Semantic Kernel, so that the LLM can perform tasks which involves your organizational data. At a much smaller scale, of course, but this is similar to the experience offered by Microsoft 365 Copilot.
Also in this case you will need to install a dedicated NuGet package first, called Microsoft.SemanticKernel.Plugins.MsGraph. The process to setup the plugin is slightly more complex than the one we have seen for the Bing plugin. The Microsoft Graph, in fact, is based on Microsoft Entra (formerly known as Azure Active Directory), which uses the OAuth2 based approach to authenticate users and applications. This means that, in order to use the Microsoft Graph APIs, you will need first to authenticate the user, so that you can get the access token needed to perform operations on behalf of them.
There are multiple ways to authenticate users with Entra: the most common one is the Authorization Code flow, which redirects the user to the Entra login page, where the user can authenticate and authorize the application to access the user’s data. Once the user has authorized the application, the user is redirected back to the application, which can then retrieve the access token needed to call the Microsoft Graph APIs. This flow is typically used by client applications, like the web based ones.
In the case of my samples, however, we need to use a different approach, since they’re console applications, which aren’t capable of opening a browser to redirect the user to the Entra login page. The approach we’re going to use is called Device Code flow, which is designed for applications which run in an input-constrained environment, like a Smart TV or, precisely, a console application. In this flow, the user is presented with a code and a URL, which the user must use to authenticate and authorize the application. The user must open the URL in a browser, enter the code provided by the app, then authenticate and authorize the application. Once the user has done that, the application can retrieve the access token needed to call the Microsoft Graph APIs.
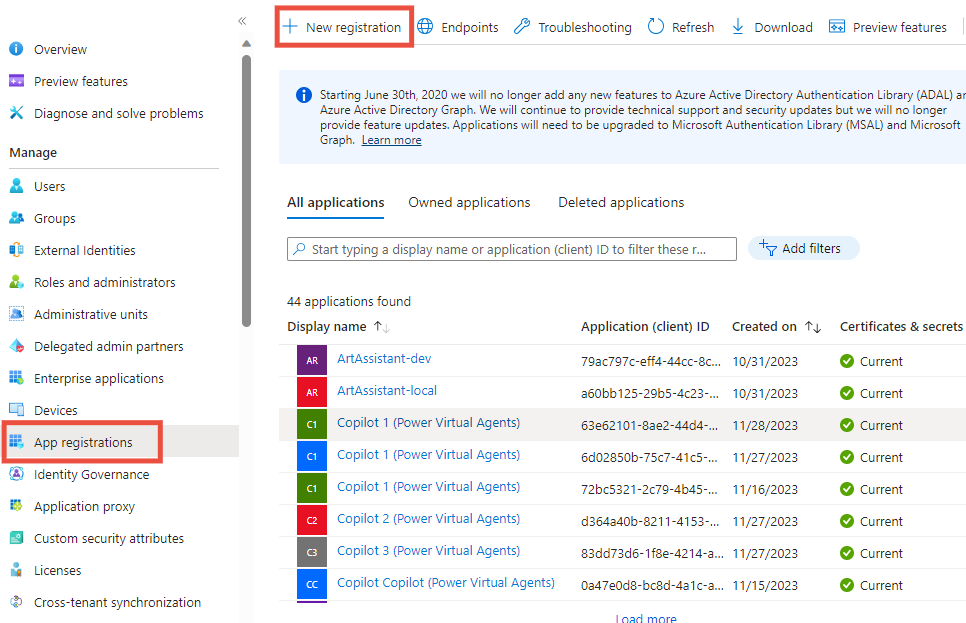
To make our life easier, the Microsoft Graph plugin includes the Microsoft Graph .NET SDK, which is a wrapper around the Microsoft Graph that we can use to implement the authentication workflow in a simpler way. But first, as for every other application that needs to interact with the Microsoft Graph, we need to register it in the Azure portal on Microsoft Entra. To do that, open the Azure portal, go to the Microsoft Entra ID section, search for the App registrations service and choose New registration:
In the next step, you must provide a name for the application and choose which type of accounts you want to support. You can choose between:
- Accounts in this organizational directory only (single tenant), which means that you’ll be able to use the application only with users that belong to the same tenant in which you’re registering the application.
- Accounts in any organizational directory (Any Microsoft Entra ID directory - Multitenant), which means that you’ll be able to use the application with users that belong to any tenant.
- Accounts in any organizational directory (Any Microsoft Entra ID directory - Multitenant) and personal Microsoft accounts (e.g. Skype, Xbox), which means that you’ll be able to use the application with users that belong to any tenant and also with personal Microsoft accounts.
- Personal Microsoft Accounts only, which is for applications that are targeting only consumers.
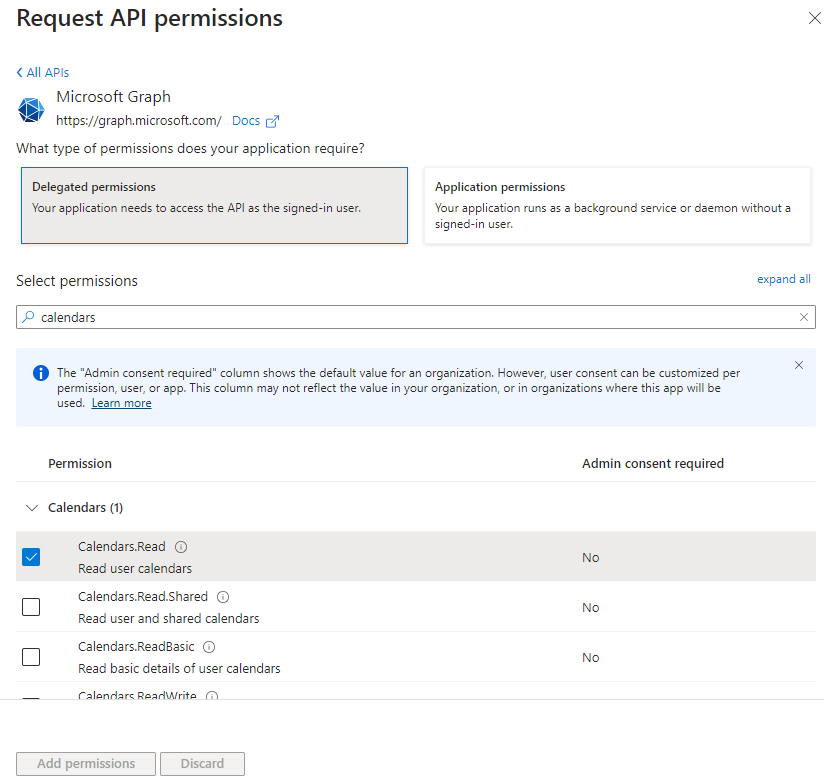
Pick up the one that works best for your scenario (in my case, I chose to build a multitenant application). Once the application is created, we have to define the permissions that the application needs to access the Microsoft Graph APIs. The type of permissions change based on the scenario you would like to implement. In my case, I’m going to build an application that you can use to query your calendar using natural language. This means that I need to access the user’s calendar, so I need to add the Calendars.Read permission. To do that, go to the API permissions section and choose Add a permission. In the next step, choose Microsoft Graph and then Delegated permissions. In the list of permissions, search for the Calendars.Read permission and select it. Once you have selected the permission, choose Add permissions.
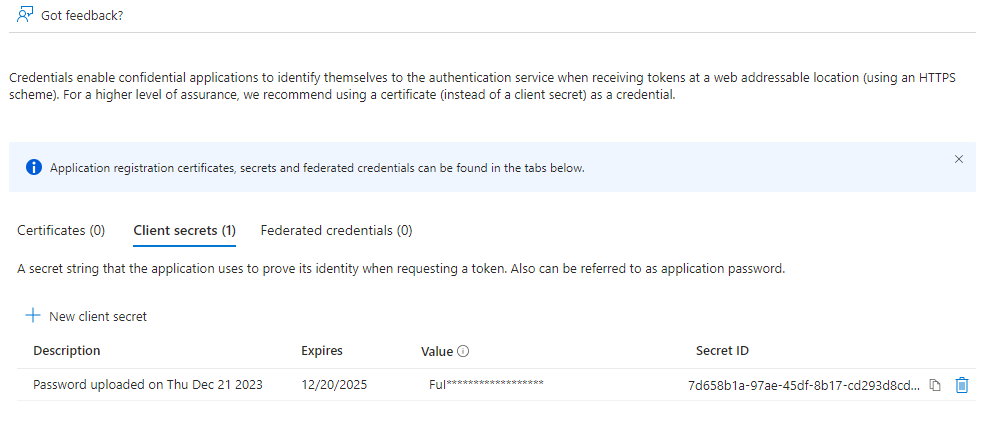
The final step is to generate a client secret, which is a key that the application can use to authenticate itself with Entra. To do that, go to the Certificates & secrets section and choose New client secret. In the next step, provide a description for the secret and choose the expiration date. Once you have done that, choose Add. Once the secret is created, copy the value of the secret somewhere, we’re going to need it later. Make sure to do it because, after you leave this section, the secret will be hidden and you won’t be able to retrieve it anymore.
Now that we have the app registration, we can start writing some code to handle the authentication:
| |
First, we have to define the information we need to perform the authentication:
- The scopes we need to access the Microsoft Graph APIs. In my case, I need to access the user’s calendar, so I need the
Calendars.Readpermission. - The tenant ID, which is the ID of the tenant in which you have registered the application.
- The client ID, which is the ID of the application you have registered.
- The client secret, which is the secret you have generated in the previous step.
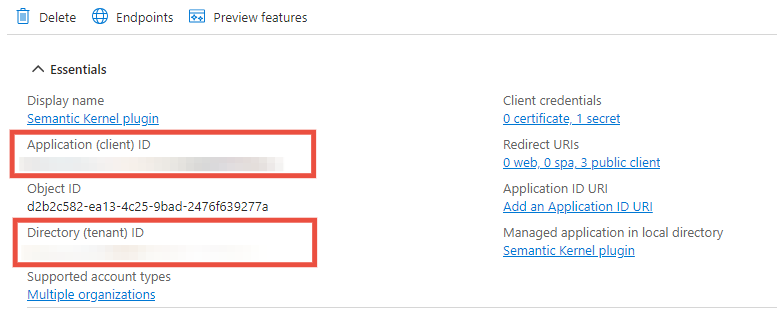
The tenant ID and the client ID are available in the Overview section of the app registration:
With these information, we can define a DeviceCodeCredentialOptions instance, which is the class that is used to configure the authentication process. The object defines all the information needed for the authentication, plus a callback (called DeviceCodeCallback) which is invoked when the code is generated and the application needs to wait for the user to complete the authentication in the browser.
Thanks to these options, we can create a new DeviceCodeCredential instance, which we can pass to the GraphServiceClient, which is the C# wrapper around the Graph APIs provided the Microsoft Graph .NET SDK.
Now we have all we need to authenticate the user. The Microsoft Graph plugin, in fact, requires an authenticated GraphClient instance to work. Let’s see how we can use it to create a plugin instance and import it into the kernel:
| |
The Microsoft Graph plugin library doesn’t include a single plugin, but multiple plugins that you can use to access different parts of the Microsoft 365 ecosystem. In this case, we’re going to use the CalendarPlugin, which is the plugin that allows you to access the user’s calendar. To initialize the plugin, we need an OutlookCalendarConnector, which requires as parameter the authenticated GraphClient object we have previously created. Finally, like we did with the Bing plugin, we import it into the kernel using the ImportPluginFromObject() method. The code is wrapped inside the usual #pragma directive, since also the Graph plugin is marked as experimental.
Now we can test the plugin by using function calling with a prompt that requires access to the calendar to be satisfied. Here is an example:
| |
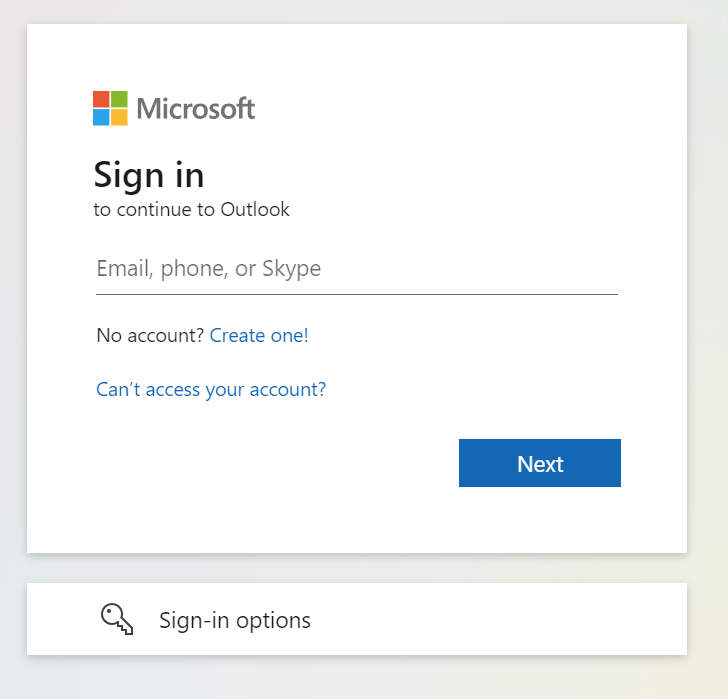
We are using Semantic Kernel to ask what’s my next meeting. If you execute the application, at first you’ll see the device code authentication experience:

You are asked to open your browser at the URL https://microsoft.com/devicelogin and to input the code you see in the console. After providing the code, you’ll have to authenticate with your Microsoft 365 account and to authorize the application to access your calendar. After having completed the authentication flow, the console application will resume the execution and, after a few seconds, you’ll see the answer to your question, which in my case is the following one:
| |
As you can see from the following image, this is indeed correct!
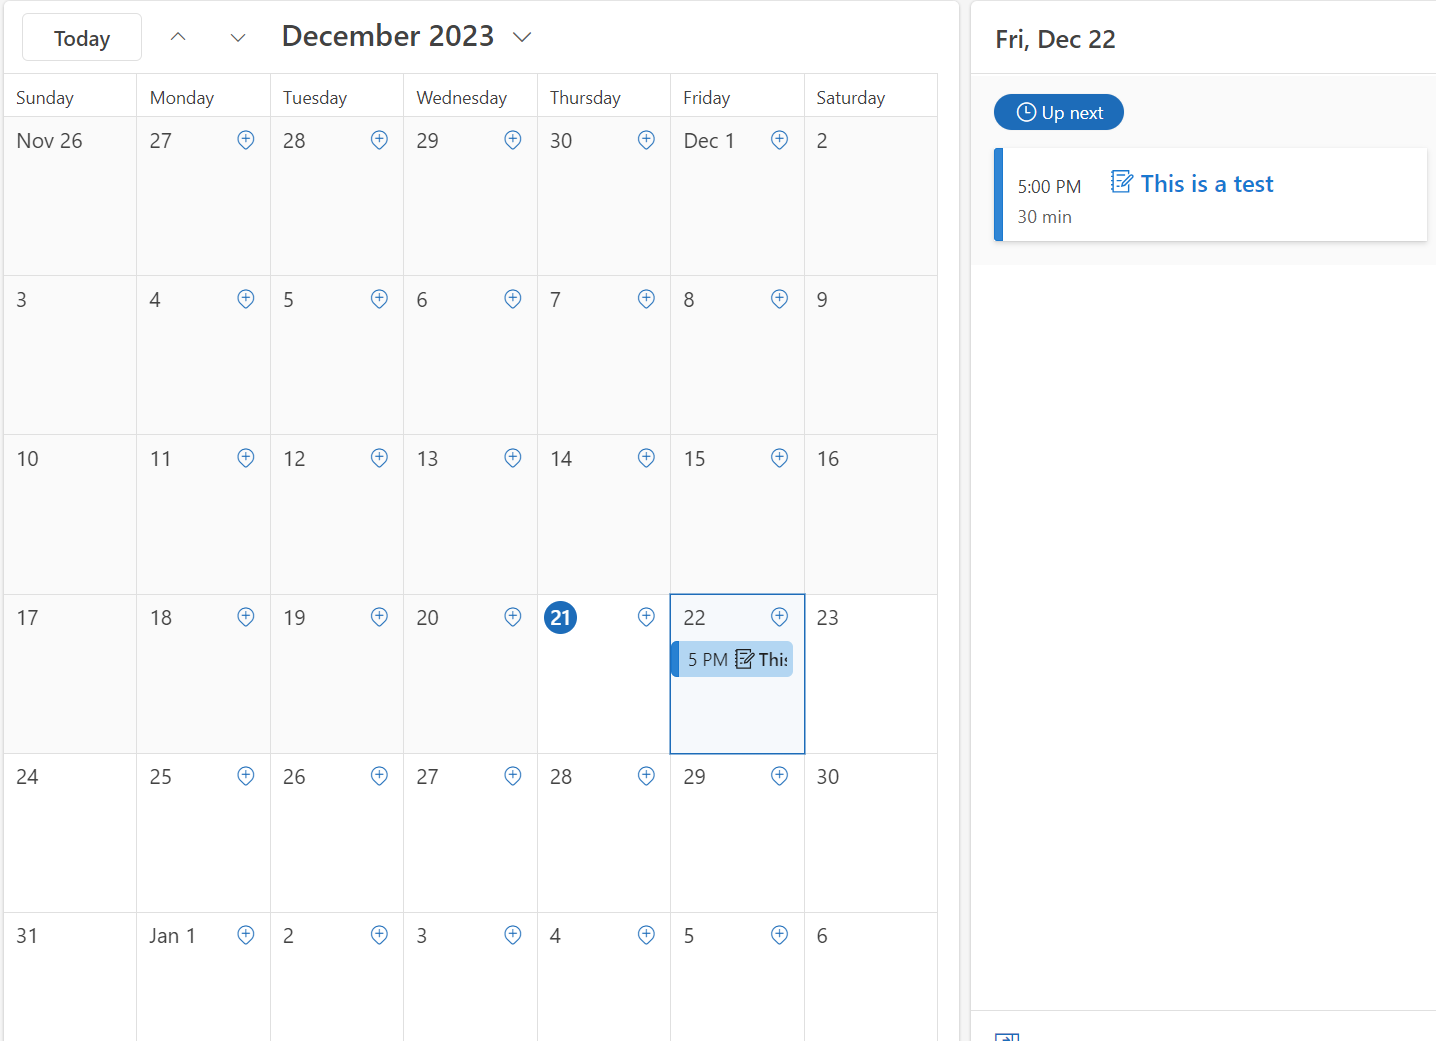
Thanks to the Semantic Kernel orchestration features, the application was able to automatically call the Calendar plugin to get the information about the next meeting and to return the information using natural language thanks to the LLM processing.
Also in this case, if we want, we can switch to the manual function calling approach to see how the plugin is called:
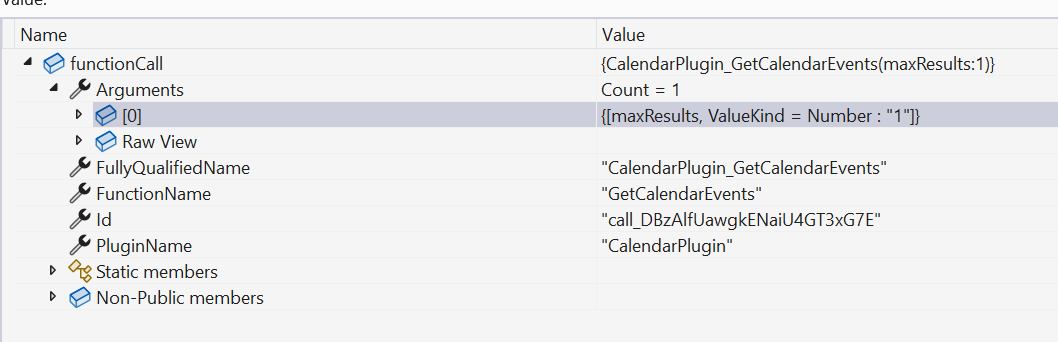
We can see that Semantic Kernel has called the GetCalendarEvent function of the Calendar plugin, passing as argument the parameter maxResults with value 1. The function, in fact, returns the list of meetings on the user’s calendar ordered by the most recent ones. Since we have asked for the next meeting, it’s enough to filter the list and to return only the first one.
Wrapping up
In this post we have seen how to use the some of the plugins for Semantic Kernel provided by the team. We have seen how to use the Bing plugin to overcome the limitations of the LLMs and how to use the Microsoft Graph plugin to access the Microsoft 365 ecosystem.
You can find all the samples in the GitHub repository of the project.