If you are paying attention to what’s happening in the AI world in the last months, you might have noticed a surge of interest in open-source LLMs. What are they? Exactly like the ones created by OpenAI, they’re models trained with a set of data that understand the rules of natural language and, as such, they’re able to perform multiple tasks which involve content generation: from summarization to translation, from question answering to text generation. However, there are two key differences:
- They’re open-source, meaning that everyone can customize and fine tune them to their needs. They’re free to download and you can host them in your environment. Closed-source models, instead, like Bard or GPT-4, can’t be modified and they can be used only through an API provided by the owner. You can’t download, for example, GPT-4 and host it on your machine.
- Most of the times, they’re smaller in size and, as such, they have lower requirements to be hosted and run. This means that they can run even on your local computer, you don’t necessarily need the scaling capabilities of the cloud.
Of course, there are also some downsides: they’re not as powerful as the closed-source ones and they’re not as easy to use. As much as they’re improving and getting more and more powerful, none of the small LLMs that you can host on your machine can match the capabilities of a cloud-hosted model like GPT-4. However, sometimes you don’t always need the full power of a cloud-hosted model and you can get away with a smaller one. For example, if you’re building an application which is focused on text summarization, you don’t need a model that can generate a full article or perform complex reasoning, you just need a model that can generate a few sentences. In this case, a smaller model can have some advantages: it’s cheaper, faster and it can work also in scenarios with limited or no Internet connection.
In this post, we’ll see how you can use Semantic Kernel with an open-source LLM, thanks to an application called LM Studio. Be aware, however, that this post is more “academical” than practical. I decided to write this post because I think it’s a very interesting topic and it shows the flexibility of open-source LLMs and Semantic Kernel, but it isn’t a production ready solution. If you want to use Semantic Kernel with an LLM, I suggest you to use the official supported services, like OpenAI and Azure OpenAI.
Let’s start!
Setting up LM Studio
We said that open-source LLMs have the distinctive feature to be available for everyone to download and host. But where to download them? And how to host them? To answer the first question, we get help from Hugging Face, the most popular community platform to host and share models and datasets. You can think of it like GitHub, but for Machine Learning models, including LLMs. To understand better how Hugging Face looks like, let’s pick up one of the available models: phi-2 from Microsoft. This is a small LLM created by Microsoft for research purposes, which is hosted here.
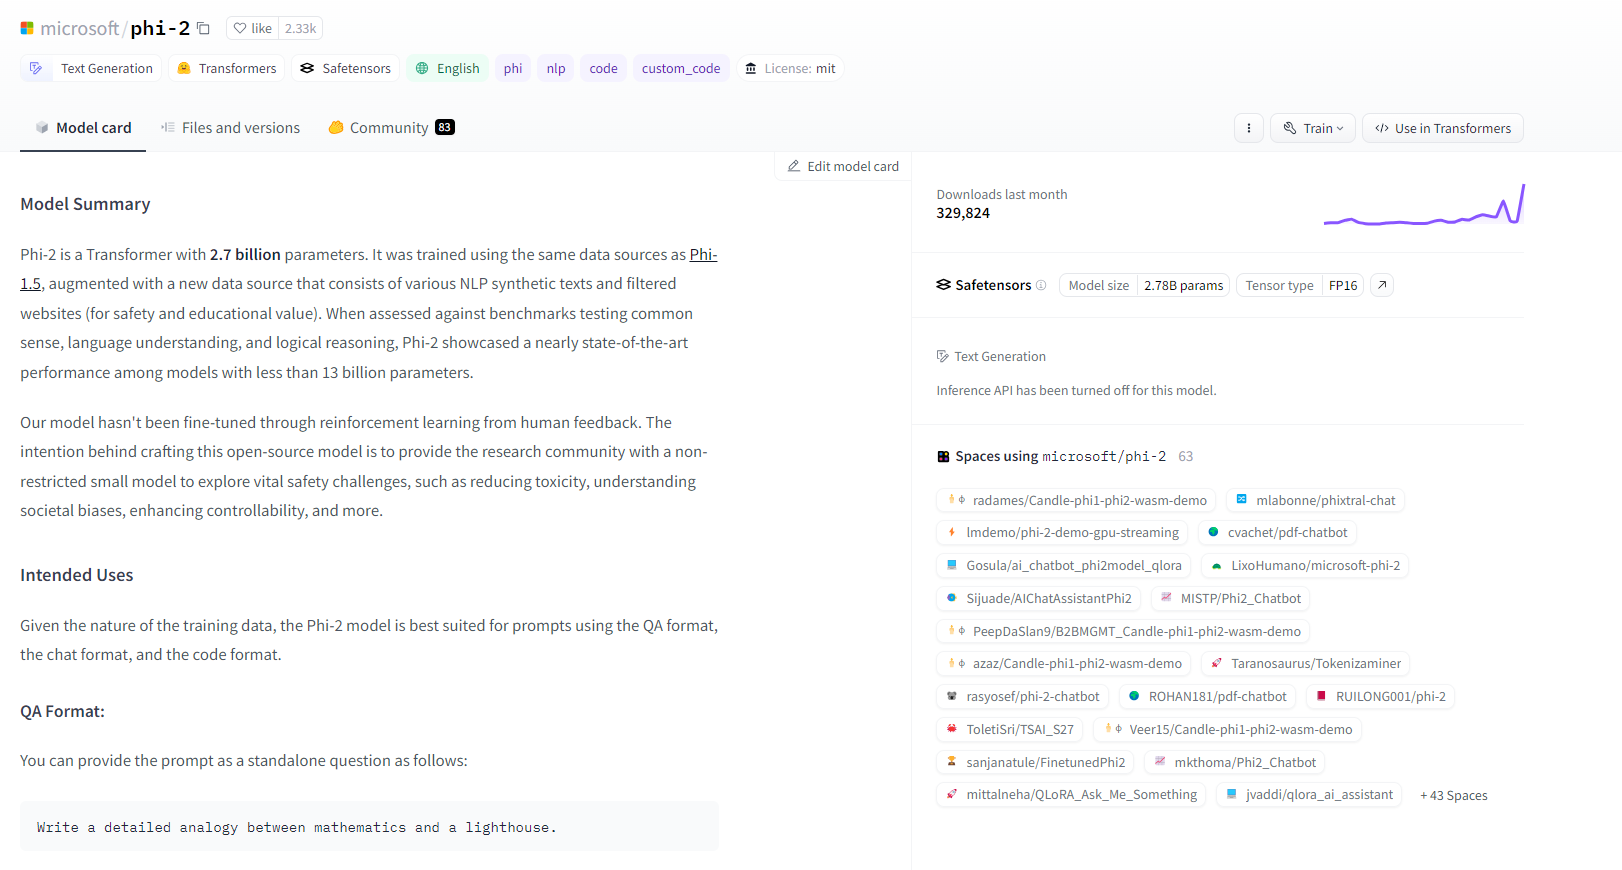
The previous image shows the landing page of a model:
- In the Model card tab, you can read a description of the model provided by the creator. This is similar to the README.md that you immediately see when you land on a GitHub repository. It’s important to read it because it usually contains important information like the capabilities, the limitations, how to use it, etc.
- In the Files and versions tab, you can access to all the files which compose the model. Hugging Face is based on Git as well, so you can clone the repository, create branches, fork the project, etc.
- In the Community tab, you have a space for the community to start conversations around this model.
At the top, you can see some tags that can help understanding the capabilities of the model. In case of phi-2, we can immediately see that this model is suitable for text generation tasks, for example.
Now that we know how to search for models in Hugging Face, let’s focus on how to use them. The easiest way is to use a tool like LM Studio, which greatly simplifies the whole experience of downloading, hosting and using a model on your local machine. You can download it from https://lmstudio.ai/. Once you have downloaded and installed the application, launch it and you will see an interface that will easily enable to you to search across models available on Hugging Face. The home page provides a built-in search bar and a curated list of the most popular available models.
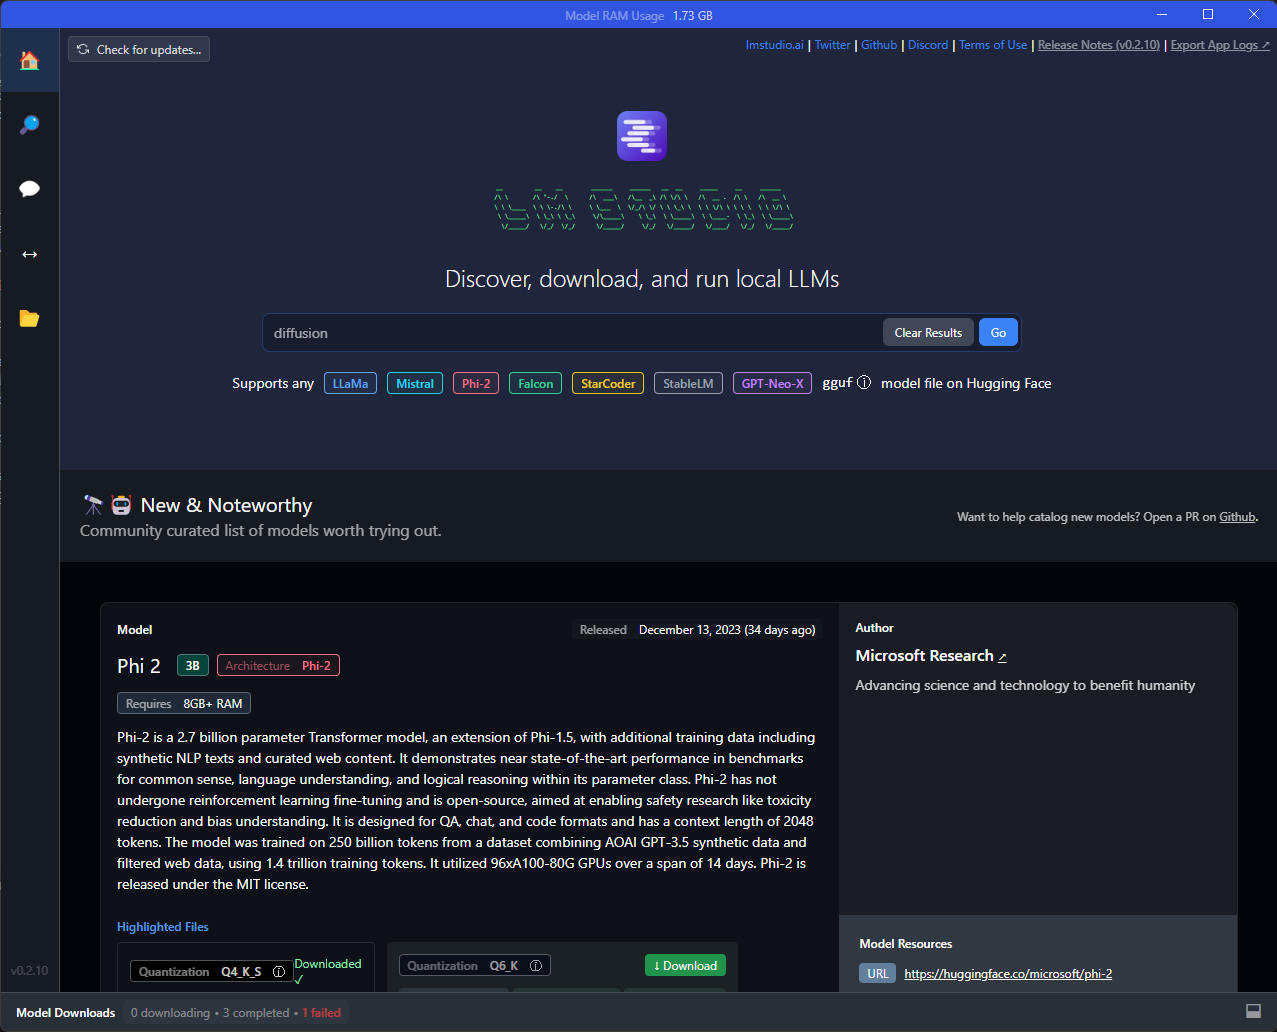
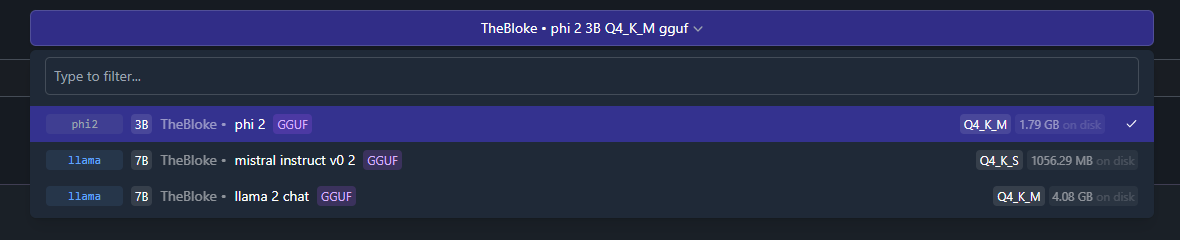
Let’s start with the phi-2 model we have seen before. At the time of writing this post, it’s the top model highlighted in the New & Noteworthy section, so you could easily download it from there, but let’s use the standard search, so that we can understand better how it works. Search for phi-2 in the search bar, you will get a similar result:
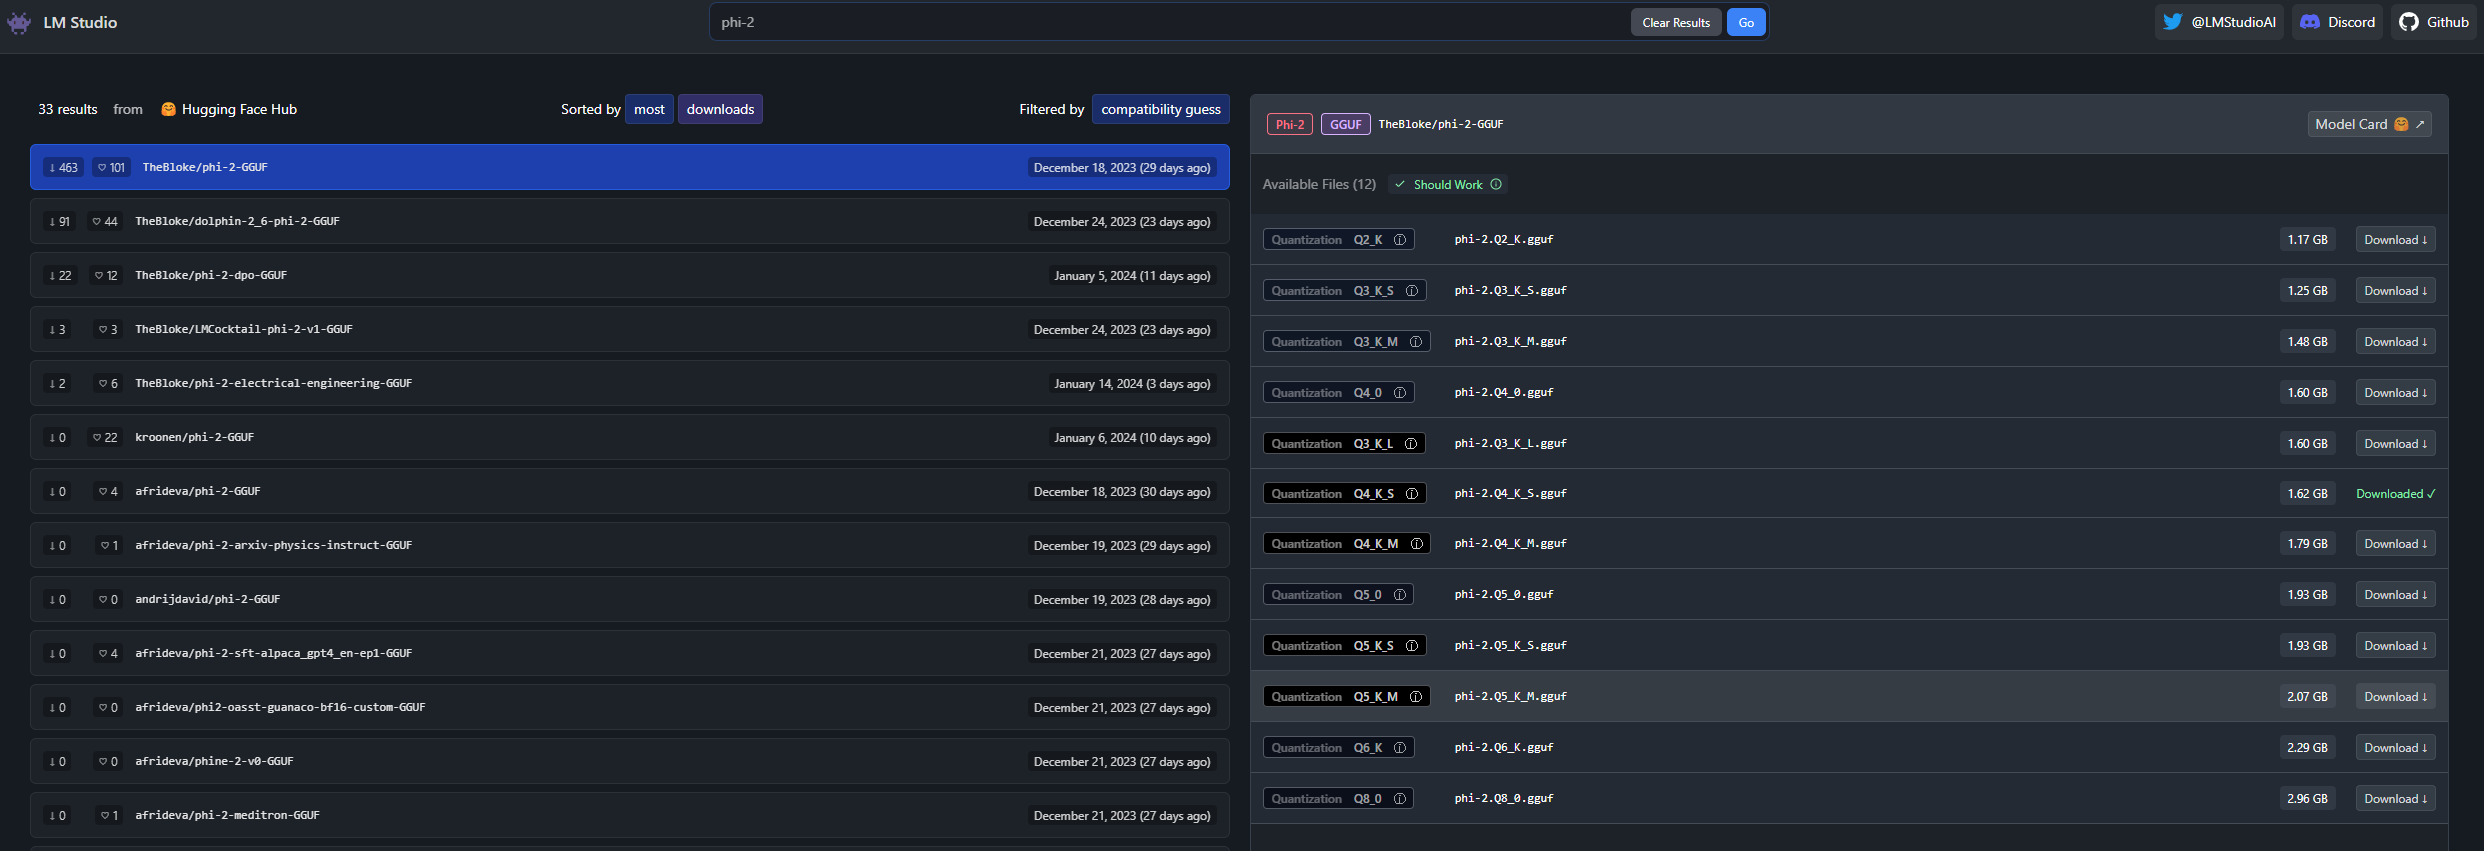
When you click on one of the models on the left, you will see on the right a list of the available versions of the model. In this case, I picked up TheBloke/phi-2-GUUF, so on the right I’m seeing all the available versions of the phi-2 model. The difference between each version is the fidelity which was used to generate it: the lower is the Q value, the smaller is the model, the lower will be the quality of the output. So why do we have multiple version? Can I just pick up the biggest one with the highest Q value? Theoretically yes, but you must keep in mind that this model won’t run on the cloud, but locally on your machine and, as you can imagine, it isn’t a lightweight task. The bigger is the model, the higher is the amount of RAM that you will need to run it. As such, you must find the right balance between the quality you need and the resources you have on your machine. For my tests, I picked up the phi-2.Q4_K_M.gguf model, which is a good trade off between quality and size. Just click on the Download icon to download the model on your machine.
Thanks to LM Studio, we can immediately host and test the model. Click on the Chat icon in the left sidebar (the one with the comic bubble icon). You will see a familiar chat interface but with, at the top, a dropdown to load one of the models you have previously downloaded:
Select the phi-2 model you have just downloaded (make sure to have at least 4 GB of RAM free in your system). You will see a prompt asking you if you want to override the system prompt. Choose Accept new system prompt: this is very important because phi-2 requires a specific way to interact with it, which is submitting a prompt formatted in the following way:
| |
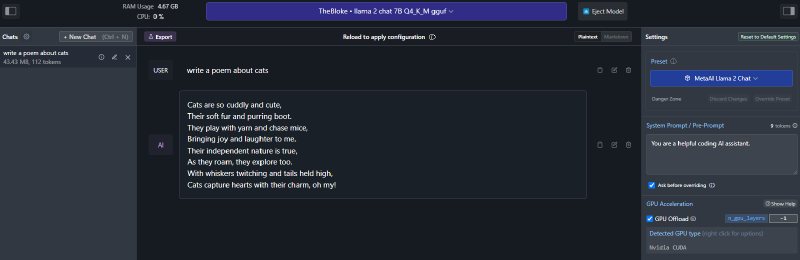
By accepting the system prompt provided by phi-2, LM Studio will automatically format the prompt in the right way. Now, you can start chatting with the model. For example, you can try to ask it to generate a poem about cats:
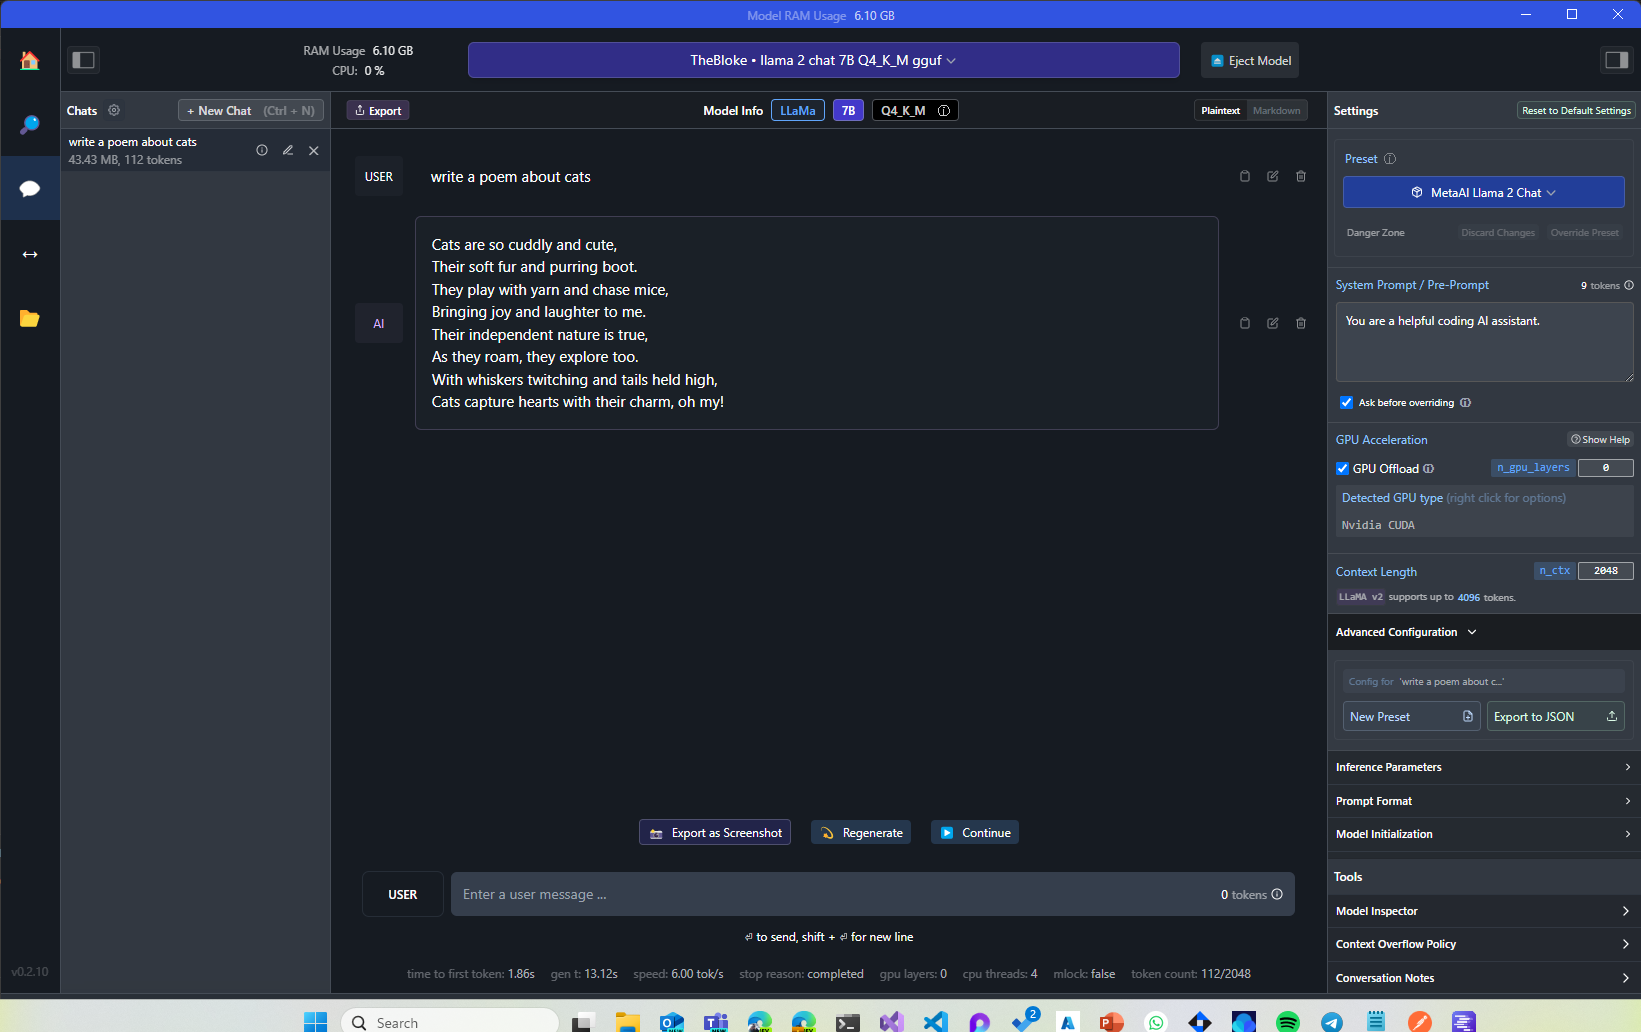
Pretty cool, right? The poem has been generated by a local model running on your machine, without needing any Internet connection. If you have an NVIDIA GPU, you can also offload some of the work to it. First, make sure to install NVIDIA Cuda Toolkit, which is available from here. Once you have installed it, you can use the Settings panel on the right in LM Studio to enable GPU support:
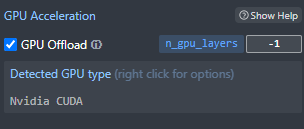
In this field, you can specify how many layers of the model you want to offload to the GPU. If you set it to -1, you will offload the entire model, which however might not work if you don’t have enough memory on your GPU. In this case, you can start low (like 10-20) and then increase to test your GPU capacity. As a reference, my work PC is a Surface Laptop Studio, which has an NVIDIA RTX A2000 with 4 GB of RAM: with this configuration, I’m able to offload the entire phi-2 model to the GPU. If you do that, you will notice that the text will be generated much faster than before.
Using the model with Semantic Kernel
So far so good, but what’s the connection between LM Studio and Semantic Kernel? So far, we just tested a regular chat experience with the user interface provided by the tool. LM Studio has a very neat feature that can turn your machine into a local server hosting the model. And, even better, it exposes a series of REST APIs which implements the same specifications of the OpenAI APIs. This means that any code you have written to interact with OpenAI works in the same way with the model hosted by LM Studio, including the one used by Semantic Kernel behind the scenes. Let’s see how to do that. In LM Studio, click on the Local Server icon on the left sidebar (the one with a two sided arrow). You will see a screen like this:
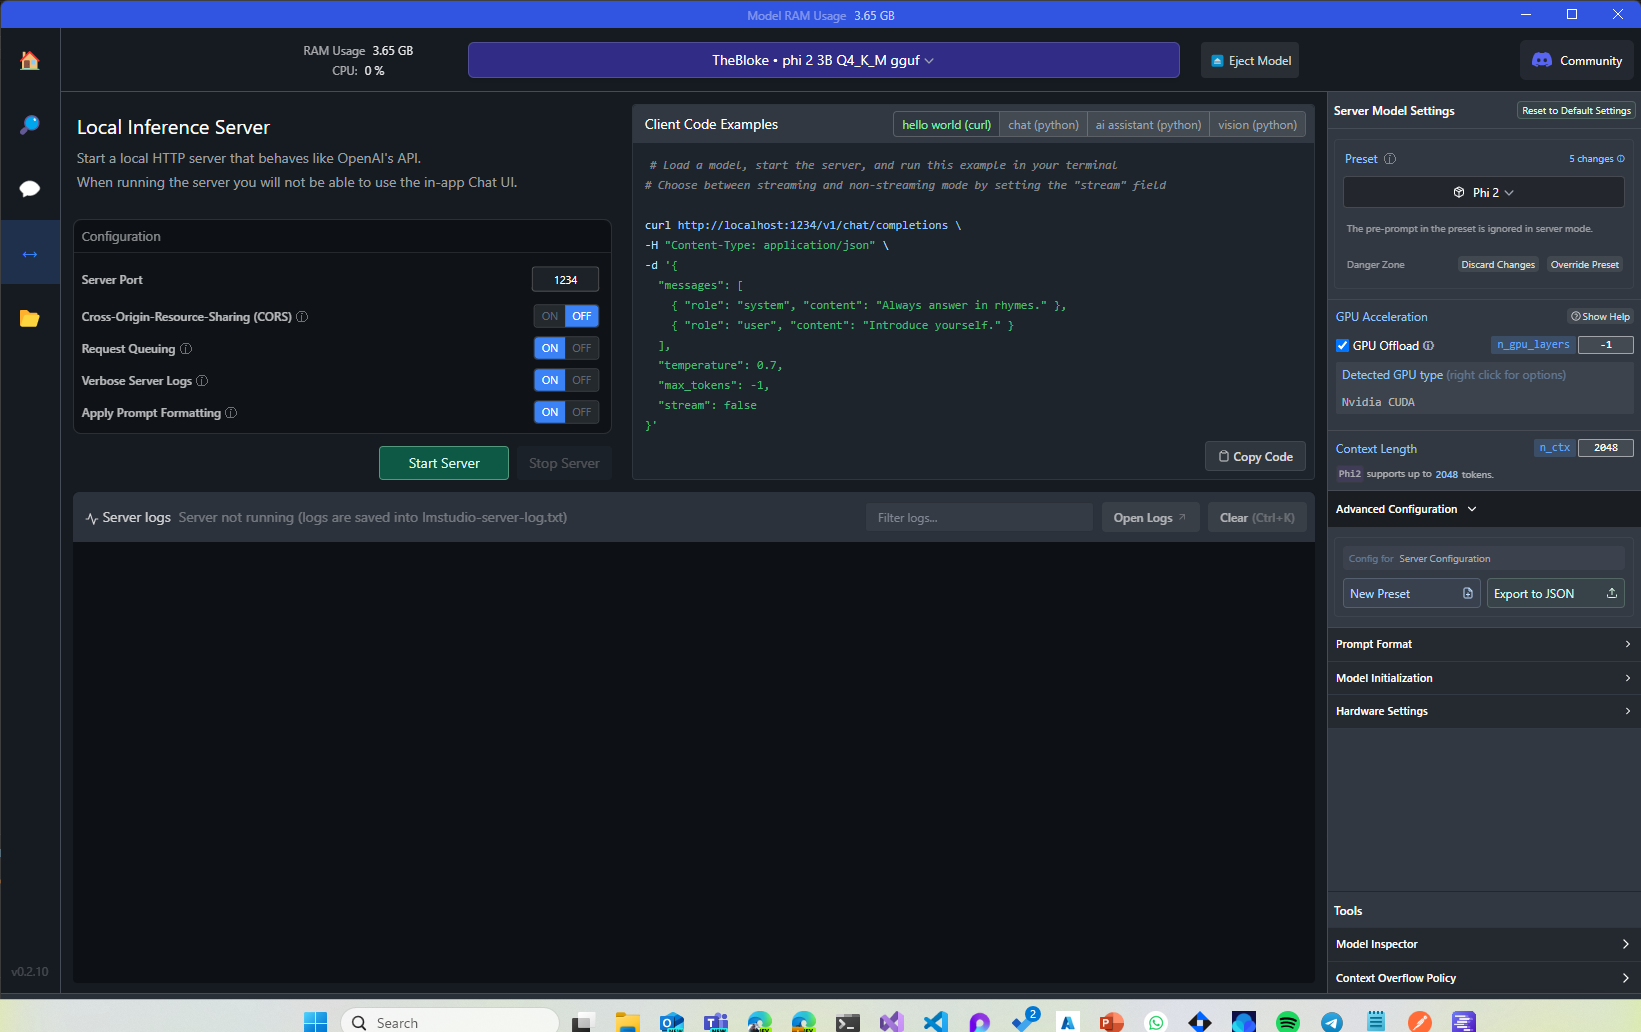
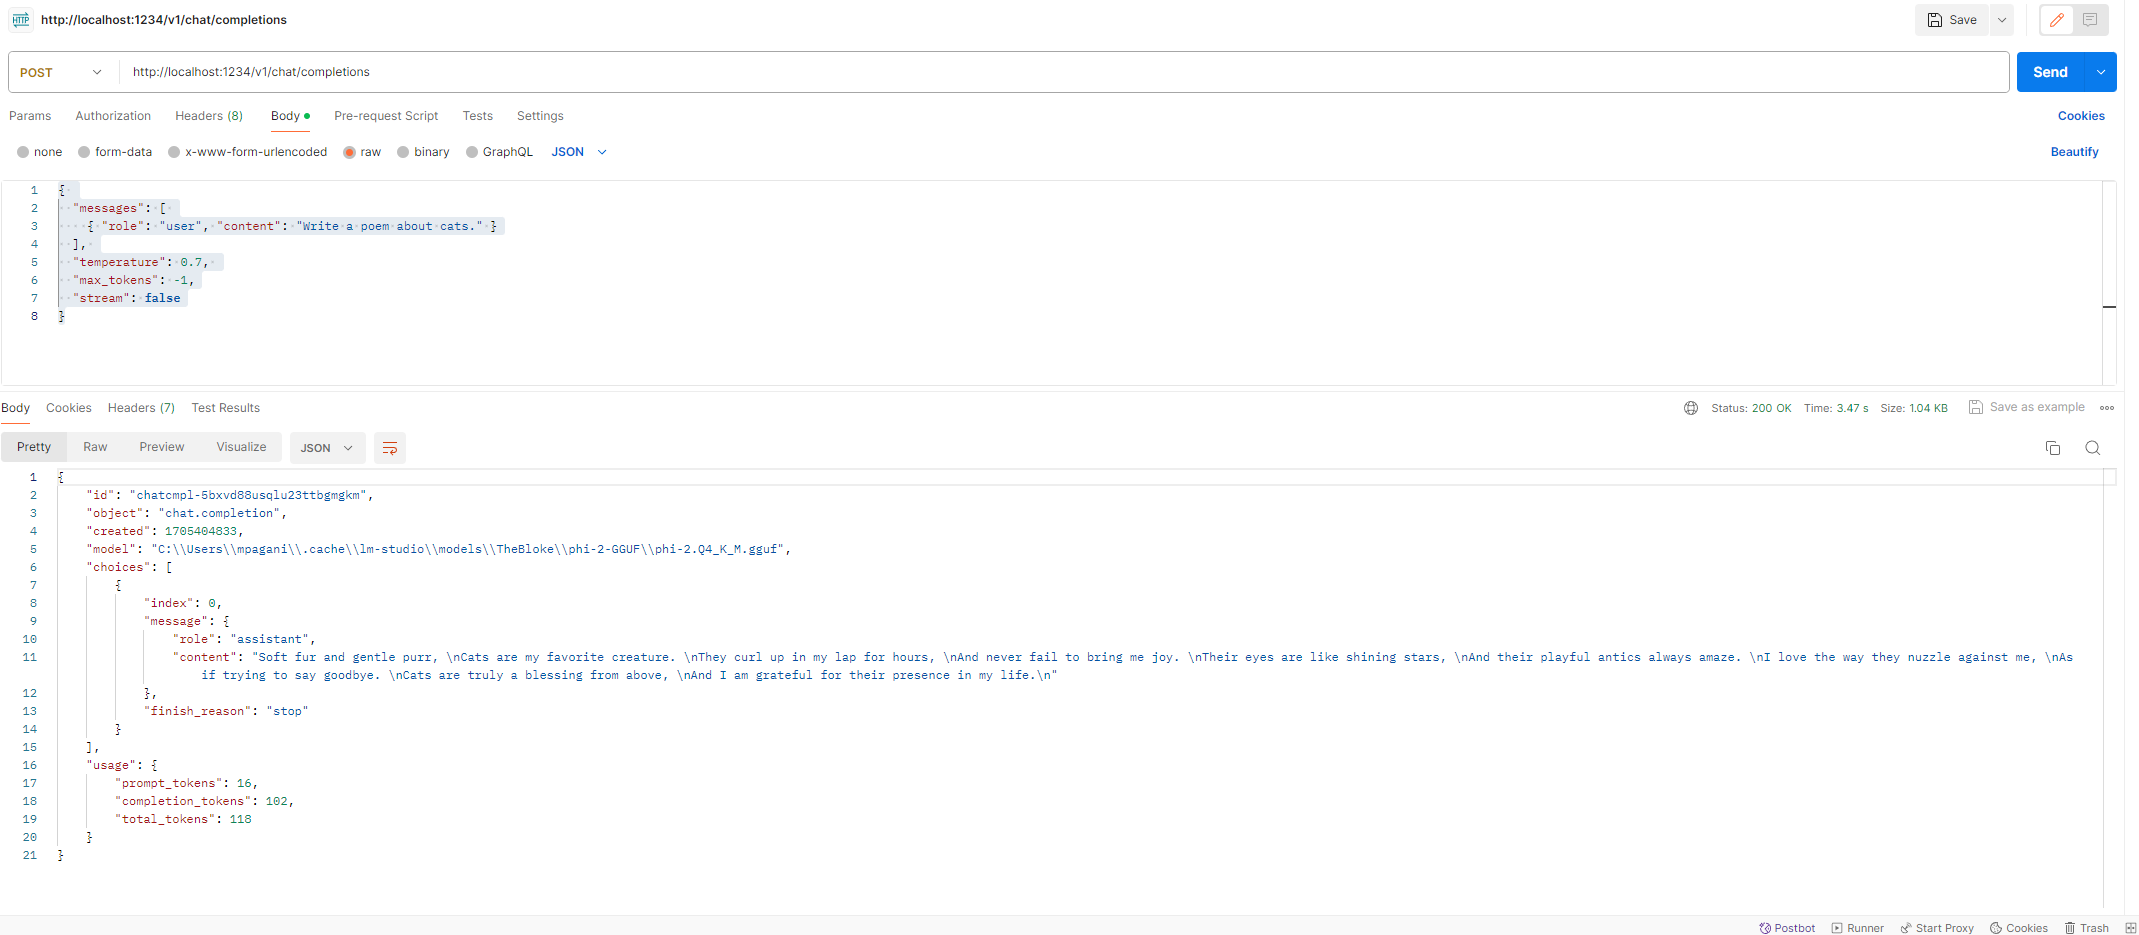
The configuration experience is the same as the chat one. From the dropdown, you can pick one of the models you have download, while with the right panel you can configure the model, like setting the GPU offload. The difference is that, this time, in the middle, you will have a panel to configure the local server and a panel which shows the real time logs. To start the server, just click on the Start server button. By default, it will be available at the URL http://localhost:1234. As mentioned, the APIs implements the same specifications of OpenAI so if, for example, you want to use the Chat Completions APIs, you must use the endpoint http://localhost:1234/v1/chat/completions. You can use as a reference the official OpenAI documentation. For example, this is the complete reference for the Chat Completion APIs. You can easily test if everything works with a tool like Postman. Just create a new request with the following configuration:
- Method: POST
- Endpoint: http://localhost:1234/v1/chat/completions
- Body:
| |
By submitting the request, you will get in response a poem about cats, as specified in the prompt:
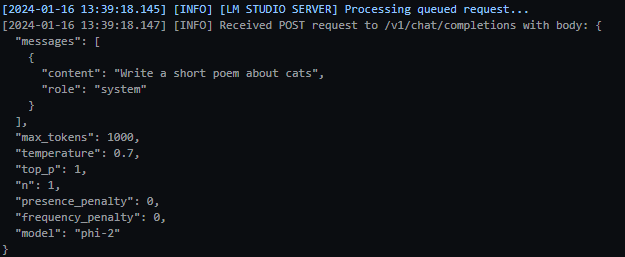
In LM Studio, you can use the Server logs panel to see the requests that are coming in and the responses that are going out in real time.
Since Semantic Kernel supports using OpenAI APIs, it means that theoretically it can work with our open-source LLM exposed by LM Studio as well. However, this is a scenario that isn’t supported by default by Semantic Kernel. When we initialize the kernel with the AddOpenAIChatCompletion() method, we don’t have a way to specify the endpoint we want to use. Semantic Kernel will always use, by default, the official endpoint provided by OpenAI. However, there’s a trick we can use to make it work: using a custom HttpClient, which is able to override all the HTTP requests and redirect them to our local server. Let’s see how to do that.
HttpClient supports this customization with HTTP handlers: custom classes that are injected into the HTTP pipeline and can change the behavior of the HTTP requests and responses. Let’s create a new class in our project called MyHttpMessageHandler with the following implementation:
| |
The class inherits from the base class HttpClientHandler, which enables us to override the SendAsync() method, which is called when we send a HTTP request. When we use Semantic Kernel with the OpenAI APIs, the requests are sent to the official OpenAI endpoint, which is api.openai.com. If the current request falls into this category, we override the request URI and we replace it with our local server. Then, we just call the base implementation of the method using the new URI, since we don’t need to change the way we call the API, just the target endpoint.
Now, we can use this class to create a custom HttpClient, which we can use to initialize Semantic Kernel, as in the following example:
| |
You can provide any values you want as model name and API key, since the local server exposed by LM Studio will ignore them and it will always route the request to the currently hosted model. Now we can use the standard Semantic Kernel code to execute a prompt:
| |
If you run the application, you will see a similar text being generated, but this time it’s using the local server hosted by LM Studio instead of the official OpenAI APIs:
| |
You can verify this by checking the logs in LM studio, which will show you the request generated by Semantic Kernel:
You can also use the streaming response support, if you prefer, and it will work just fine:
| |
Performing more complex task
Phi-2 is a very good model to start with, because it’s simple and light, so you can host it even if you don’t have a super powerful computer. However, it’s also a good way to highlight that open-source LLMs aren’t as powerful as the cloud-based one and they are more specialized in performing specific tasks. For example, let’s change the code of our original basic Semantic Kernel example (the application that can turn a text into a business mail) so that we usi phi-2 instead of Azure OpenAI:
| |
The output won’t be very satisfying:
| |
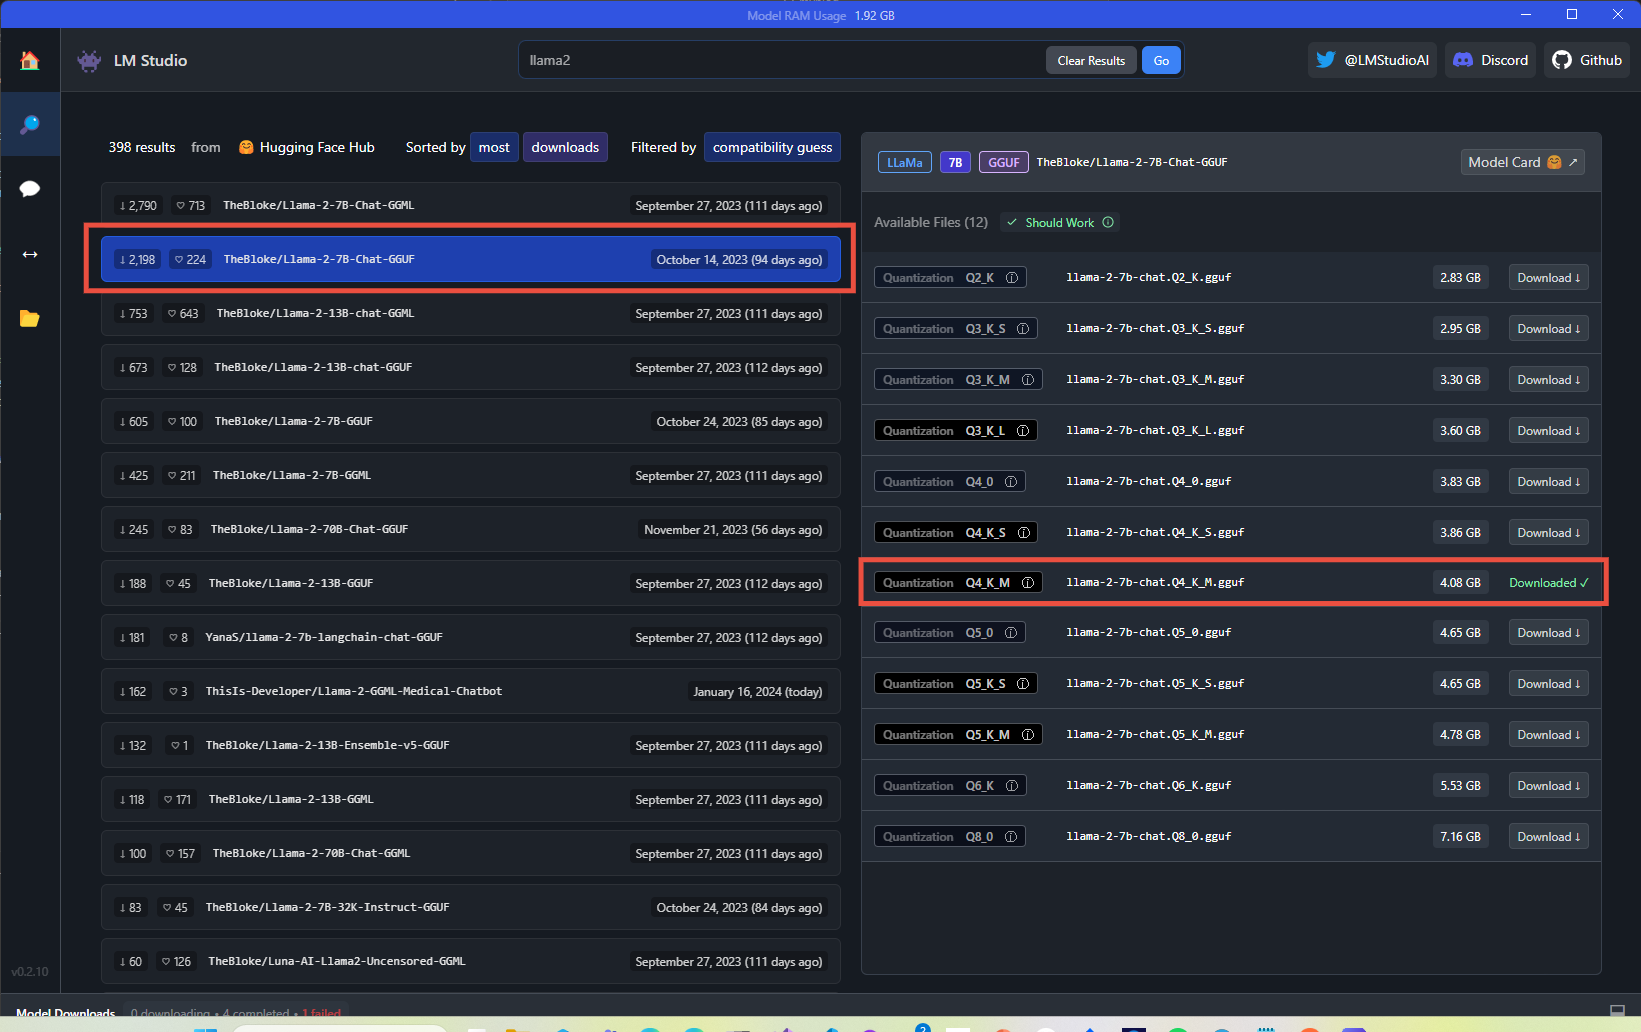
This is because phi-2 is a model specialized in text generation, so it’s not able to handle transformations like this one very well. However, we can try with a more capable (but resource intensive) model like llama2, an open-source LLM created by Meta which comes with different sizes based on the number of parameters. The most advanced version (the one trained with 70 billions of parameters) is not really suited for local use, since you will need between up to 74 GB of RAM to run it, but the 7 billions one can run just fine with 8 GB of RAM. Go back to LM Studio and search for the llama2 model. Choose the one called TheBloke/Llama-2-7B-Chat-GGUF and pick up the llama-2-7b-chat.Q4_K_M.gguf variant, which is a good tradeoff between quality and size. After you have downloaded it, go back to the Local Server section of LM Studio, use the Eject model button to unload phi-2, pick llama2 from the dropdown and start the server again.
Now, if you run the application, you will see that the output is much better:
| |
This time, we’re getting a result which is comparable to the one that we obtain when we use OpenAI models like gpt-4. And, again, all of this is running locally on our machine, without needing any Internet connection.
Wrapping up
Compared to my previous posts about Semantic Kernel, this time we entered into a more “experimental” territory: we used Semantic Kernel with an open-source LLM hosted on our local machine. This isn’t absolutely made for production scenarios since, as you have learned from the post, we had to use a workaround (a HttpClient with a custom handler) to use the model hosted by LM Studio instead of the official OpenAI APIs. Additionally, we were able to do that only because LM Studio can expose a model using the same API interface of OpenAI, which means that the Semantic Kernel, behind the scenes, doesn’t realize that it’s not actually talking with the OpenAI servers, but with our local one.
If you want, you can continue experimenting using open-source models with the other examples I have created for Semantic Kernel. However, keep in mind that some of them (like the ones to demonstrate AI orchestrations) are based on features which are OpenAI specific, like function calling. As such, they won’t work with open-source models, since they don’t have the ability to automatically figure out which functions to call to perform a specific task.
However, I hope you have enjoyed this post and that you have understood a bit more why everyone is excited for open-source LLMs. They’re not as powerful as the cloud-based ones, but they’re much more flexible and they can be used in scenarios where you don’t need the full power of a cloud-based model. Additionally, they open up lot of interesting opportunities for mixed scenarios. For example, you might have an application that automatically routes the request to a local offline model (to save cost, time and bandwidth) for simple tasks, while it switches to OpenAI or Azure OpenAI for more complex tasks that requires more complex reasoning and capabilities.
Happy coding!