
Updated on 17th November 2023 to reflect the latest changes in the Semantic Kernel APIs:
- All the Azure OpenAI extension methods have been renamed from Azure to AzureOpenAI. For example,
WithAzureChatCompletionService()is nowWithAzureOpenAIChatCompletionService().
The advent of Generative AI is changing the tech industry and more and more applications are adding AI powered features. If you just think to what Microsoft is doing these days in this space, they are integrating Copilot experiences powered by AI and LLMs almost in every product: Microsoft 365, Windows, Defender, Power Platform. From a technical perspective, integrating generative AI services from the most popular AI providers (like OpenAI) is fairly simple. They all offer a set of REST APIs to cover the most common scenarios, like generating a response starting from a prompt, supporting a chat conversation or creating an image out of a prompt.
However, when you start to build more complex enterprise applications, like a customized Copilot experience, you hit multiple challenges in using these APIs directly, like:
- The need of changing the communication layer in case you need to use different services and models, which are based on a different set of APIs.
- Managing prompts and requests in a scalable way.
- Managing complex operations that might requires multiple prompts to be completed.
- Integrating vector search to support Retrieval Augmented Generation (RAG), so that you can use the LLM to perform operations on private data, like the organizational data.
Of course, it’s possible to build all these features just by calling the REST APIs, but it requires lot of work. To support developers in this journey, the tech market saw the rise of AI orchestration libraries and SDKs, that abstract many of the AI concepts into a set of easy-to-use APIs. You might already have heard of LangChain, which is one of the most popular available libraries for Python developers.
Microsoft is investing a lot in the AI ecosystem, as such they decided to join the AI orchestration space, with the dual goal of supporting developers who are using Microsoft tools and platforms (like .NET and Azure OpenAI) and having a platform that the company can use to infuse AI in their app ecosystem in an easier way. Please welcome Semantic Kernel, an open-source AI orchestration library which can be used by C#, Python and Java developers.
Semantic Kernel supports the following features:
- Built-in support for multiple AI providers, like OpenAI, Azure OpenAI and Hugging Face.
- Support for plugins (built-in and build your own ones)
- Built-in support for many vector databases to store history and context
- Automatic orchestration with planner
This post is the first one in a series, in which I’m going to cover all the most interesting features of Semantic Kernel, starting form the simplest to the most advanced ones. You will find all the samples that will be part of this series in the following GitHub repository.
Let’s start the journey!
Building your first Semantic Kernel app
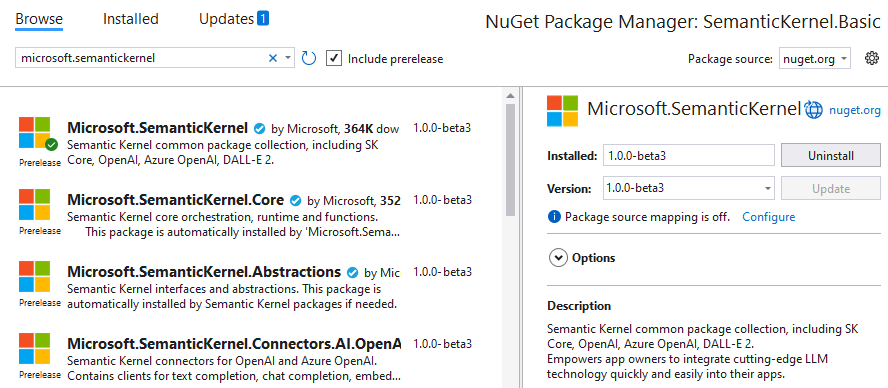
For this series of posts, I will use a .NET C# terminal application. However, the same tasks can be performed in Python and Java. As such, I’m going to open Visual Studio 2022, choose Create new project and select Console App. After creating the project, your first step should be to install Semantic Kernel. Right click on the project, choose Manage NuGet packages and look for a package called Microsoft.SemanticKernel. At the time of writing, the package is still published as prerelease, so you will have to make sure the option Include prerelease is turned on to find it:
Now we are ready to set up the kernel object, which is the one that we’re going to use across our application to orchestrate AI operations. To create a kernel, we use the KernelBuilder class, which offers a series of extension methods to initialize the object based on the AI service and the model we’re going to use. The C# version currently supports OpenAI and Azure OpenAI, with the following extension methods:
WithChatCompletionService(), to use chat models likegpt3.5-turbo.WithImageGenerationService(), to use AI models to generate images, like DALL-E, rather than text.WithTextCompletionService(), to use text completion models likedavinci.WithTextEmbeddingGenerationService(), to use models liketext-embedding-ada-002to convert text into embeddings, to be used with vector databases.
Each method has two different versions, based on the service. For example, if you want to use a chat model, you can use WithAzureChatCompletionService() with Azure OpenAI or WithOpenAIChatCompletionService() with OpenAI.
Depending on the service you want to use, you will have to provide two different set of credentials.
Using OpenAI
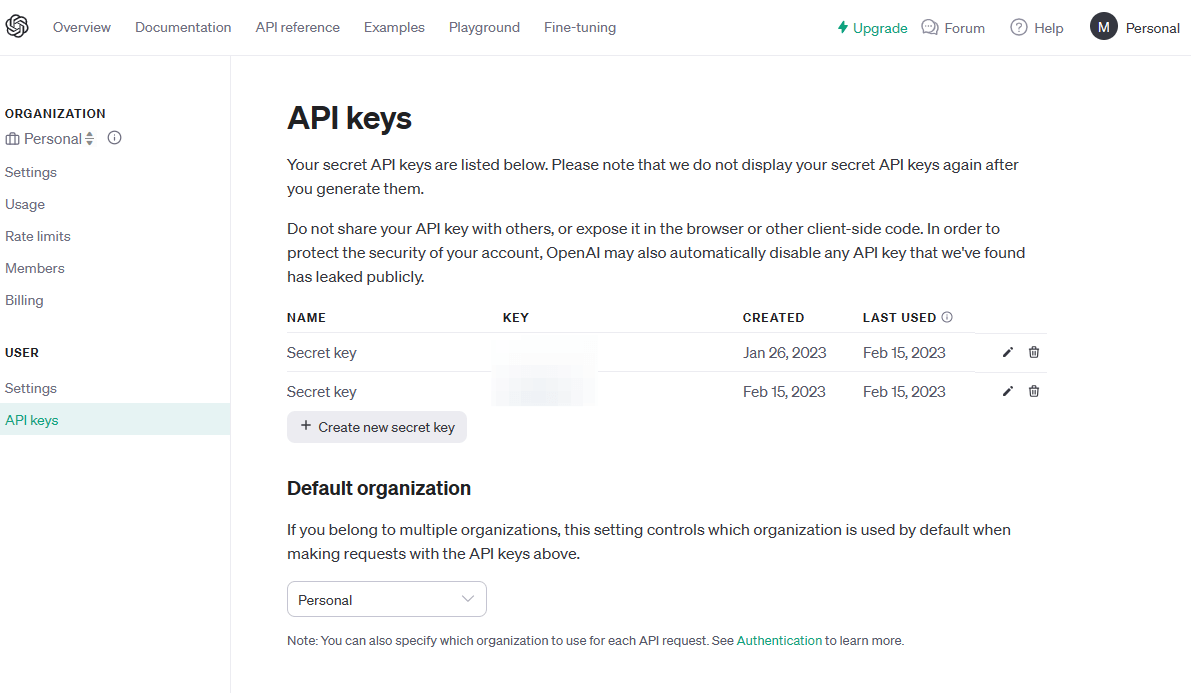
To use OpenAI, you must provide:
- The API key
- The model name
Both information can be retrieved from your OpenAI account:
Once you have them, you can pass them as parameters to the initialization method. For example, the following code shows how to initialize the kernel to use the chat completion service from OpenAI:
| |
Please note that this is just a sample to keep the code simple. In a real application, the API key would be retrieved from a secure service, like Azure Key Vault or a user secret.
Using Azure OpenAI
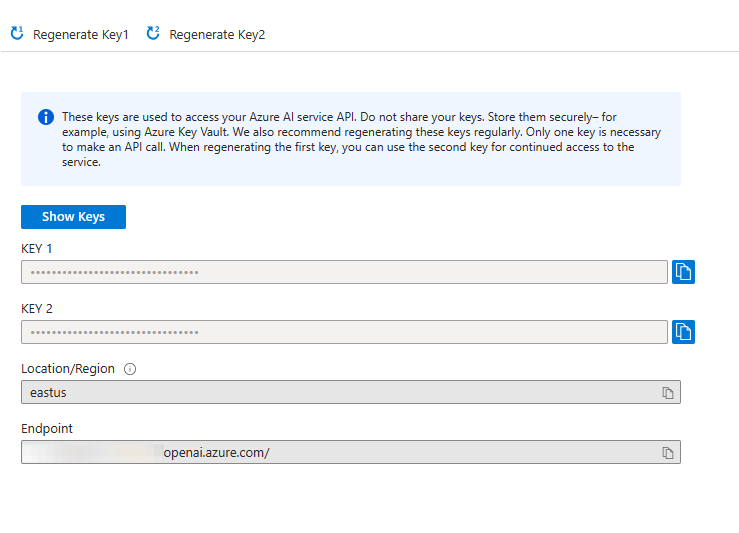
To use Azure OpenAI, you must provide:
- The URL endpoint
- The deployment name
- The API key
This information can be retrieved from the Azure portal, when you access to the Azure OpenAI service you have deployed:
Once you have them, you can use them with one of the various WithAzureOpenAI...() extension methods provided by the KernelBuilder class. For example, the following code shows how to initialize the kernel to use the chat completion service from Azure OpenAI:
| |
Regardless of the service you’re using, you can get a kernel object by calling the Build() method of the KernelBuilder class:
| |
Now we’re ready to start orchestrating your AI workflows.
A simple scenario: sending a prompt
We’ll start from the simplest scenario you can achieve with AI services: submitting a prompt and getting a response back. For the moment, we’re going to hard code the prompt inside the code, as in the following example:
| |
The purpose of the prompt is very simple: turning a sentence into a business mail, written in a professional tone. We can already see one interesting feature provided by Semantic Kernel: prompt templates. Instead of hard coding the sentence we want to turn into an e-mail, we define a placeholder using the keyword $input. This way, we can reuse the same prompt easily, we just need to change the provided input.
Now we can use the prompt to generate a semantic function, which is the way Semantic Kernel calls functions which are represented by a prompt:
| |
If we want, we have the option to customize the OpenAI parameters by supplying an OpenAIRequestSetting object as second parameter. For example, in the following sample we’re creating the same function, but changing the temperature (which controls the randomness of the response; the higher the value, the more random the result will be) and the maximum number of tokens to generate for the response.
| |
Now we need to supply the input variables for the prompt. In this case we have just one, called input. We supply them through the ContextVariables dictionary, which is a key-value pair collection:
| |
For each entry, we supply as key the placeholder we have included in the prompt, while as value the text we want to provide.
Finally, we execute the function using the RunAsync() method offered by the kernel, passing as input the variables and the semantic function we want to execute:
| |
From the result, we can use the GetValue<T>() method to extract the response, where T is the data type we’re expecting back. In this case, we’re using a chat model, so we know that the output will be a string.
The response will be similar to the following one:
| |
Wrapping up
In this first post, we have learned the basics of how to add Semantic Kernel to our applications and to perform a basic operation: submitting a prompt to the LLM and get a response back. We’re still far from having explored the most powerful features of Semantic Kernel, but we have already seen a few advantages compared to using directly the REST APIs provided by OpenAI or Azure OpenAI:
- We don’t need to learn different ways to interact with the API, based on the service we need to use.
- If we need to swap the service (or use different services based on the task), we don’t need to rewrite the entire communication layer. We just need to setup the kernel with a different extension method, and we’ll continue to use it in the same way.
- With prompt templates, we can easily reuse the same prompt with multiple inputs.
In the next post, we’re going to introduce one of the most interesting features of Semantic Kernel: plugins.
Meantime, remember that you can find this sample in the dedicated GitHub repository.