
This post is an updated version of a series of articles I published a while ago on the Microsoft Tech Community site, which explored the new set of Microsoft Graph APIs to work with Viva Learning. However, if the basic building blocks of these articles are still valid, the APIs have evolved since then. This post will show you how to build a Blazor application that you can use to create a custom Viva Learning provider, add new content and track assignments.
In this hybrid world, in which on-site activities are more and more often combined with remote work, the Microsoft Viva platform is becoming a very popular way to keep employees engaged and productive. In this post, we’re going to focus on one of the solutions of the Viva Platform, called Viva Learning. Through Viva Learning, enterprises can make available learning content in a variety of forms (videos, articles, books, etc.) that employees can consume at their own pace. Through the platform, administrators can also dispatch learning assignments to employees, which is very useful for scenarios like compliance trainings or learning experiences that are required for a specific role. Viva Learning comes with a wide range of popular learning providers, like LinkedIn Learning, Microsoft Learn, Coursera, Pluralsight, and many others. However, it’s also possible to create custom learning providers, which is what we’re going to explore in this post.
As a proof of concept, we’re going to build a web application with Blazor, which will allow to perform three type of operations
- Create a custom Viva Learning provider.
- Add new content to the provider.
- Assign content to users.
If you’re a content provider who wants to make your content available to all the Viva Learning customers, this article isn’t for you, since this scenario isn’t supported. This article focuses on building your own custom provider, so that you can make it available to employees who are part of a specific Microsoft 365 tenant.
In this post, we’re going to focus on setting up the authentication, creating the basic Blazor project and writing the code to create a custom provider. In the next posts, we’ll explore how to add content to the provider and how to assign content to users.
Create a new project in Blazor
For our sample application, we’re going to use Blazor, the popular web framework from Microsoft that allows you to build interactive web applications using C#. However, we aren’t going to use the most recent .NET 8.0 template, the one called Blazor Web App, because it doesn’t handle very well the integration with the Microsoft Identity platform yet. We’re going to use, instead, the classic Blazor Server app template, which is the one that gives us most flexibility since the code will actually run on a server, but thanks to SignalR, the user experience will be very similar to a client-side application.
Open Visual Studio, create a new project and pick the Blazor Server app template. Give it a name and pick the following options in the wizard:
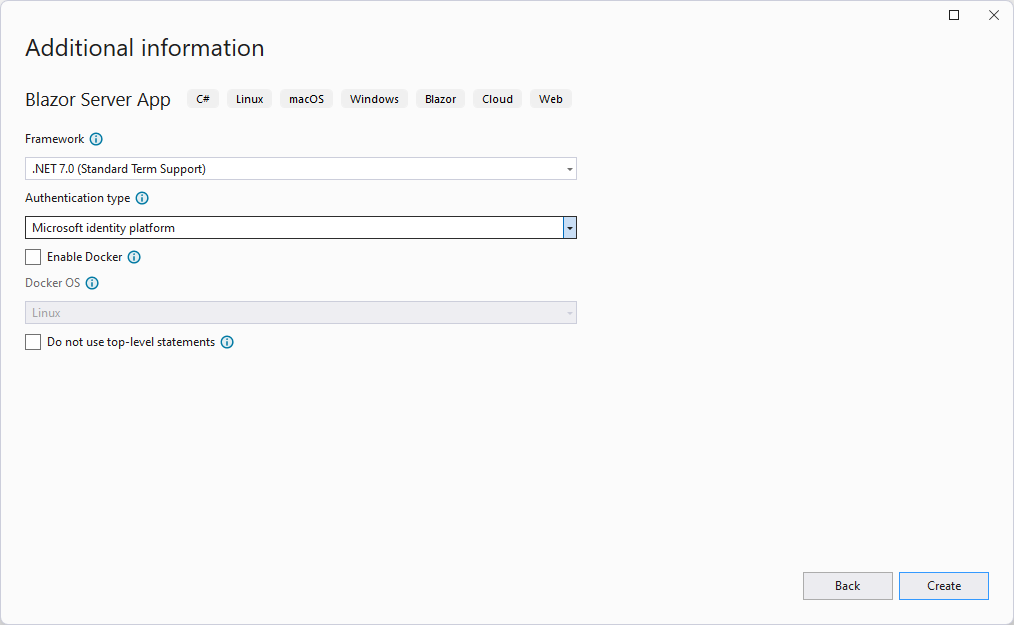
Make sure to choose Microsoft Identity platform under Authentication type. By doing this, as soon as you hit the Create button, Visual Studio will create the project and will redirect you to the Connected services page to set up the authentication. As a first step, make sure to authenticate with a Microsoft work account on the tenant where you want to create the application. The window will list all the app registrations you already have created on your tenant. If you don’t have any, you can create a new one by clicking on the Create new app button. You’ll be asked for a name.
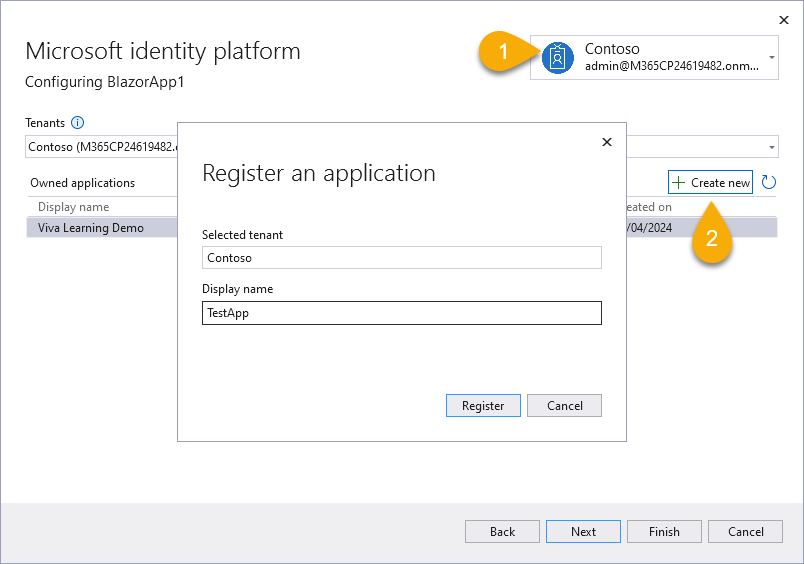
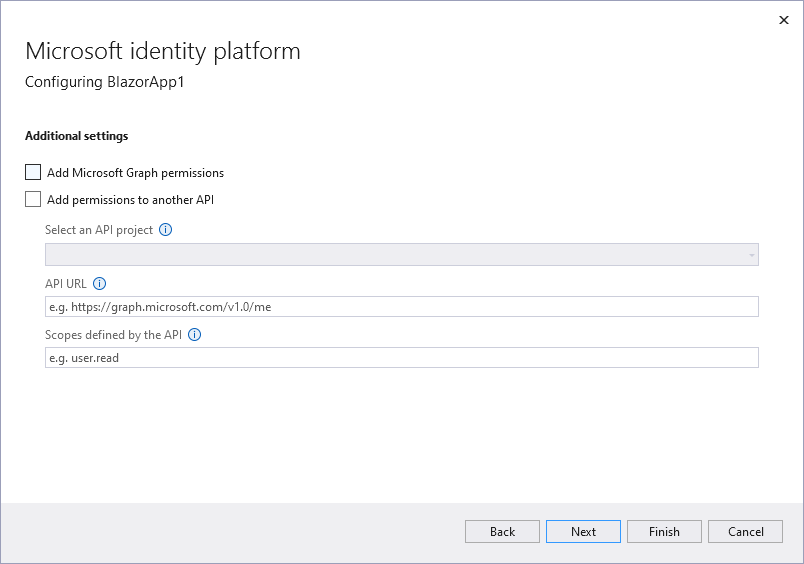
In the next page, you’ll be asked if you want to configure additional settings. Check the Add Microsoft Graph permissions option, since the APIs to work with Viva Learning are part of the Microsoft Graph.
After you’ve completed the wizard, the Blazor project will be configure to support authentication with the Microsoft Identity platform and to call the Microsoft Graph APIs:
In the Program.cs file, there will be a new snippet of code that enables the identity integration:
 1
 2
 3
 4
 5
 6
 7
 8
 9
10
11
12
13
14
15
16
17
18
var builder = WebApplication.CreateBuilder(args); var initialScopes = builder.Configuration["DownstreamApi:Scopes"]?.Split(' ') ?? builder.Configuration["MicrosoftGraph:Scopes"]?.Split(' '); // Add services to the container. builder.Services.AddAuthentication(OpenIdConnectDefaults.AuthenticationScheme) .AddMicrosoftIdentityWebApp(builder.Configuration.GetSection("AzureAd")) .EnableTokenAcquisitionToCallDownstreamApi(initialScopes) .AddMicrosoftGraph(builder.Configuration.GetSection("MicrosoftGraph")) .AddInMemoryTokenCaches(); builder.Services.AddControllersWithViews() .AddMicrosoftIdentityUI(); builder.Services.AddAuthorization(options => { // By default, all incoming requests will be authorized according to the default policy options.FallbackPolicy = options.DefaultPolicy; });In the appsettings.json file, there will be a new section with the configuration the Microsoft Entra and the Microsoft Graph. The configuration will look like this:
 1
 2
 3
 4
 5
 6
 7
 8
 9
10
11
12
13
14
15
{ "AzureAd": { "Instance": "https://login.microsoftonline.com/", "Domain": "M365CP24619482.onmicrosoft.com", "TenantId": "b280c832-405f-4dac-8858-7cb49c821df1", "ClientId": "0ba96243-393c-4fef-ab6e-5cde25c34736", "ClientSecret": "Client secret from app-registration. Check user secrets/azure portal.", "CallbackPath": "/signin-oidc" }, "AllowedHosts": "*", "MicrosoftGraph": { "BaseUrl": "https://graph.microsoft.com/v1.0", "Scopes": "user.read" } }All these information are automatically retrieved from the app registration that we created during the wizard.
If you right click on the project and choose Manage User Secrets, you will find an additional setting called
AzureAD:ClientSecret, which overrides the value in the appsettings.json file. This is the secret that you can use to authenticate your application with the Microsoft Identity platform and, since it’s a sensitive information, it’s stored in a separate file that is not part of the project. This way, if you decide to commit your code to a public repository, you won’t expose your secret.
Before we move forward writing some code, we need to make a few changes to the configuration of the project. The first one is that, even if we picked up the Blazor Server app template, it doesn’t mean we must stick to .NET 7.0. By moving to .NET 8.0, in fact, we can take advantage of the latest features of the runtime and the longer support period of the LTS version.
As a first step, install the .NET Upgrade Assistant tool from the Visual Studio marketplace. Once you have installed the tool, right-click on the project in Visual Studio and choose Upgrade to start the wizard.
- Choose In-place project upgrade.
- Select .NET 8.0 on the next page.
- Click on Upgrade selection on the final page, making sure all the files are selected.
Once the process is completed, your Blazor app will be upgraded to .NET 8.0.

As the next step, we must change the package which is installed to integrate the Microsoft Graph. The reason is that, by default, the template uses a library called Microsoft.Identity.Web.MicrosoftGraph, which is based on the 4.x version of the Microsoft Graph .NET library, which doesn’t support all the latest features of the Viva Learning platform. In order to use the new version of the Microsoft Graph library (5.x), we must uninstall the Microsoft.Identity.Web.MicrosoftGraph package and install the one called Microsoft.Identity.Web.GraphServiceClient.
The reason why the .NET team opted for a different package, rather than upgrading the existing one, is that the 5.x version of the Microsoft Graph library contains many breaking changes around authentication and the way you call the APIs.
Everything will continue to build as expected, except for a minor change you’ll need to make in the ShowProfile.razor file in the Pages folder. The header of the component will look like this:
| |
You’ll need to change the line:
| |
to
| |
This is because the new version of the Microsoft Graph library has a different namespace for the models that represent the entities exposed by the Microsoft Graph.
Finishing setting up the Microsoft Entra application
The Visual Studio wizard has automated many operations for us:
- It has created a new app registration in the Microsoft Entra portal.
- It has added Web as a supported platform with, as redirect URIs, the URLs of the local development server.
- It has generated a secret and copied it over as a user secret.
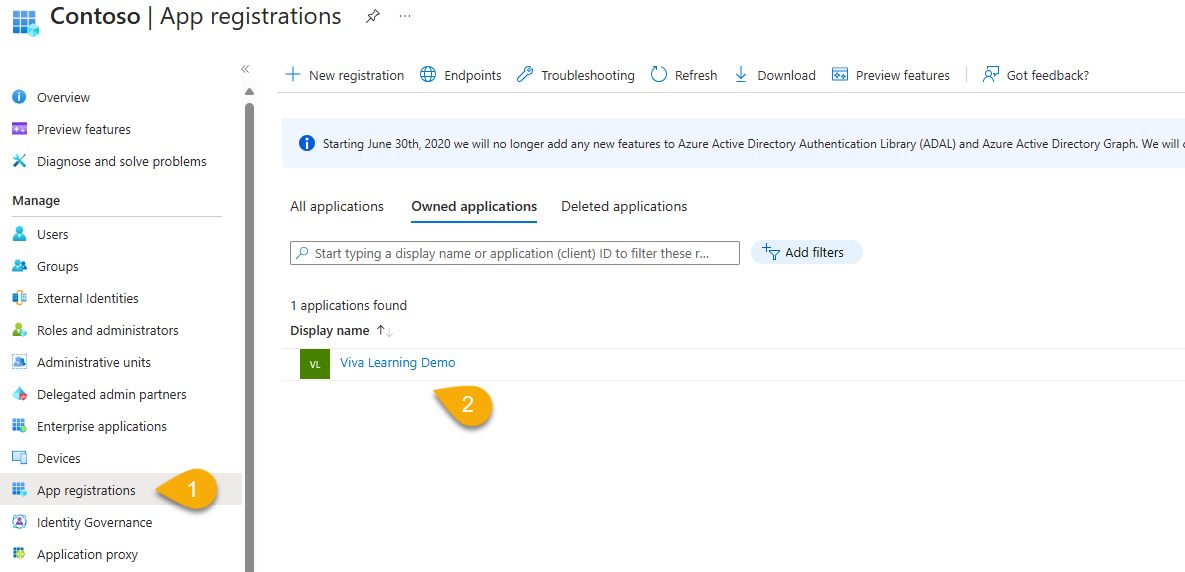
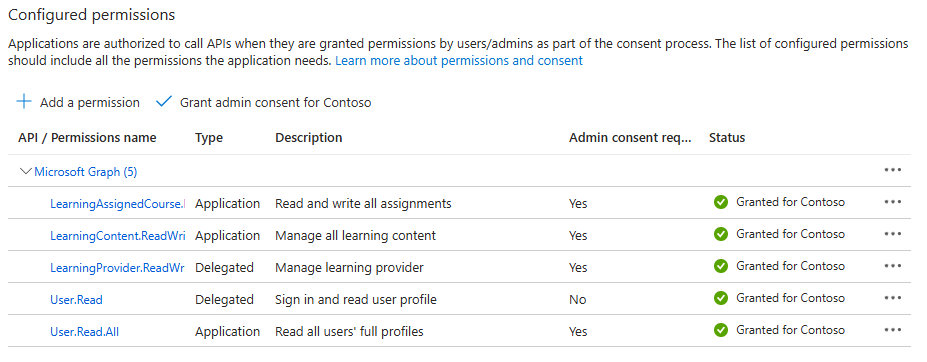
However, this isn’t enough to make our application work, since we need to add the required permissions to interact with Viva Learning. Head to the Azure portal, open the Microsoft Entra ID section and choose App registrations. Locate in the list the one you have created using the Visual Studio wizard and click on it.
Then move to the API permissions section, click on the Add a permission button and choose Microsoft Graph. We’ll have to enable a different set of permissions, since the Microsoft Graph APIs to work with Viva Learning use different approaches based on the task:
- To create, list and update custom providers, you’ll need to use delegated permissions (the ones which are used to perform operations on behalf of the logged user).
- To create, list and update content and assignments, you’ll need to use application permissions (the ones which are typically used by services and that can perform operations of behalf of an administrator).
First, pick Delegated permissions and search for the LearningProvider.ReadWrite permission. Then, move to the Application permissions section and add the following permissions:
- LearningContent.ReadWrite.All
- LearningAssignedCourse.ReadWrite.All
- User.Read.All
As last operation, click on Add permission. Then, click on Grant admin consent for {your tenant name} and confirm the operation. This will make the permissions effective for all the users in your tenant.
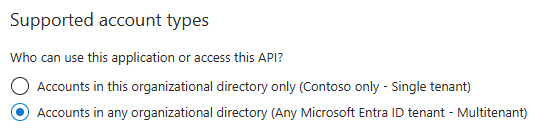
There’s a last step that you must perform, even if it’s optional. By default, the way the app registration has been configured by Visual Studio is for a single tenant. This means that the application can be used only by users who are part of the same tenant where the app registration has been created. If you want to create an application that, instead, enables you to create Viva Learning providers on any tenant, you must change the Supported account types setting. Move to the Authentication section and change the setting from Accounts in this organizational only (Single tenant) to Accounts in any organizational directory (Multitenant). Then, click on Save.
The other change to make is in the appsettings.json file of the Blazor application. One of the properties you’ll find under the AzureAD section is called TenantId, which contains the id of the tenant where the app has been registered. To make the application multi-tenant, you must replace the existing value with common, as in the following example:
| |
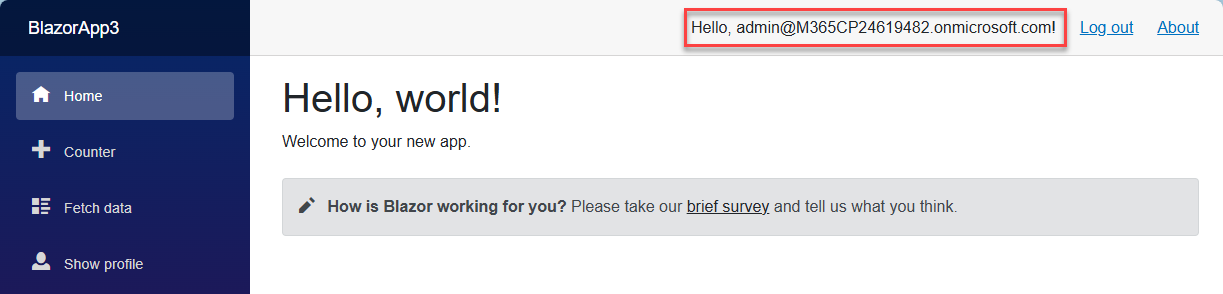
Now you can test that everything works as expected. Simply launch the Blazor application from Visual Studio by pressing F5. If you did everything well, you should be asked to log in with a Microsoft 365 account. After you’ve authenticated, you should see the home page of the application and, at the top right corner, you’ll see a greeting message with your mail address.
Now we can start writing some code!
Creating a custom provider for Viva Learning
To manage all the operations with the Graph APIs, we’re going to create a service that will handle all the tasks we must perform with Viva Learning. Create a new folder in the project called Services and add a new class called CustomGraphService.cs. One great advantage of using the Microsoft Identity library and the Visual Studio integration is that the initialization code that was added to the Program.cs file automatically registers in the dependency injection container the GraphServiceClient class, already configured with the proper authentication token.
As such, in order to interact with the Graph APIs, we just need to add in the constructor in our custom class a GraphServiceClient parameter. The code will look like this:
| |
You can notice an extra parameter, which type is MicrosoftIdentityConsentAndConditionalAccessHandler. It’s an helper class provided by the Microsoft Identity Web library that we can use to wrap our Microsoft Graph operations so that we make sure that the proper consent is requested in case of issues with the access token.
Now have everything we need to write our first call to the Graph APIs to create a custom provider. The code will look like this:
| |
The Microsoft.Graph.Models namespace includes many classes that map the entities that are exposed by the Microsoft Graph. For our scenario, the concept of a Viva Learning provider is represented by the LearningProvider class. The key properties are:
DisplayName, which is the name of the provider displayed in the Viva Learning platform.IsCourseActivitySyncEnabled, which is a boolean that indicates if the provider supports the synchronization of the learning activities. We need to set this totrueif we want to use the APIs to manage assignments later.
The other properties are required to customize the look & feel of the provider in the Viva Learning platform. There are two different type of logos used in the platform, you must supply both of them in two versions: one for the light theme (the properties with the ForLightTheme suffix) and one for the dark theme (the properties with the ForDarkTheme suffix).
Once we have created the provider, we need to perform a POST operation against the following url:
| |
Thanks to the Microsoft Graph .NET library, we don’t need to perform the operation manually, but we can use the following method of the GraphServiceClient class:
| |
However, if we run this code as it is, we might encounter an error the first time, because the token might not have the required permissions. In this case, the HandleException method of the MicrosoftIdentityConsentAndConditionalAccessHandler class will take care of requesting the proper consent to the user. We just need to catch the exception that might be triggered by the usage of the Microsoft Graph APIs and call this method.
Before starting to use the CustomGraphService class, let’s register it in the dependency injection container of the application, so that we can easily reuse it in every component and class. First, let’s create an interface that describes the class:
| |
Then, head to the Program.cs file and, in any place before the builder.Build() method, add the following line of code:
| |
Now let’s create a Blazor page that will allow us to provide the information required to create a custom provider. Right click on the Pages folder and add a new Razor component called NewLearningProvider.razor. We’re going to use the EditForm component in Blazor to simplify the data binding and the validation of the form. At first, we need a model class that maps the properties we’re going to collect:
| |
Each property represents one of the information that we must provide when we create a custom provider: the name and the logos. We mark all of them with the [Required] attribute, so that the form will be validated before it’s submitted.
Now we can write the code for the Razor component:
| |
For my sample project, I’m using the approach to keep the UI separated from code. As such, for every Razor component, I have a code file with the same name, plus the .cs extension. This is the meaning of the first line you see in the code
@inherits NewLearningProviderBase: the code which handles the component is implemented in a class calledNewLearningProviderBase, stored in a file called NewLearningProvider.razor.cs.
We have created an EditForm component that is bound to the learningProviderModel property. The form has five fields, one for each property of the model class. When the form is submitted, the HandleSubmit() method is called. Let’s take a look now at the code file:
| |
Since have registered the CustomGraphService class in the dependency injection container, we don’t need to manually create a new instance, but we can just inject it in our class. In Blazor, we can just do that by decorating the property with the [Inject] attribute.
Once we have our client, the HandleSubmit() method implementation is simple. We just call the CreateLearningProviderAsync() method of the service, passing the properties of the model class that we have collected from the form.
Now you can press F5, launch the application, open the /newLearningProvider page and create a new custom provider. Congratulations! Let’s add some code now to verify that the Learning Provider was indeed created.
Listing the custom providers
Listing the custom providers we have created is quite simple, since we must use the same endpoint we have used to create a provider, but this time with a GET operation. Let’s add a new method to our CustomGraphService class:
| |
The code is very similar to the one we have written to create a provider, but this time we use the GetAsync() method of the GraphServiceClient class. Additionally, we don’t need to supply any input parameter. The result is a collection of LearningProvider objects, which we return to the caller.
Remember to add the signature of this method to the
ICustomGraphServiceinterface as well.
Now we can create a new Razor component that will list all the custom providers. Right click on the Pages folder and add a new Razor component called LearningProviders.razor. The code will look like this:
| |
We have created a table with two columns: the id and the name of the provider. Inside the table, we use the @foreach directive to iterate over the collection of providers and we use it to fill the content of the table. If the collection is null, we display a message that says “Loading…”.
Now let’s take a look at the code to see how the collection of providers is populated:
| |
No surprises here! We’re injecting the CustomGraphService class and we call the GetLearningProvidersAsync() method we have just implemented. We do it in the OnInitializedAsync() method, which gets called when the component is loaded. Once the providers collection is populated, the UI will be updated automatically.
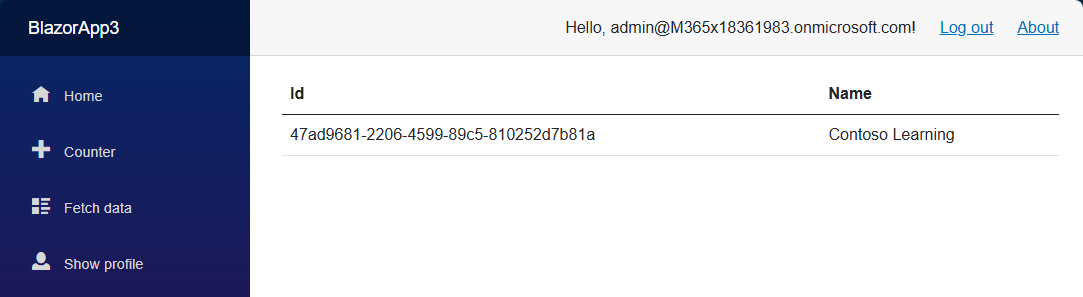
If we did everything properly, we should be able to see the list of custom providers we have created. Press F5, launch the application, open the /learningProviders page and verify that the list is displayed correctly.
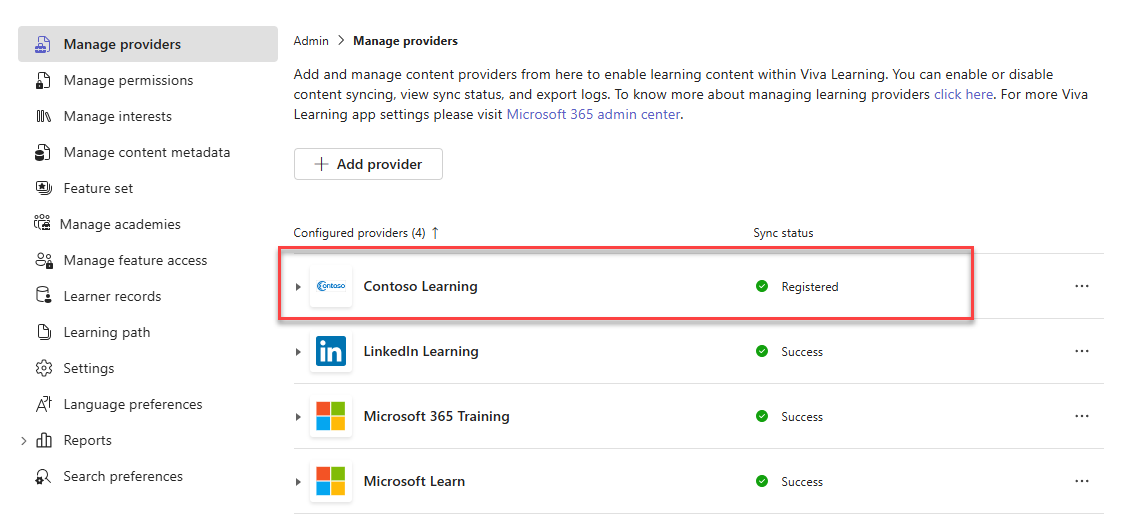
Of course, there’s also another way to check that the custom provider was properly created: through the Viva Learning portal! If you log in to the portal with an account that has the proper permissions, you should see the custom provider listed in the Manage providers section of the Admin tab:
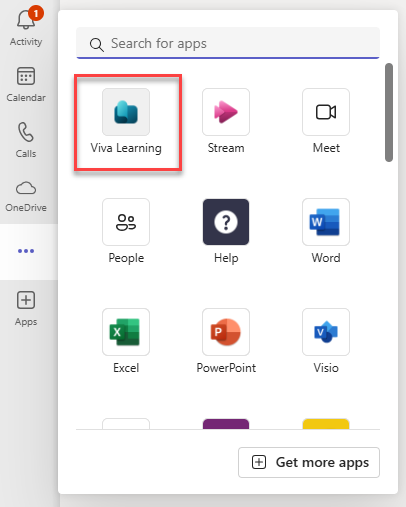
In case you don’t know, the Viva Learning portal is available as a Teams application. If Viva Learning is enabled in your organization, you will find it in the list of available apps:
Wrapping up (for now)
In this blog post, we started building our web application to manage custom Viva Learning provider. The work to be done is far from being completed, but we have laid the foundation for the next steps. In the next post, we’ll see how to add content to the provider and how to assign it to users. Stay tuned!
In the meantime, you can find the final version of the app on GitHub.