
Welcome to the last part of this series about building a web application with Blazor to manage a custom provider for Viva Learning! In part 1, we built the base architecture and we introduced the option to create and list custom providers. In part 2, we made our custom provider to something actually useful, by adding content that the employees can read or watch. In this post, we’re going to introduce assignments.
Viva Learning, in fact, isn’t just a platform that offers content that employees can leverage to learn new things. It also allows managers to create assignments, which are courses that employees must complete. Think, for example, of compliance training about security or privacy. Or a new selling approach that all your sales team must learn. Assignments are a powerful tool to ensure that your employees are up-to-date with the latest information and that they are compliant with the company’s policies.
Let’s start writing the code to manage assignments in our Blazor application.
Adding an assignment
This post will be much shorter compared to the previous ones. Thanks to the building blocks we have set in the first post and the implementation we did to include a GraphServiceClient instance configured to use application permissions in the second post, we already have everything we need.
The Microsoft Graph API we must use to submit assignments is the following one:
| |
This is translated, in the Microsoft Graph .NET SDK, to the following code, which we must add to our CustomGraphService class:
| |
The assignment is mapped with the LearningAssignment class, which has a few key properties we must define:
LearningProviderId: the ID of the provider that offers the content.LearningContentId: the ID of the content.LearnerUserId: the ID of the user that must complete the assignment.Status: the status of the assignment. We set it toNotStartedbecause we’re creating a new assignment.AssignmentType: the type of the assignment. We set it toRequiredbecause we want the user to complete it.DueDateTime: the date and time when the assignment must be completed.AssignedDateTime: the date and time when the assignment was assigned.
Then, we just call the PostAsync() method on the LearningCourseActivities property of the selected provider, passing the assignment object. The Microsoft Graph SDK will take care of the rest.
Since we’re already working with the CustomGraphService class, let’s add another method that we’re going to need later:
| |
This method uses the Microsoft Graph APIs to search for a specific user in the tenant given their mail address and to retrieve their ID. This is useful because, when we create an assignment, we must specify the ID of the user that must complete it. However, from a user experience perspective, it’s much easier to ask the user to specify their mail address rather than their ID, which is a GUID.
The method requires using the application permissions to call the /users endpoint of the graph. To improve the performance, we provide a requestConfig parameter to filter the results by the mail address we’re looking for and to select only the id property.
Thanks to this method, when it will come to build the UI to create an assignment, we’ll be able to simply ask to the user the mail address of the person who must complete the assignment, and then we’ll be able to retrieve the ID of the user using this method.
Adding the user interface
Now that we have our method, we just need to update the UI so that we can enable the user to create assignments. Assignments are mapped to a specific content, so let’s add a new column in the content table in the LearningProviders.razor component. This column will contain a button that, when clicked, will redirect to a new page to assign the selected content to a user.
| |
The button we have just added will call a method in code called AddAssignment(), passing as parameter the id of the selected content. Let’s implement this method in the LearningProviders.razor.cs file:
| |
We’re going to use, again, the navigationManager object to trigger the navigation to a new page, called AddAssignment, which we’re going to create as next step. We’re going to implement the navigation in a slightly different way than what we did to enable the creation of content. This is because, to manage an assignment, we need to carry over two properties: the id of the content and the id of the provider. As such, the best way to do that is by using query strings.
Now let’s create a new component under the Pages folder called AddAssignment.razor. This component will contain a form to create a new assignment, using the same approach we have used so far based on the EditForm component. First, let’s create a model class to represent the assignment:
| |
For the sake of simplicity, in this sample we’re going to allow the user to customize only two key properties: the assigned user and the due date. In a real-world scenario, you would probably want to add more properties, such as the assignment type or the status. Now, we can add to our Razor component a form mapped to this new model class:
| |
The form is very simple: it contains two fields, one for the user’s email and one for the due date. When the form is submitted, the HandleSubmit() method is called. Let’s take a look now at the AddAssignment.razor.cs file:
| |
First, in a similar way we did for the content creation, we’re going to retrieve the parameters we need from the LearningProviders.razor page. The difference is that, since they will be retrieved from the query string and not from the Uri, we need to use a different attribute to decorate our properties, called [SupplyParameterFromQuery]. The outcome, however, will be the same: the two properties will be automatically populated with the values from the query string, without needing to perform any manual parsing of the URL.
Then, we have the HandleSubmit() method, which is called when the form is submitted. As the first step, we use the GetUserId() method we have implemented before to retrieve the ID of the user that must complete the assignment from their mail address. Then, we can simply call the AddAssignment() method we have implemented, passing the id of the content, the id of the provider, the id of the user, and the due date. The only thing you need to keep in mind is that the due date is specified using a DateTimeTimeZone object, so you need to create an instance of this class starting from the DateTime property that is returned by the InputDate Blazor component.
Testing the code
That’s it! Now we’re ready to test the code. Press F5 to start the application and then:
- Navigate to the Learning Providers page.
- Click on the Assign button next to one of the available contents.
- In the new form, specify the email address of the user who must complete the assignment and the due date. For simplicity, you can use your own email address.
- Click on the Assign button.
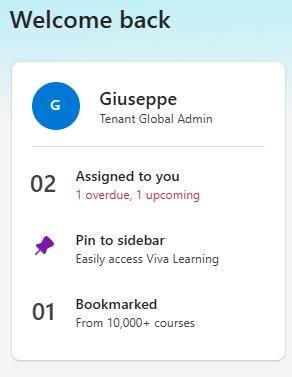
To test that the operation completed successfully, you can just login to the Viva Learning portal in Microsoft Teams. You should see that now you have some pending assignments right from the main page:
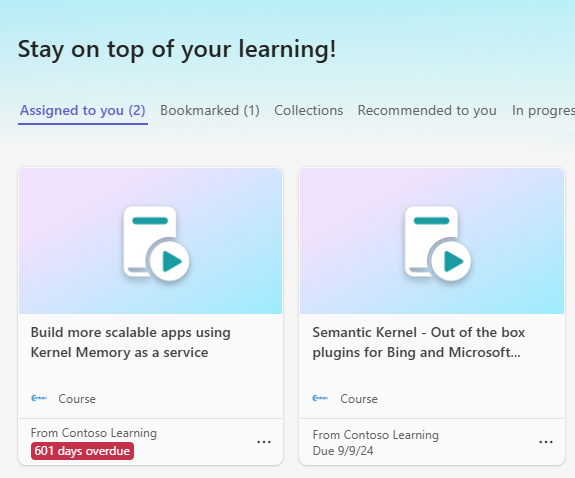
If you click on Assigned to you, you should see the content from your custom provider being assigned to you with the due date you have specified:
Wrapping up
In this post, we have concluded our journey of building a web application with Blazor to manage a custom provider for Viva Learning. We have added the ability to create assignments, which are mandatory courses for employees. Now we have a full application that we can use to manage all the basic operations that you can perform with Viva Learning to integrate your content catalog into the platform.
You can find the full sample application on GitHub.
Happy coding!