
In the previous post, we began building a Blazor web application for managing a custom Viva Learning provider. We created the project, implemented the authentication flow, and added the initial operations: creating and listing custom content providers. Today, we’ll explore how to add new content.
Managing the authentication
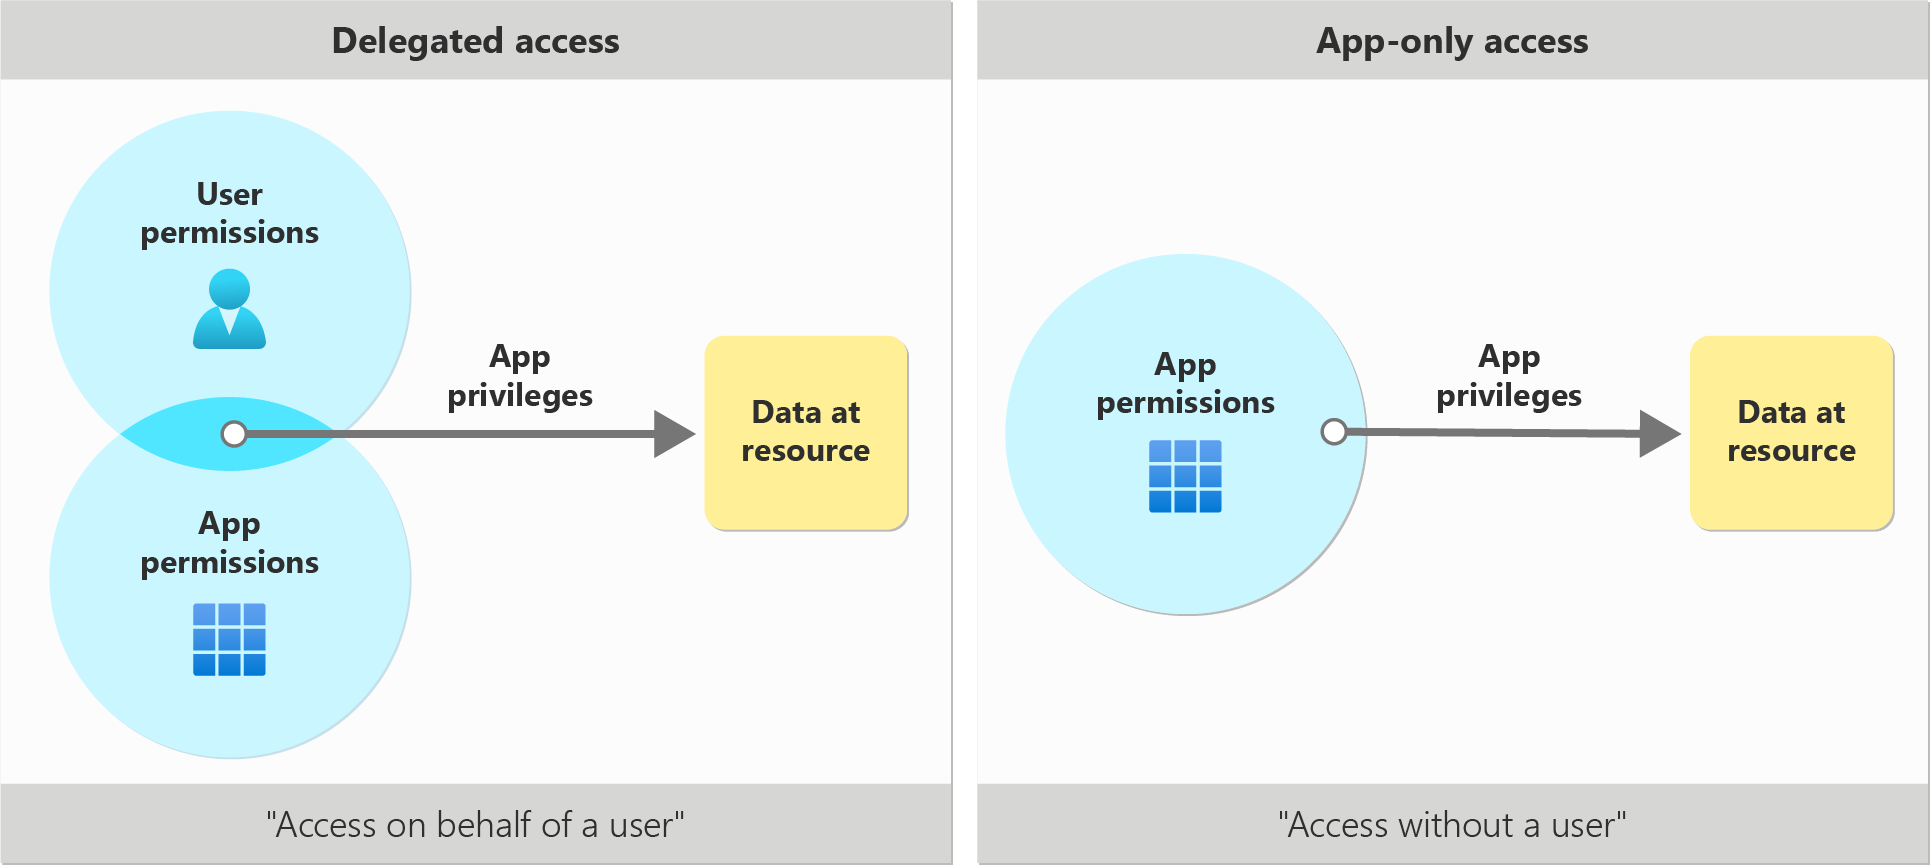
You might be wondering, “Why are we discussing authentication again? Didn’t the Microsoft Identity Web library handle everything for us?” Almost 😊 The challenge comes from the fact that the authentication process we have implemented is based on the user’s identity. This was fine when it comes to create and list learning providers, since these APIs required delegated permissions. Delegated permissions allow the app to act on behalf of a user, whereas application permissions enable the app to act independently. This is where the concept of application permissions comes into play.
If you want to learn more, you can read the official documentation on the topic.
This means that the delegatedClient object that was injected into the CustomGraphService class and that we have been using so far isn’t enough. We need to create a new instance of the GraphServiceClient class that will use application permissions. In order to do this, we need to manually create a new instance of the GraphServiceClient class, thus we need to read the Microsoft Entra configuration we have stored in the appsettings.json file. As such, we need a new IConfiguration parameter in the constructor of the CustomGraphService class to easily get access to the content of the appsettings.json file.
| |
Now we can add a new method in the service that will create the application client.
| |
The Microsoft Entra application we’re going to use to authenticate is the same, so we retrieve the content of the AzureAD section of the configuration file, in which we stored the client id, the redirect URL, etc. However, we need to authenticate in a different way, since application permissions don’t require any user interaction. For this purpose, we create a ClientSecretCredential object passing, as parameters, the client ID and the client secret. There’s an extra parameter we need to supply, which is the tenant ID: we get it as a parameter from the method, so that we can enable the usage of our application with any tenant in a multi-tenant scenario. Then, we create a new instance of the GraphServiceClient class, passing the ClientSecretCredential object as a parameter. We store this instance in a property of the class, so that we can use it in the methods that require application permissions.
Adding new content to a custom provider
The first operation we’re going to implement is the ability to add new content to a custom provider. We’re going to use articles from this blog as sample content to load in our provider. The API to do this is a bit peculiar. We’ll have to perform, in fact, a PATCH operation against the following URL:
| |
As you can see, the URL is a bit peculiar because we need to supply two different parameters in the URL itself:
- The ID of the learning provider we want to add the content to. This is the
learningProviderIdparameter. - We need to supply the ID that identifies the content we want to add. This ID is the
externalIdproperty of the content and it’s called external because this is the ID how your system identifies that content. For example, in case of this blog, it could be the slug of the post. We’ll have to provide this value regardless if we’re performing the operation to create a new content or to update an existing one.
Luckily, the Microsoft Graph library for .NET makes this operation really simple, as you can see from the following snippet:
| |
First, we create a new LearningContent object, which maps a content for Viva Learning. There are many properties available that you can explore in the official docs, in this sample you can see the four required ones:
ExternalId: the ID that identifies the content in your system. It must be the same you’re going to supply also in the URL.Title: the title of the content.ContentWebUrl: the URL where the content is available.LanguageTag: the language of the content.
Now we can call the Microsoft Graph APIs. Whenever they require a parameter in the URL to identify a specific content (like, in this case, the identifier of the learning provider), the .NET library translates this by using the array syntax. This is why we have the LearningProviders[providerId] syntax in the method.
The complex second parameter implementation is made easier by the LearningContentsWithExternalId() helper method, which allows us to specify the external ID of the content we want to add. The PatchAsync() method, finally, is the one that actually performs the PATCH operation and adds the content to our provider.
Since we’re already working on the CustomGraphService class, we can add a new method to retrieve the list of available content for a given provider. The implementation is simple:
| |
Now that we have both methods, we can update the UI to support this new feature. We’re going to make three changes:
- Initialize the
GraphServiceClientwhich supports application permissions. - Update the LearningProviders.razor component to show the list of contents for a provider.
- Create a new component to add content to a provider.
Initializing the application client
At the beginning of the post, we have added a new method to our CustomGraphService class to create an instance of the Microsoft Graph client which uses application permissions. Now it’s time to use it! Let’s change the OnInitializedAsync() method in the LearningProviders.razor.cs file to call this method:
| |
As you can notice, we’re not just calling the method, but there’s more to it. The reason is that we built the AcquireApplicationAccessToken() method to support multi-tenant scenarios, so we must provide as parameter the id of the tenant we want to interact with. We can retrieve this information from the user’s claims, which contains the tenant ID. To do that, we need to:
- Inject the
AuthenticationStateProviderservice, which is automatically registered in the dependency injection container when we initialize the authentication support. - Call the
GetAuthenticationStateAsync()method to retrieve the current user’s authentication state. - Retrieve the user’s claims from the
AuthenticationStateobject. - Extract the tenant ID from the claims.
Now that we have the identifier of the tenant, we can finally call the AcquireApplicationAccessToken() method we have previously implemented. This will create the GraphServiceClient object that uses application permissions, which will be needed to call the Microsoft Graph APIs to work with content.
Listing the content for a given provider
Now that we have setup the code so that we can use an application client, we’re going to change the column which contains the provider’s identifier to become actionable. By clicking on the id, we’re going to load the available content for that provider. First, we’re going to add in the LearningProviders.razor.cs file a new method to load the content given a provider’s ID:
| |
We have created a new property called contents, which will store the list of content for a given provider. The LoadContent() method receives, as input, the id of the provider and it uses it to call the GetLearningContentAsync() method we have previously implemented.
Now update the table in the LearningProviders.razor component in the following way:
| |
Instead of just displaying the value of the Id property, we’re now wrapping it in an anchor tag. We’re also adding an @onclick directive to the tag, which will call the LoadContent() method when the user clicks on it, passing as parameter the id of the current row’s provider. We’re also adding the @onclick:preventDefault directive to prevent navigating to the URL specified in the href attribute. We just want to call, in fact, the LoadContent() method.
As the second step, we need to add a new table which is actually going to display the items in the contents collection. Here is the code to add below the previous table:
| |
The implementation is very similar to the one for the providers. We add a table with two columns, one for the tile of the content and one or its URL. Then, using a @foreach statement, we iterate over the contents collection and add a new row to the table for each item. Now, every time you click on the id of the provider, the list of content for that provider will be loaded and displayed in the table.
That’s it! However, it’s a bit early to test the work, because the list of content will be actually empty. Let’s add a new component to create one!
Adding content to a provider
As the first step, we’re going to create a new component called NewLearningContent.razor inside the Pages folder. The approach we’re going to use it the same one we have used for the NewLearningProvider component.
As such, first, we need to create a new class to hold the model of the content we’re going to add. This class will be called LearningContentModel and it will contain the following properties:
| |
The properties are the same ones we have seen in the LearningContent class provided by the Microsoft Graph SDK. We’re also adding the Required attribute to all the properties, to ensure that the user provides a value for each of them.
Now we can build the UI using an EditForm component to request the input from the user. Here is how it looks like:
| |
Let’s see now the implementation of the NewLearningContent.razor.cs file:
| |
The code should be familiar. Also in this case, we’re injecting our instance of the CustomGraphService class, which we’re going to use inside the HandleSubmit() method to call the AddLearningContent() method we have previously implemented. The method will pass the values provided by the user in the form to the service.
There’s only an extra thing we need to take care of. As you can see, we have a property called LearningProviderId, which is decorated with the [Parameter] attribute. This is because we’re going to get the id of the provider from the previous page by passing it as a navigation parameter (for example, /newLearningContent/47ad9681-2206-4599-89c5-810252d7b81a). By using this special attribute, its value will be automatically populated based on the URL.
To make this working, we need to change the routing of the page in the NewLearningContent.razor file so that it can accept the id of the provider as a parameter:
| |
This way, since the name of the parameter in the URL matches the name of the property in code, it will be automatically populated.
As the last step, we need to trigger the navigation to the new page when from the LearningProviders.razor component, so that we pass the id of the provider. First, let’s add a new column to our table which will be populated by a button that will trigger the navigation:
| |
We have added a new column called Content and, inside it, we have place a button which is going to call a method in our code called CreateNewLearningContent(), passing as parameter the id of the selected provider. Now we need to implement this method in the LearningProviders.razor.cs file:
| |
To manage the navigation in Blazor, we can use the NavigationManager class, which is registered as well in the dependency injection container. As such, we just need to add a property of this type and decorate it with the [Inject] attribute.
Then, inside the CreateNewLearningContent() method, we use the NavigationManager by calling the NavigateTo() method, passing the relative URL to the new component we’ve just created, including the id of the provider.
Testing everything!
Now that we have completed all the required steps, we’re ready to test everything! Here are the steps to follow:
Run the application.
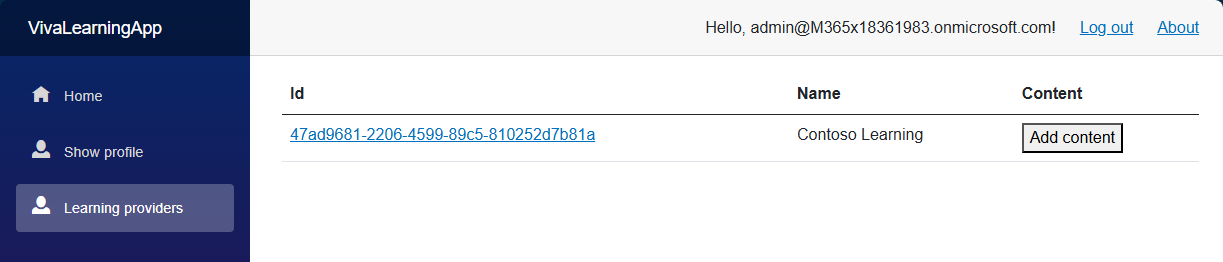
Navigate to the Learning Providers page. You should see the list of providers with, this time, a new column with the Add content button. Additionally, the id of the provider will be clickable, even if nothing will happen if you click on it because the list of content is currently empty.
Click the Add content button next to the provider.
Fill all the required information in the new page.
Click Create.
Verify the content by navigating back to the LearningProviders page and clicking on the provider ID.
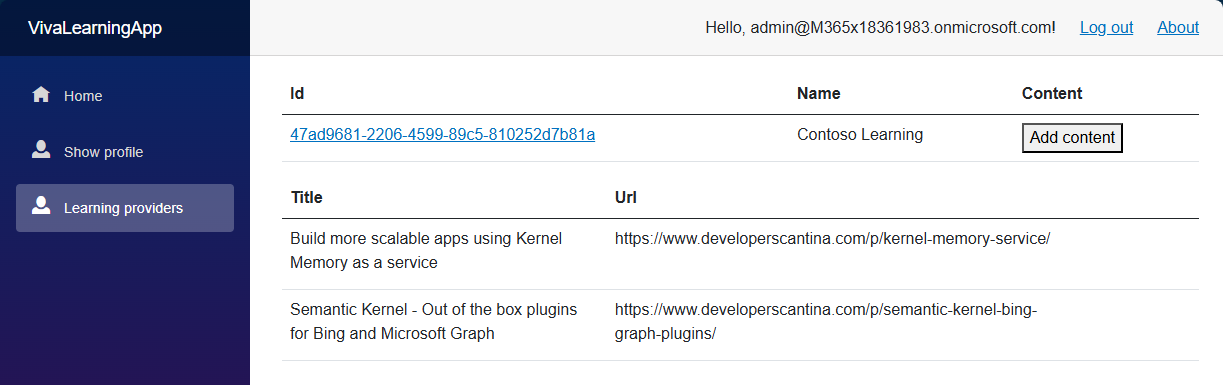
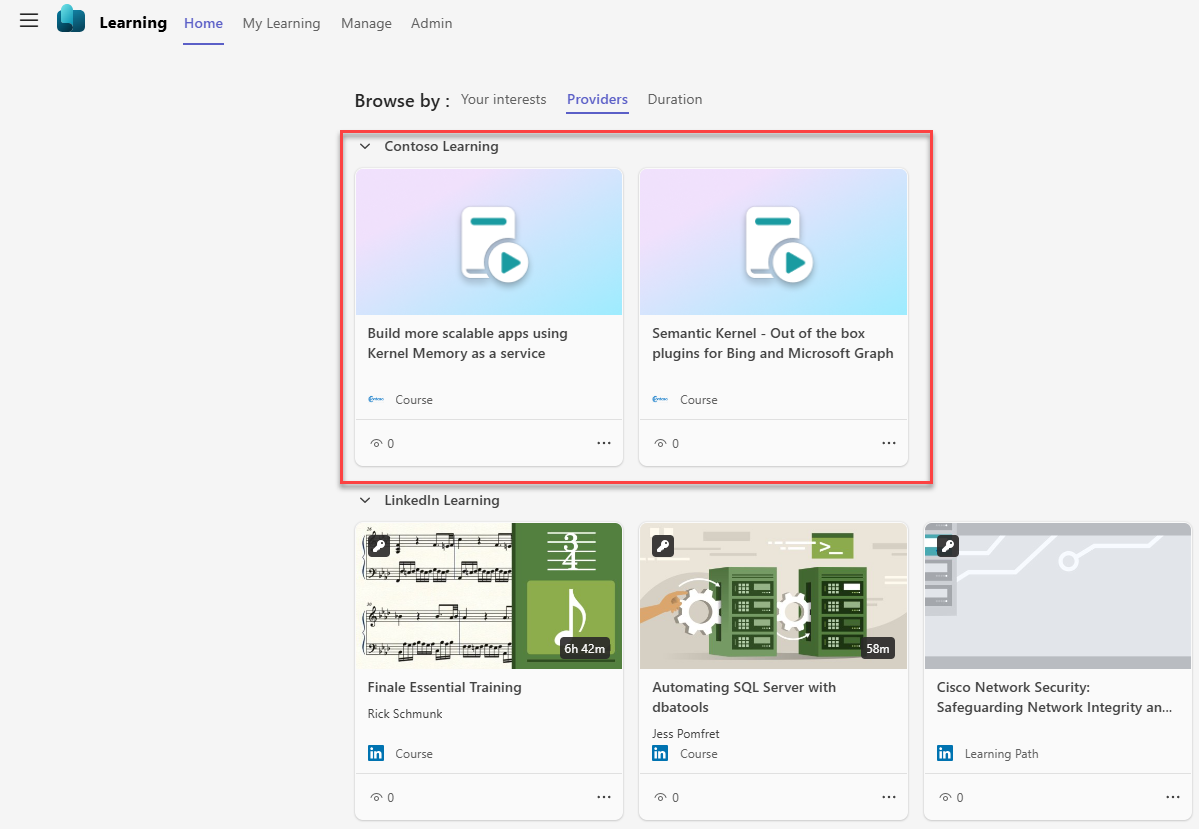
Of course, you can verify this also by using the Viva Learning platform, like we did in the previous post for the learning providers. If you move to the Browse section and you select the Providers tab, you should be able to see your custom provider with the content you’ve added.
Wrapping up (for the moment)
We’re almost there! In today’s article, we added another piece of the story to our sample application: the ability to add content to a custom Viva Learning provider. In the next post, we’re going to implement the last features, which is also the newest one added to the Microsoft Graph: the ability to track assignments. Stay tuned!
In the meantime, you can find the complete source code of the application on GitHub.