
In the previous posts of this series, we have built a few Model Context Protocol (MCP) servers and we have learned how to protect them with Microsoft Entra. So far, however, the clients consuming these servers have always been developer tools: Visual Studio Code, the MCP Inspector, or a custom agent we built ourselves. In this post, we’re going to explore a different scenario: how to consume an MCP server directly from Microsoft 365 Copilot, by turning it into a federated connector.
As usual, before we get into the how, let’s spend a moment understanding the why. Let’s get started!
What a federated Copilot Connector is
If you have already worked with Copilot Connectors, you are probably familiar with the traditional model: you ingest the data from an external system (a CRM, a ticketing tool, a wiki) into the Microsoft 365 tenant, where it gets indexed so that Copilot can reason over it. This is what we call a synced connector. It works well, but it comes with a cost: you’re copying the data into the tenant, you have to keep it in sync, and there’s always a window in which the indexed copy and the source of truth disagree.
A federated connector takes a different approach. Instead of syncing the data in, it retrieves the data live, on demand, from the external system through an MCP server. Nothing is ingested into the tenant: when Copilot needs the information, it calls the connector, the connector calls our MCP server, and the answer comes back directly from the source.
There are a few important consequences of this design that are worth highlighting:
- The user’s identity is preserved. Each request carries the identity of the signed-in user, so it’s our server that decides what that specific user is allowed to see. We aren’t flattening everyone’s permissions into a single indexed copy.
- The tools must be read-only. A federated connector is about reading live data, not about performing actions. It’s a querying surface, not an automation surface.
- The data shows up where people already work. Federated connectors can surface in Researcher and in Copilot Chat, which is exactly where we’re going to see our data at the end of this post.
If you want the official reference, Microsoft documents this scenario in the Set up custom federated connectors article, which is worth reading alongside this walkthrough.
Now that we understand what we’re building, let’s take a look at the MCP server we’re going to use.
The Customer Data MCP server
The MCP server we’re going to use is intentionally simple, since the goal of this post isn’t to build an MCP server (we have already covered this topic multiple times in this series), but to connect it to Microsoft 365 Copilot. It’s a .NET 10 MCP server that exposes a set of read-only tools over customer data: a few tools to search and retrieve customers, and a few tools to search and retrieve invoices.
For the sake of simplicity, the data is fake and embedded directly in the server: six customers (from CUST-1001 to CUST-1006) and six invoices (from INV-2001 to INV-2006). The server uses the Streamable HTTP transport, which is the one required to integrate with Microsoft 365 Copilot.
I won’t go through the code needed to build the server, since we have already covered it in the previous posts of the series. If you need a refresher on how to scaffold an MCP server in .NET and how to define tools, you’ll find everything you need there. For our purposes, it’s enough to keep this mental model: we have an HTTP MCP server, it exposes read-only customer and invoice tools, and it returns live data when it’s called. You can find the complete source code on GitHub.
Securing the MCP server with Microsoft Entra
Before we can use our MCP server with Microsoft 365 Copilot, there’s an important requirement to satisfy: the server must be protected with authentication. Copilot will not connect to an MCP server that is openly accessible. It must be able to acquire an access token on behalf of the signed-in user and present it to the server, which in turn must validate it.
If you have followed the previous posts of this series, this concept isn’t new. The difference is that, last time, we offloaded the whole authentication layer to Azure API Management (APIM), without touching the server’s code. This time, instead, we’re going to implement the authentication directly in our .NET application. The main reason is that, for a sample like this, it’s quicker to set up and it keeps everything inside a single project, without having to provision an APIM instance.
The starting point, however, is the same regardless of the approach: we need to register our applications in Microsoft Entra. We’re going to need two of them: one to represent the MCP server (the API that is being protected) and one to represent the client (the application that requests the tokens). Let’s start with the server.
Registering the MCP server application
The first step is to register our MCP server as an application in Microsoft Entra.
- Go to the Azure portal and navigate to the App registrations section.
- Click on New registration to create a new application.
- Give it a meaningful name, like Customer Data MCP Server.
- Choose the appropriate supported account types. For this demo, we’ll choose Accounts in this organizational directory only, but you can make the application multi-tenant if you want to allow users from other organizations to access it.
- Click on Register to create the application.
Now we have to tweak a few things, starting by exposing an API for our application. This is what will allow clients to request access tokens to call our MCP server. Click on the Expose an API section in the left menu, then click on Add a scope. In the dialog that opens up, set the following values:
- Scope name:
access_as_user - Who can consent?: choose Admins and users
- Admin consent display name: set Access Customer Data MCP Server
- Admin consent description: set Allows the app to access the Customer Data MCP Server on behalf of the signed-in user.
- User consent display name: set Access Customer Data MCP Server
- User consent description: set Allows the app to access the Customer Data MCP Server on your behalf.
- State: Enabled
Then click on Add scope to create the scope.
Now, still under Expose an API, take a look at the Application ID URI at the top. By default, Microsoft Entra sets it to api://<client-id>, where <client-id> is the Application (client) ID of our application. This is exactly what we want, so we can leave it as it is. This value is important, because it’s used as the audience (aud) claim in the access tokens, and the scope our clients will request is api://<client-id>/access_as_user.
That’s it for the server app registration. Before moving on, go back to the Overview page and take note of the Application (client) ID, since we’re going to need it in the configuration of our server.
Implementing the authentication in code
Now that we have the app registration in place, let’s take a look at how the authentication is set up in the Program.cs file of our server. The key idea is that everything is handled by two cooperating authentication schemes, each one with a distinct job:
| |
Let’s go through what’s happening here, focusing on the role of each scheme rather than on every single line.
The first scheme is the MCP challenge scheme, which comes from the ModelContextProtocol.AspNetCore.Authentication package and is registered with the .AddMcp(...) method. We set it as the DefaultChallengeScheme, which means that it’s the one in charge of handling the requests that arrive without a valid token. In this case, it returns a 401 response and, more importantly, it advertises the Protected Resource Metadata at the well-known endpoint /.well-known/oauth-protected-resource. This is the standard format described by RFC 9728, and it’s how an MCP client discovers where and how to authenticate. Please notice how the ResourceMetadata we configure describes exactly that: the resource identifier, the authorization server and the scope the client must request.
The second scheme is the JWT bearer scheme, which comes from the Microsoft.Identity.Web library and is registered with the AddMicrosoftIdentityWebApi() method. We set it as the DefaultAuthenticateScheme, which means that it’s the one in charge of validating the tokens once the client provides them. On every call, it checks that the token is valid: issuer, audience, signature and lifetime must all be correct before the request can reach our tools.
Finally, we need to actually require a valid token on our MCP endpoint, which we do with a single line:
| |
As you can see, the two schemes split the work cleanly: the first one tells the unauthenticated clients how to obtain a token, while the second one validates the token once they come back with it.
Configuring the application
Now that the application is implemented, we need to provide it with the information about the app registration we have just created. All these settings live in the appsettings.json file:
| |
Let’s go through the values one by one:
AzureAd:Instanceis the Microsoft Entra authority. We can leave it set tohttps://login.microsoftonline.com/.AzureAd:TenantIdidentifies which accounts are allowed to authenticate. We’re usingorganizations, which accepts any work or school account; if you prefer to restrict access to your own tenant only, you can replace it with your tenant ID.AzureAd:ClientIdis the Application (client) ID of the Customer Data MCP Server app registration we created earlier. You can find it in the Overview page of the app registration.AzureAd:Audiencesis the list of audiences that the server accepts in the incoming tokens. Since our Application ID URI is the standardapi://<client-id>, the tokens issued by Microsoft Entra will carry the bare client ID as theaudclaim, so we only need to add the Application (client) ID of the server app registration.Mcp:ServerUrlis the public URL of our server. We’ll come back to this value in a moment, when we set up the dev tunnel.Mcp:Scopeis the scope we exposed in the server app registration, in the formapi://<client-id>/access_as_user.
Remember to replace <server-client-id> with the actual Application (client) ID of your Customer Data MCP Server app registration.
How the authentication flow works
I won’t go into the full details of the authentication flow, because it’s exactly the same one we described in the previous post: the only difference is that there it was implemented through APIM policies, while here it’s implemented in code. In short, the client calls the server, receives a 401 together with the Protected Resource Metadata document, reads from it which authorization server to talk to and which scope to request, runs the OAuth flow against Microsoft Entra, and finally calls the server again with a valid token. The metadata document also tells the client which resource the token must be requested for, using the resource indicators defined in RFC 8707.
If you want every step of the flow spelled out, head over to the previous post: everything you read there about the OAuth and discovery flow applies here as well.
Exposing the server with a dev tunnel
Our MCP server runs locally on http://localhost:5000, but Microsoft 365 Copilot runs in the cloud and needs a publicly reachable endpoint to call. During development, the simplest way to satisfy this requirement is to expose the local server through a dev tunnel. We create a persistent tunnel, with anonymous access, on a single HTTP port, which gives us a stable public URL in the form https://<tunnel-id>-5000.euw.devtunnels.ms:
| |
To make the day-to-day debugging more convenient, I have also added a Visual Studio Code launch profile which, thanks to a preLaunchTask, first hosts the dev tunnel and then launches the .NET application with the debugger attached. This way, a single F5 starts both the tunnel and the server.
There’s one important detail to keep in mind about the Mcp:ServerUrl setting we saw in the appsettings.json file: its value must match the public URL of the dev tunnel. The reason is that the server uses this value to build the resource identifier it advertises in the Protected Resource Metadata document (it’s the Mcp:ServerUrl value plus the /mcp path). This is what the discovery document ends up looking like:
| |
The client, in turn, uses that same resource value when it requests the token. If the two don’t match, two things can go wrong: the client rejects the metadata, because the advertised resource is different from the URL it actually called, or it ends up with a token issued for the wrong resource, which the server then rejects during validation. The takeaway is to make sure that the Mcp:ServerUrl value always matches the public URL of your tunnel.
Registering the federated connector
Now that we have an authenticated MCP server, reachable from a public URL, we can finally register it as a federated connector. The process is made of three steps: first we register a second application in Microsoft Entra to act as the client, then we register an OAuth connection in the Teams Developer Portal, and finally we create the connector in the Microsoft 365 admin center.
Registering the client application in Microsoft Entra
The second application we need to register represents the client: it’s the identity that the federated connector will use to request the access tokens. We can’t reuse the server app registration for this purpose (we’ll see why in the troubleshooting section), so we need to create a dedicated one.
- Go to the Azure portal and navigate to the App registrations section.
- Click on New registration to create a new application.
- Give it a meaningful name, like Customer Data MCP Client.
- Choose the same supported account types you chose for the server application.
- Click on Register to create the application.
Now move to the Authentication section and click on Add a platform. Choose Web and add the following Redirect URI, which is the one used by Microsoft 365 to receive the authentication response:
| |
Next, we need to authorize this client to call our MCP server. Move to the API permissions section, then:
- Click on Add a permission.
- Choose APIs my organization uses.
- Search for Customer Data MCP Server (the server app registration we created earlier).
- Under What type of permission does your application require?, choose Delegated permissions.
- Under Permissions, check access_as_user and click Add permissions.
The last step is to create a client secret:
- Go to Certificates & secrets.
- Click on New client secret.
- Give it a meaningful name and choose an expiration.
- Copy the value of the secret immediately: once you move away from this page, the secret will be hidden forever.
Finally, go back to the Overview page and take note of the Application (client) ID of this application as well. We’re going to need both the client ID and the secret in the next step.
Make sure not to confuse the two app registrations. From now on, the client ID and the secret we need are the ones of the Customer Data MCP Client application, not the Customer Data MCP Server one we created at the beginning.
Setting up the OAuth connection in the Teams Developer Portal
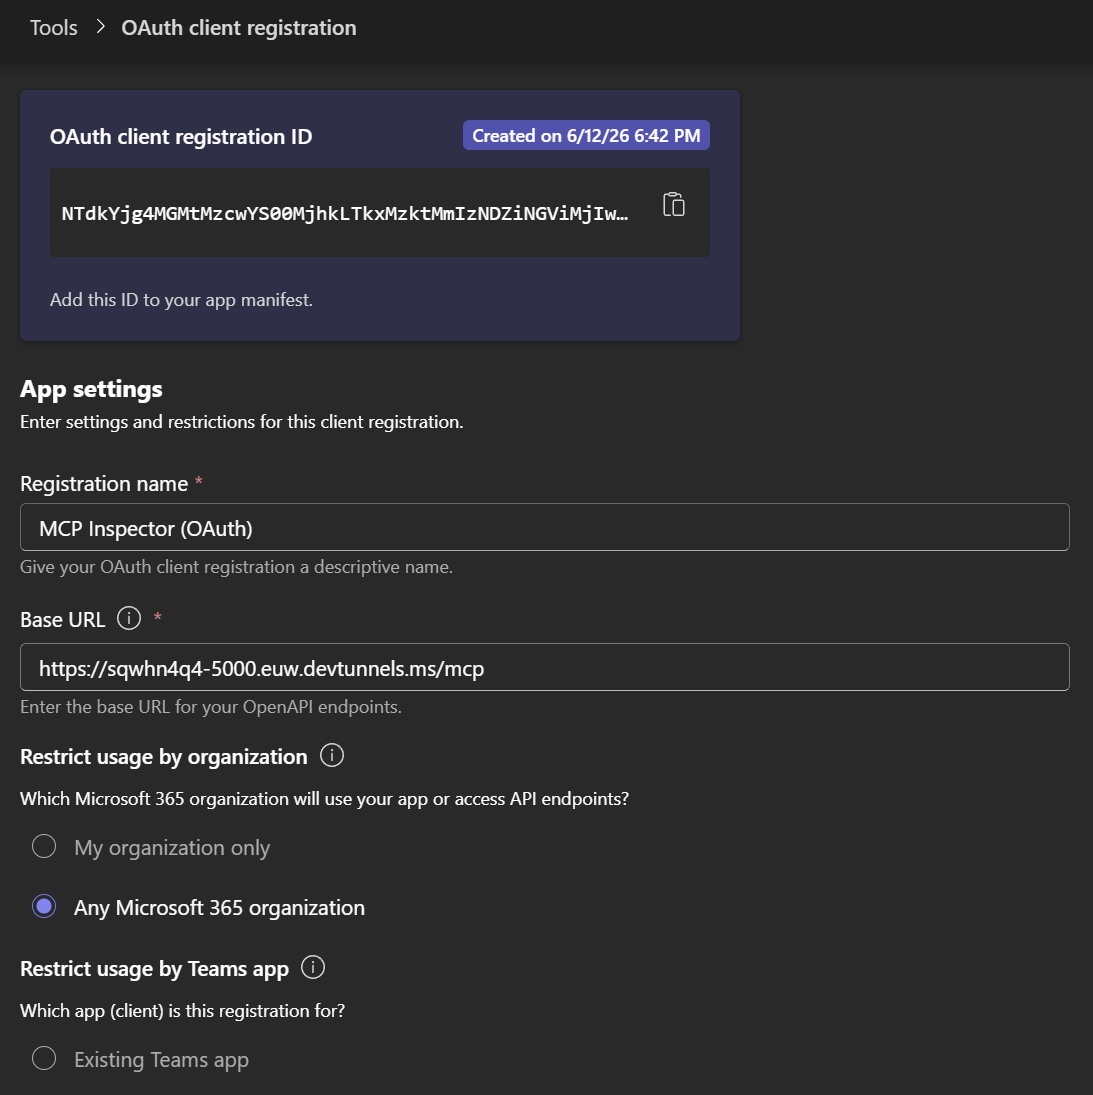
The next step is to describe to Microsoft 365 how it should obtain a token for our server. We do this by registering an OAuth connection in the Teams Developer Portal. Head to the portal and go to Tools → OAuth Client Registration → + New OAuth connection, then fill in the following values:
- Name: a descriptive name, so you can find it later.
- Base URL: the public URL of our MCP server, including the
/mcppath. - Client ID and Client secret: the ones of the Customer Data MCP Client application we registered in the previous step.
- Authorization endpoint:
https://login.microsoftonline.com/organizations/oauth2/v2.0/authorize - Token endpoint:
https://login.microsoftonline.com/organizations/oauth2/v2.0/token - Refresh endpoint:
https://login.microsoftonline.com/organizations/oauth2/v2.0/token - Scope: the scope exposed by the server app registration,
api://<server-client-id>/access_as_user.
Once you save, the portal generates a Reference ID (also called registration ID). Take note of it, because we’ll need it in the next step.
Creating the connector in the Microsoft 365 admin center
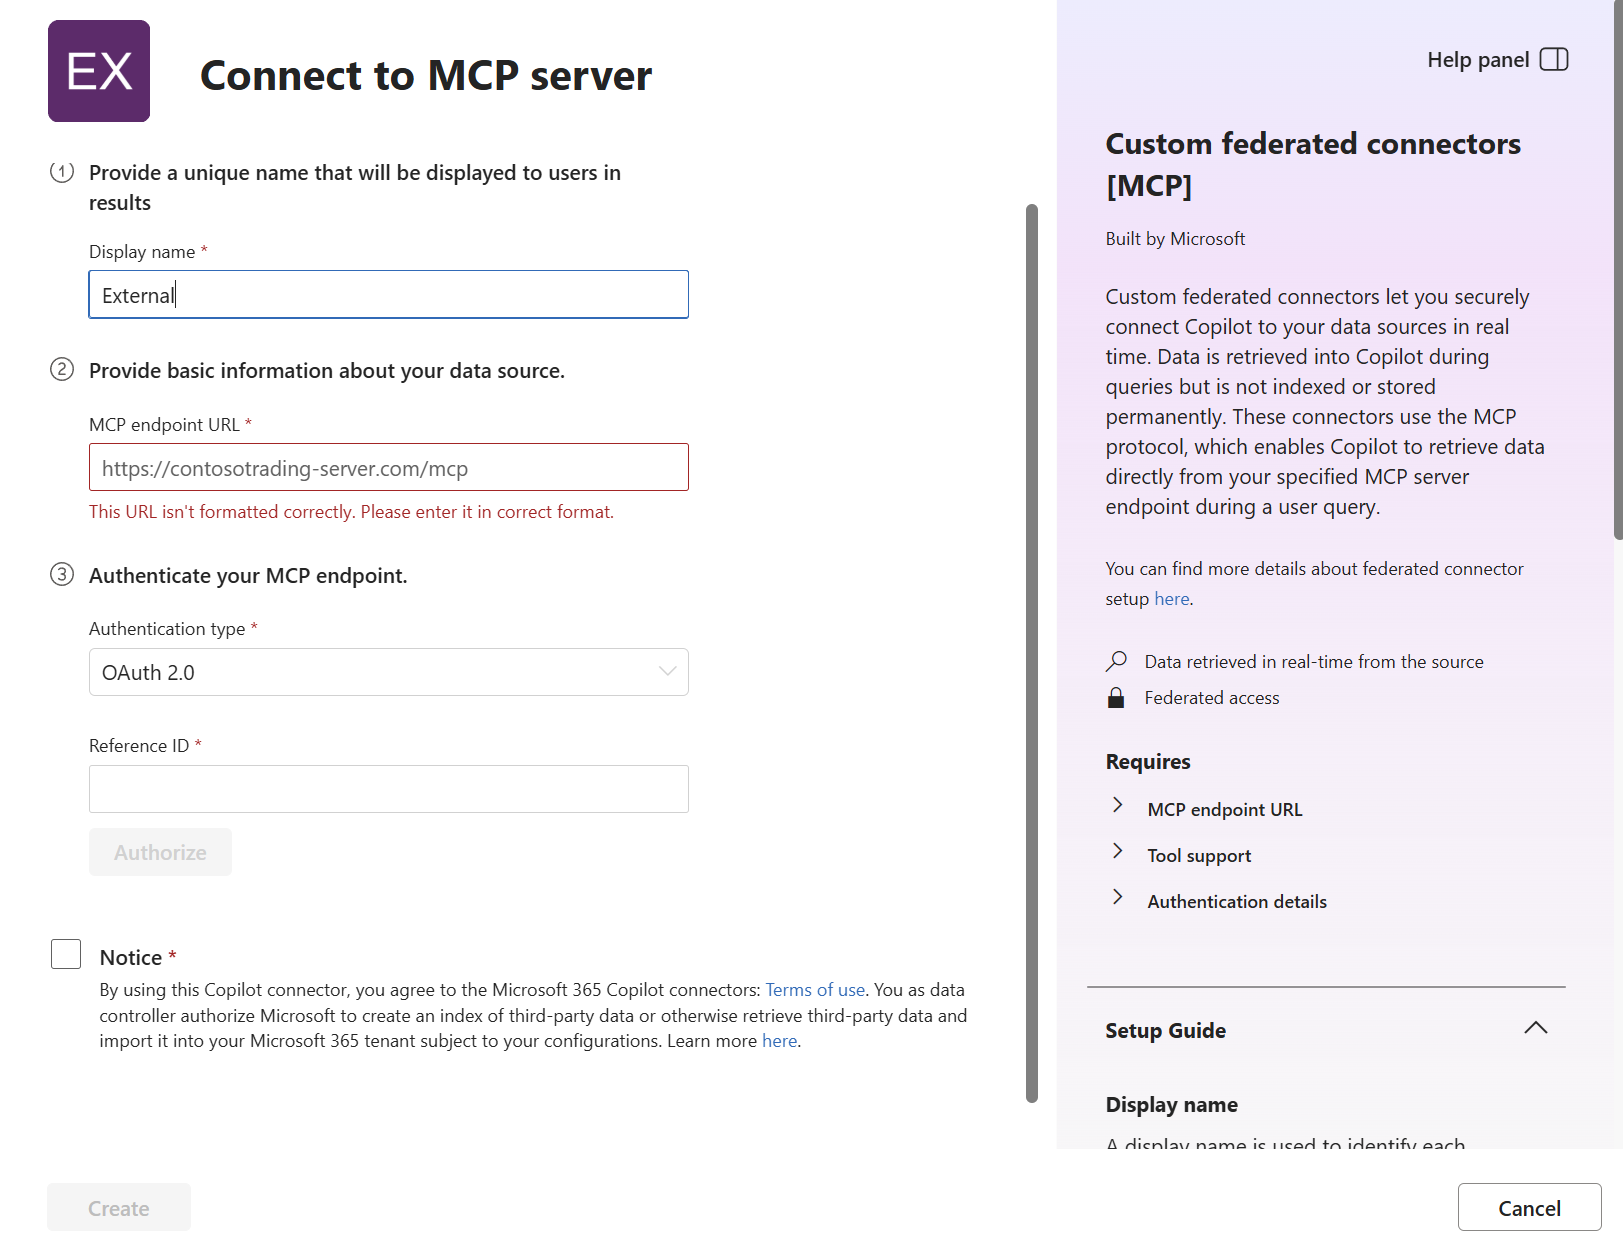
We can now create the actual connector. Open the Microsoft 365 admin center and go to Copilot → Connectors. Move to the Gallery tab and, under Created by your org, choose Create a new connector and click on Add. On the page that opens up, you’ll see two options: choose Connect to MCP server (the other one, Sync from a data source, is the traditional synced connector we mentioned at the beginning) and click on Add.
From here, fill in the following information:
- A Display name for the connector.
- The MCP endpoint URL, which is the public URL of our server, including the
/mcppath. - The Authentication type, which we set to OAuth 2.0 (we’ll see why it has to be OAuth 2.0, and not Entra SSO, in the troubleshooting section below).
- The Reference ID we copied from the Teams Developer Portal.
Then click on Authorize to start the authentication flow and sign in with your Microsoft Entra account. If everything is configured correctly, you’ll see a green checkmark, and you can click on Create to complete the process.
A couple of operational notes before we move on. The changes can take up to about 15 minutes to take effect, so don’t worry if the connector isn’t immediately available. And if you want to be cautious, you can use the staged rollout option to pilot the connector with specific users or groups, before making it available to everyone in the organization.
A gotcha with the Entra SSO authentication type
When I first set up the connector, I didn’t choose OAuth 2.0 as the authentication type, but the other available option: Microsoft Entra SSO. It looked like the most natural choice, since our server is protected with Microsoft Entra. However, I couldn’t get it to work. When I clicked on Authorize, a new tab was opening with the correct authentication prompt, but the wizard would immediately fail, reporting that the authentication flow had been cancelled. Even when I completed the sign-in, I just ended up on a blank page, with nothing happening in the wizard.
After some investigation, I found that two changes were needed to make it work:
- Switch the authentication type from Microsoft Entra SSO to OAuth 2.0 in the Teams Developer Portal.
- Use a dedicated client app registration, instead of reusing the one that protects the MCP server. This is the Customer Data MCP Client registration we created earlier.
Testing the connector in Microsoft 365 Copilot
Now that the connector is registered and authenticated, Microsoft 365 Copilot can call our MCP server live. Let’s see it in action in two different surfaces.
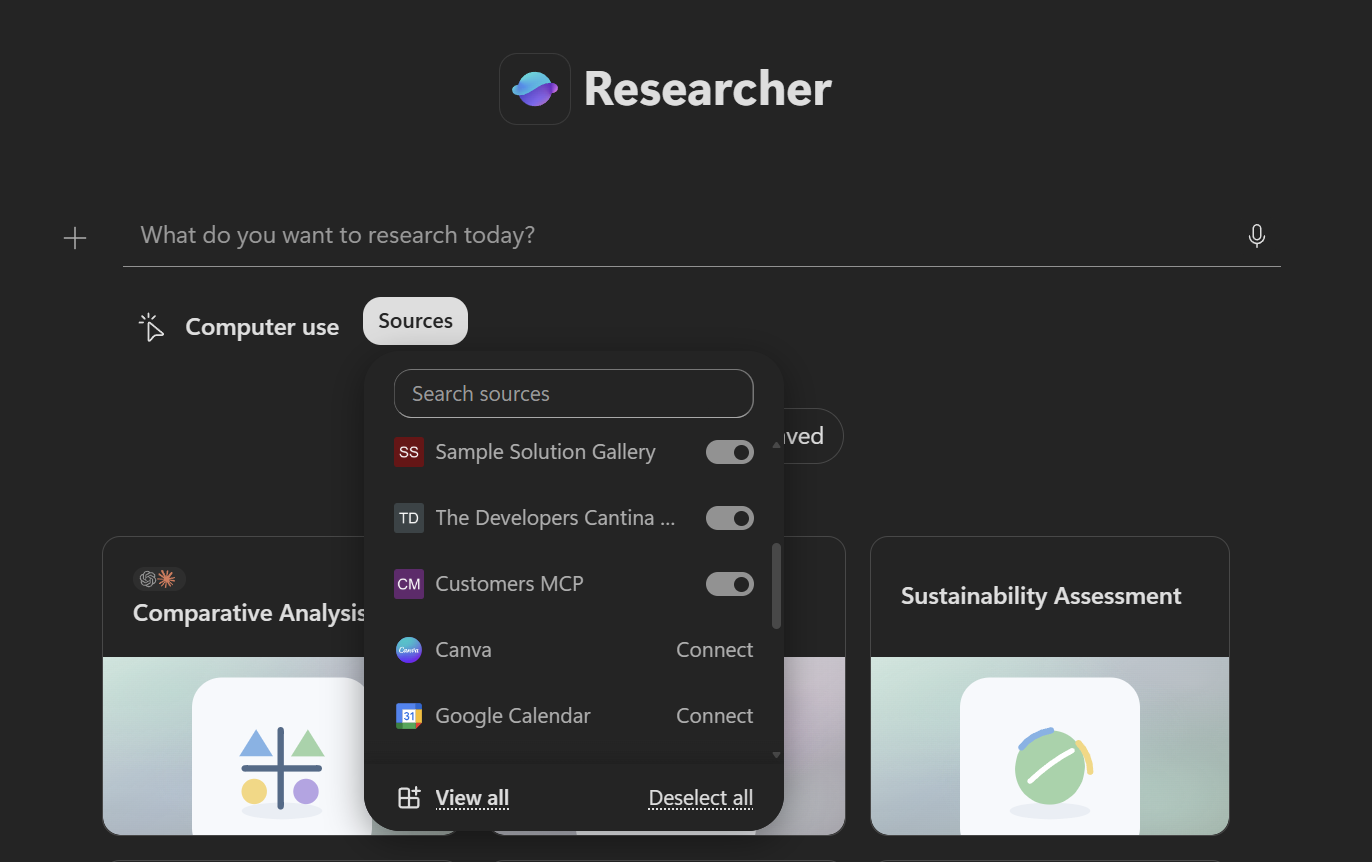
Researcher
In Researcher, our connector shows up as one of the available sources in the Sources panel. After enabling it, you’ll get an authentication prompt the first time, which is exactly the OAuth flow we set up earlier. Once you’re signed in, a prompt like “Generate a report based on the list of customers” makes Researcher reach out to our MCP server and retrieve the list of customers, live from the source.
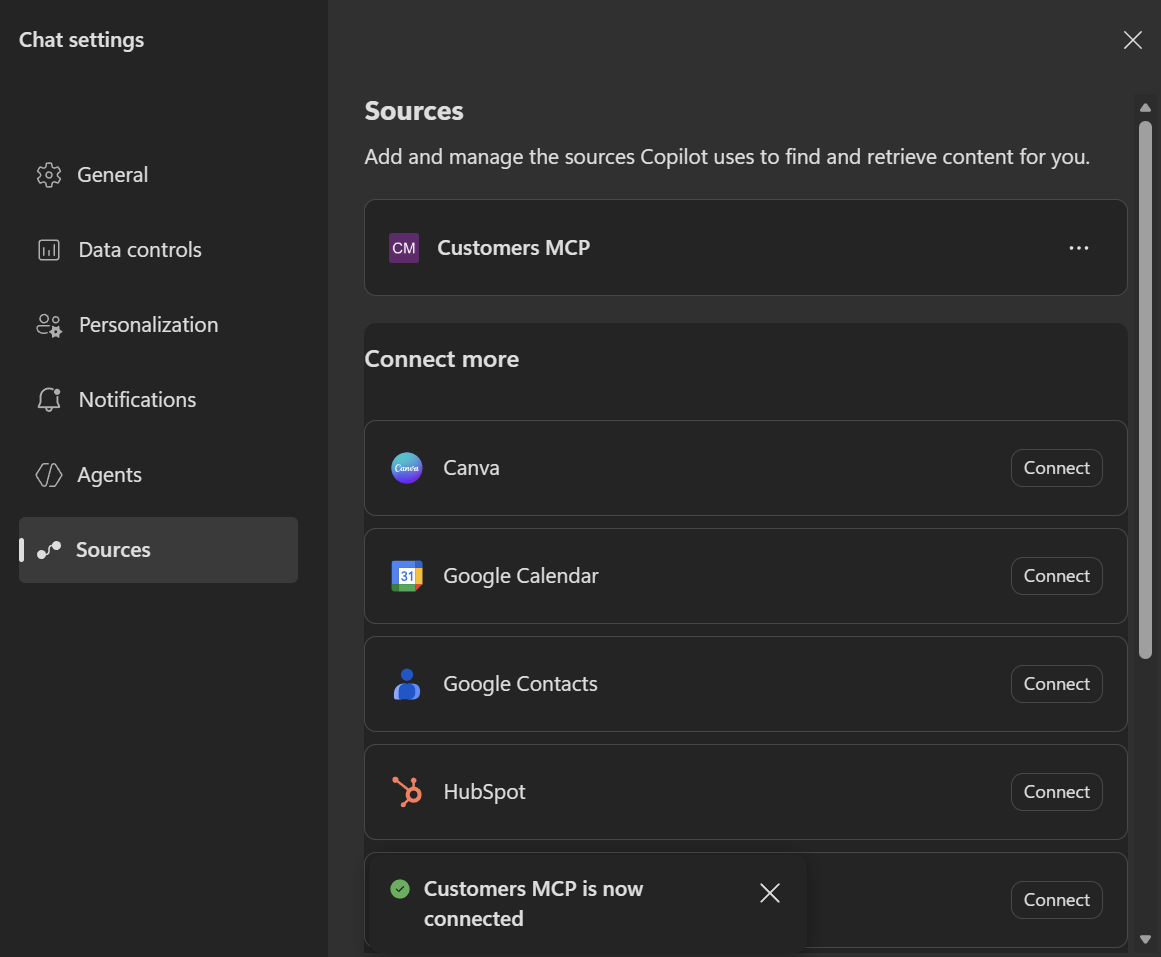
Copilot Chat
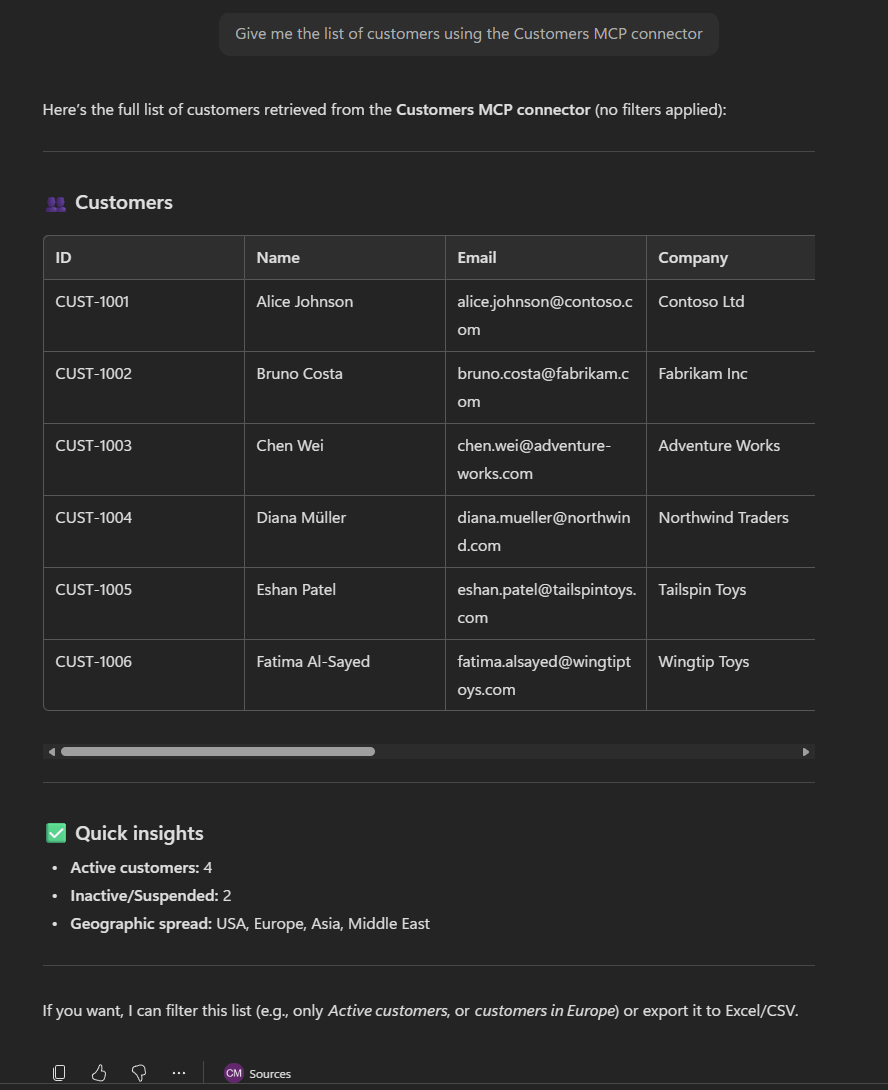
In Copilot Chat, the connector appears under Settings → Sources. After enabling it (again, with an authentication prompt the first time), a prompt that names the source directly, like “Give me a list of customers from Customers MCP”, triggers the connector and returns the data. Naming the source in the prompt is a reliable way to make sure that Copilot routes the request to our connector.
Seeing our own MCP server answer a Copilot prompt with live data is a great result. We did it!
Wrapping up
In this post, we have taken an MCP server we built ourselves and we have turned it into a federated Copilot Connector, so that Researcher and Copilot Chat can query it live, on demand, without ingesting any data into the tenant.
To summarize, here are the steps we went through:
- Registered two applications in Microsoft Entra: one for the MCP server (exposing the
access_as_userscope) and one for the client (with the proper redirect URI, API permission and client secret). - Implemented and configured the authentication in code, using the MCP challenge scheme to advertise the discovery metadata and the JWT bearer scheme to validate the tokens, with all the values wired up in
appsettings.json. - Exposed the server through a dev tunnel, making sure that the
Mcp:ServerUrlvalue matches the public URL. - Registered the federated connector, by creating an OAuth connection in the Teams Developer Portal and then creating the connector in the Microsoft 365 admin center.
- Tested the connector in Researcher and Copilot Chat.
The most important thing to keep in mind is to use the OAuth 2.0 authentication type with a dedicated client application, and to start from the standard api://<client-id> Application ID URI for the server: this keeps the configuration simple and avoids the audience complications we saw in the troubleshooting section.
You can find the complete source code of the MCP server on GitHub. For the official documentation, you can refer to the Set up custom federated connectors article.
Happy coding!