In my previous post, we explored how to build an authenticated MCP server using Microsoft Entra for identity management and Azure API Management to protect our APIs. That implementation worked great, but it had one important limitation: it only supported single-tenant authentication. This means that only users from the same organization where the app registration was created could access the MCP server.
While single-tenant authentication is perfectly fine for internal applications, there are many scenarios where you need to enable access to users from different organizations. For example, imagine you’re building an MCP server as an ISV that you want to offer to multiple customers. In these cases, requiring each user to create their own app registration becomes impractical and creates unnecessary friction.
In this post, we’re going to explore how to enable multi-tenant authentication for our MCP server. The good news is that the changes we need to make are surprisingly straightforward—they’re all in the Azure configuration, with no code changes required. However, knowing exactly which settings to change isn’t always obvious, so let’s walk through the process step by step.
Understanding the challenge
Before we dive into the configuration changes, it’s important to understand what we’re trying to solve. In the single-tenant setup from the previous post, both our app registrations (the API and the client) were configured to accept “Accounts in this organizational directory only.” This means that when Microsoft Entra validates an access token, it checks that the user belongs to the same tenant where the app was registered.
For multi-tenant scenarios, we need to make a few key changes:
- Configure both app registrations to accept accounts from any organizational directory
- Update the APIM policies to use the
commonendpoint instead of a specific tenant ID - Add explicit client application IDs to the token validation policy
- Update the OAuth metadata endpoint to point to the multi-tenant endpoints
The beauty of this approach is that all these changes happen at the infrastructure level. Our .NET MCP server code doesn’t need to change at all, since authentication is handled entirely by APIM.
Let’s get started!
Updating the app registrations
The first step is to update both app registrations to support multi-tenant authentication. We need to modify both the API app registration (Flights MCP Server) and the client app registration (Flights MCP Client).
Updating the Flights MCP Server API app registration
Let’s start with the API app registration. Navigate to the Azure portal and go to the App registrations section. Find the Flights MCP Server app registration we created in the previous post.
- Click on the app registration to open its details
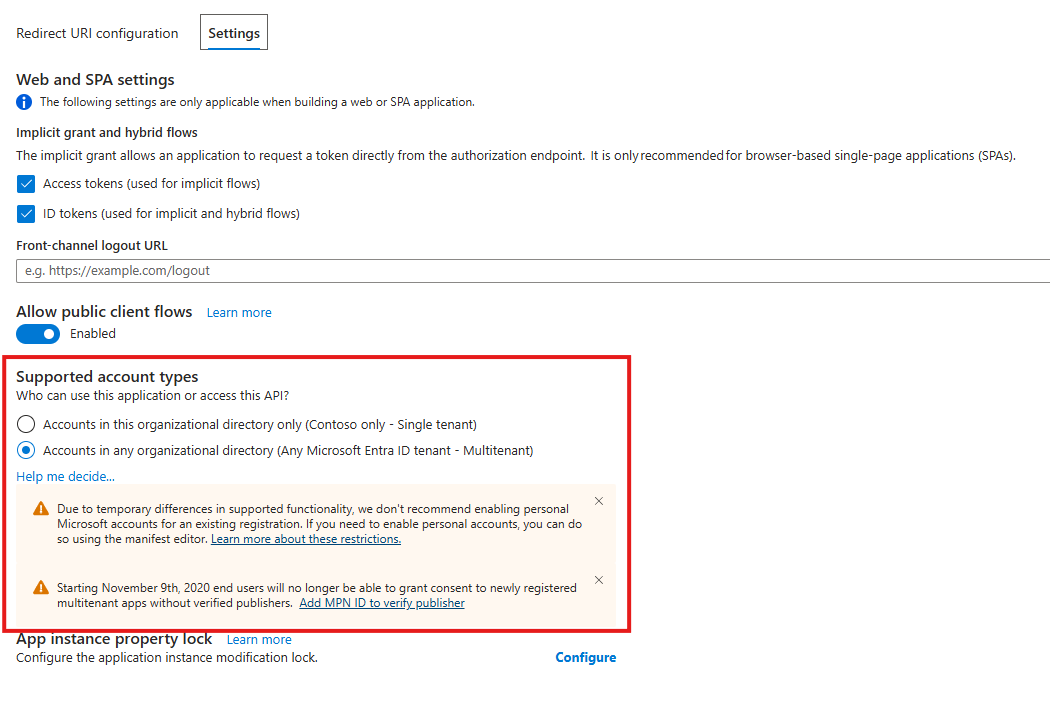
- In the left menu, click on Authentication and move to the Settings tab
- Under Supported account types, change the selection from Accounts in this organizational directory only to Accounts in any organizational directory (Any Microsoft Entra directory - Multitenant)
- Click Save to apply the changes
That’s it for the API app registration! Notice that we didn’t need to change anything else. The Application ID URI (api://your-client-id), the access_as_user scope, and all other settings remain exactly the same.
Updating the Flights MCP Client app registration
Now we need to make the same change to the client app registration. Still in the App registrations section, find the Flights MCP Client app registration.
- Click on the app registration to open its details
- In the left menu, click on Authentication and move to the Settings tab
- Under Supported account types, change the selection to Accounts in any organizational directory (Any Microsoft Entra directory - Multitenant)
- Click Save to apply the changes
Again, the redirect URIs (https://vscode.dev/redirect and http://127.0.0.1:33418) and the API permissions (access_as_user from the Flights MCP Server API) remain unchanged.
Now that both app registrations are configured for multi-tenant support, we can move to the APIM configuration changes.
Updating the APIM token validation policy
The next step is to update the APIM policy that validates access tokens. This is where we need to make two important changes: switching to the common tenant ID and adding explicit client application IDs.
Navigate to your APIM instance in the Azure portal, then:
- Click on APIs in the left menu
- Select the API that was created for your MCP server
- Click on the Design tab
- Select All operations
- In the Inbound processing section, click on the policy editor icon (the
</>symbol)
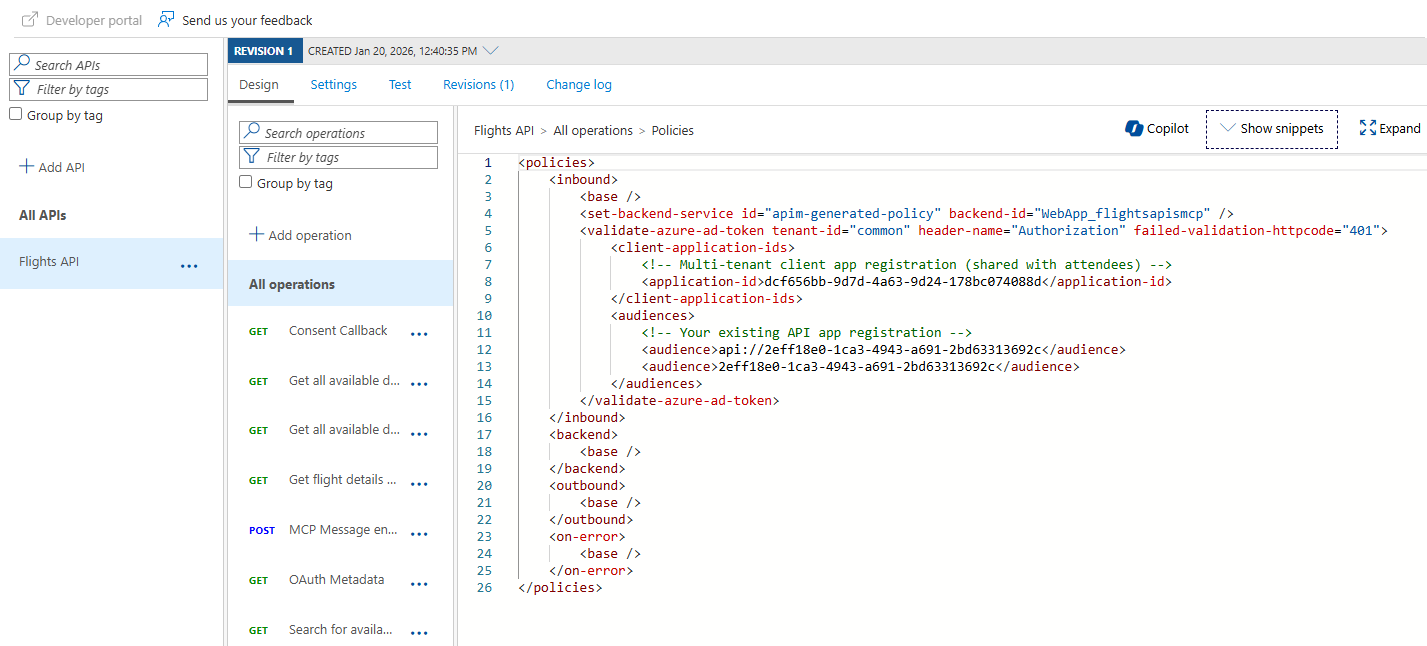
You should see the existing policy that we created in the previous post. Now we need to modify the <validate-azure-ad-token> element. Here’s what the updated policy looks like:
| |
Let’s break down the two key changes:
Using the common tenant ID
The first change is replacing the specific tenant ID with common:
| |
The common endpoint is a special Microsoft Entra endpoint that accepts users from any organizational directory. When a user authenticates, Microsoft Entra will validate their credentials against their home tenant, but the token validation will work for any tenant.
Adding client application IDs
The second change is the addition of the <client-application-ids> section:
| |
This is a critical piece that isn’t immediately obvious. When using multi-tenant authentication, you need to explicitly specify which client applications are allowed to call your API. Replace your-client-app-id with the Application (client) ID of your Flights MCP Client app registration.
This is what enables the ISV scenario I mentioned earlier: you create one multi-tenant client app registration, and then you can share its client ID with all workshop attendees. They don’t need to create their own app registrations, they simply use the one you provide, and they authenticate with their own credentials from their own tenant.
Remember to replace your-api-app-id with the actual Application (client) ID of your Flights MCP Server app registration.
Updating the OAuth metadata endpoint
You might remember that, in the previous post, we have added to our MCP server a special endpoint, /.well-known/oauth-authorization-server. This endpoint is used by clients (like Visual Studio Code) to discover the authorization and token endpoints they need to use for authentication. Now we need to update the OAuth metadata endpoint that we configured in the previous post to support a multi-tenant scenario.
Still in the APIM Design tab:
- Find the operation called OAuth 2.0 Authorization Server Metadata (the one at
/.well-known/oauth-authorization-server) - Click on it to select it
- In the Inbound processing section, click on the policy editor icon
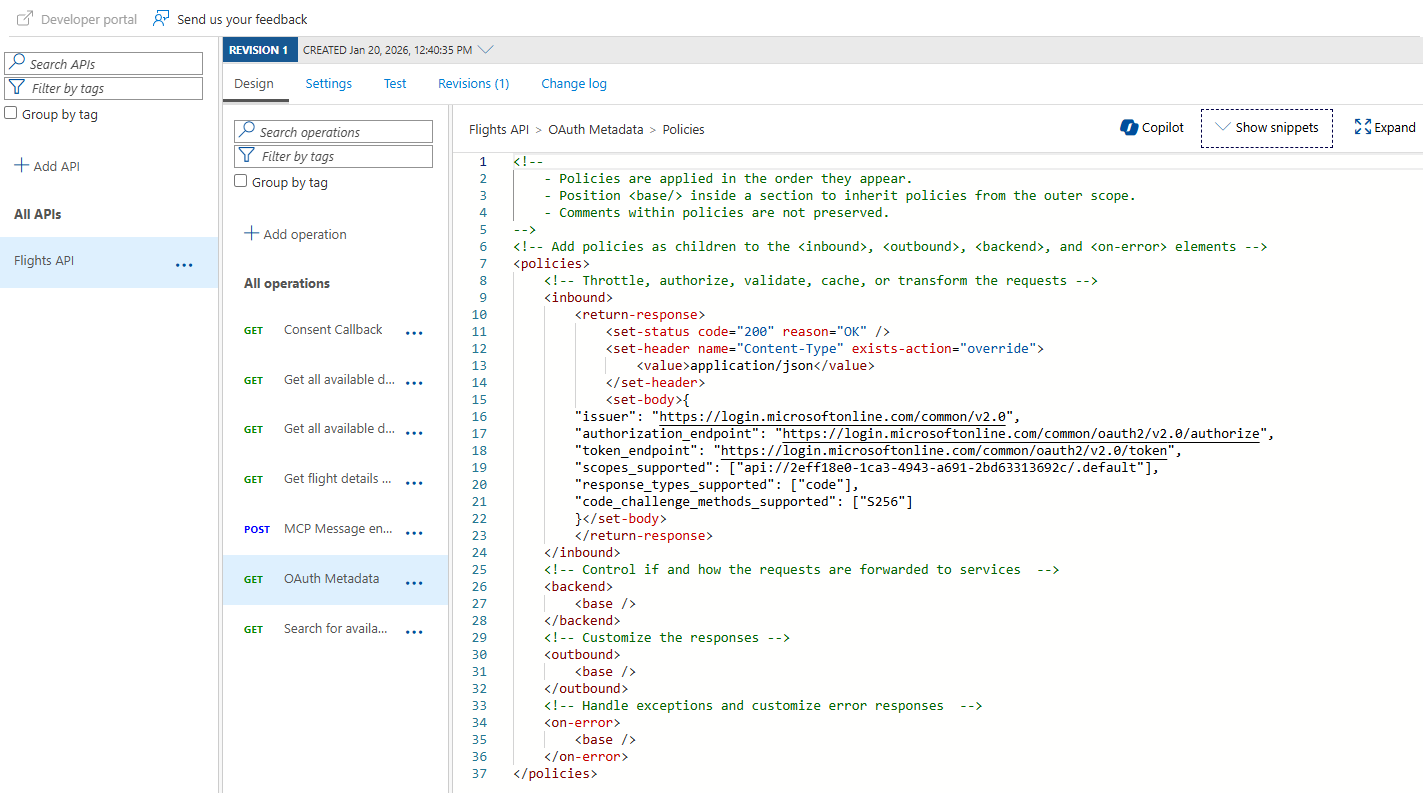
You’ll see the policy that returns the OAuth metadata. We need to update all the URLs to use common instead of the specific tenant ID. Here’s the updated policy:
| |
Notice how all three endpoints (issuer, authorization_endpoint, and token_endpoint) now use common instead of a specific tenant ID. The scopes_supported array remains unchanged, it still references your API app registration.
Remember to replace your-api-app-id with the actual Application (client) ID of your Flights MCP Server app registration.
That’s it! Your APIM configuration is now ready for multi-tenant authentication.
Testing the multi-tenant setup
Now comes the moment of truth: testing that our multi-tenant configuration actually works. The best way to do this is to test with a user from a different tenant than the one where you created the app registrations.
Testing with the original tenant
Before testing with a different tenant, I recommend first verifying that your original setup still works. This is an important regression test! You want to make sure that users from your own tenant can still authenticate successfully.
Open Visual Studio Code and configure the mcp.json file to point to your APIM endpoint, just like you did in the previous post. When you start the MCP server connection, you should be prompted to authenticate. Log in with your original credentials (from the tenant where the app registrations were created), and verify that everything still works as expected. You should be able to still see, from the toolbar, that the MCP server is running and that there 4 tools available. You could also ask GitHub Copilot to find flights just like before.
Testing with a different tenant
Now for the real test: authenticating with a user from a different tenant. If you don’t have one and you are eligible, you can create a free Microsoft 365 developer tenant for testing purposes.
Here’s an important tip: Visual Studio Code caches authentication credentials, and I didn’t find an easy way to clear them without completely resetting the storage. For testing, I recommend using Visual Studio Code Insiders as a separate installation or a separate PC with another Visual Studio Code installation. This way, you can test the multi-tenant flow without interfering with your existing VS Code setup.
If, by any chance, you want to clear the cached credentials in your existing VS Code installation, you can delete the files states.vscbd and states.vscdb.backup located in:
- For VS Code: the
%APPDATA%\Code\User\globalStorage\folder on Windows - For VS Code Insiders: the
%APPDATA%\Code - Insiders\User\globalStorage\folder on Windows
Deleting these files will completely reset the VS Code configuration, including extensions, customizations, and settings. This is why I suggest using a separate installation for testing.
When you try to connect to the MCP server with a user from the new tenant:
- Visual Studio Code will prompt you for the client ID. Provide the Application (client) ID of your Flights MCP Client app registration
- When asked for a secret, just leave it empty and press Enter (since we’re using a public client)
- You’ll be redirected to the Microsoft Entra login page. Login with an account from your different tenant.
- After logging in, you’ll see a consent screen asking for permission to access the Flights MCP Server API
- Click Accept to grant consent
This consent step happens only the first time a user from a new tenant authenticates. Because we configured the access_as_user scope to allow user consent (not just admin consent), regular users can grant this permission themselves, with no admin involvement needed.
After consenting, you should see the MCP server connection established successfully. Try asking GitHub Copilot to find flights from New York to London, just like in the previous post. If everything works, you’ve successfully enabled multi-tenant authentication!
Troubleshooting tips
As I was implementing this multi-tenant setup, I ran into a few issues that might help you if you encounter similar problems.
Token validation errors
The most common error I encountered was a 404 (content not found) when trying to call the API. This wasn’t very helpful, as it didn’t clearly indicate that the problem was with token validation.
What really helped me troubleshoot was using the Azure CLI to generate a valid bearer token and then testing it directly in APIM. Here’s the command I used:
| |
Replace your-api-app-id with the actual Application (client) ID of your Flights MCP Server app registration. This command will return a bearer token that you can use for testing.
Once you have the token, go to your APIM instance in the Azure portal:
- Navigate to APIs and select your MCP server API
- Click on the Test tab
- Select the
/mcpendpoint - In the HTTP Request section, add an Authorization header with the value
Bearer YOUR_TOKEN_HERE(replaceYOUR_TOKEN_HEREwith the token from the CLI command) - Execute the test by pressing the Trace button
The operation will fail anyway because we aren’t supplying valid MCP parameters, but the Trace output will show you detailed information about the token validation process, so you can diagnose what’s going wrong. For example, during one of my tests, I discovered that the audience claim in the token wasn’t matching what the policy expected. Without the trace output, I would have been completely lost.
Security considerations
Before you implement multi-tenant authentication, it’s important to understand the security implications. With the configuration we just implemented, any user with a valid Microsoft Entra ID from any organization can authenticate and access your MCP server.
For my scenario (delivering a workshop where attendees are required to connect my protected MCP server from their own tenant), this is exactly what I wanted. I don’t know in advance which tenants my attendees will come from, so I need to accept any organizational account. However, this might not be appropriate for all scenarios.
I recommend reviewing the Azure Architecture Center’s guide on multi-tenancy with API Management for more detailed security considerations and best practices.
Wrapping up
In this post, we’ve learned how to enable multi-tenant authentication for MCP servers using Microsoft Entra and Azure API Management. The changes we made were surprisingly simple—just a few configuration updates in the app registrations and APIM policies—but they unlock powerful scenarios for sharing your MCP servers with users from different organizations.
To summarize, here are the four key changes needed to move from single-tenant to multi-tenant:
- Update both app registrations (API and client) to support “Accounts in any organizational directory”
- Modify the APIM token validation policy to use
tenant-id="common"and add the<client-application-ids>section - Update the OAuth metadata endpoint to use
commonin all URLs - No code changes required in your .NET MCP server
This multi-tenant setup is perfect for scenarios like workshops, where you want to minimize friction for attendees, or for ISVs who want to offer their MCP servers as a service to multiple customers. Users from different organizations can all use the same shared client ID, and they authenticate with their own credentials from their own tenants.
The complete source code for the MCP server is still available in the same GitHub repository we used in the previous post—remember, the code itself didn’t change at all!
Happy coding!