The post has been updated on 29th January 2026 to include additional APIM endpoints which are required to be fully compliant with the MCP Streamable HTTP protocol specifications.
We have talked multiple times about Model-Context-Protocol (MCP) in this blog. It’s been a while since the last time I wrote about it, but in the meantime the interest and growth around MCP has been steadily increasing. More and more companies are adopting MCP as a standard for exposing their services to AI applications.
As MCP grew, one of the aspects that has become increasingly important is authentication and authorization. Over the past months, we built a few sample MCP servers but, for simplicity, we didn’t include any authentication mechanism. However, in a production scenario, it’s crucial to ensure that only authorized clients can access the MCP services. When our MCP server is exposing sensitive data or tools, we need to ensure only authorized users and agents can access them.
In this post, we’re going to explore how to build an authenticated MCP server using Microsoft Entra for identity management. Microsoft Entra provides a robust and scalable solution for managing identities and access, making it an excellent choice for securing our MCP server. Then, later in the series, we’ll look at how we can leverage this setup in Microsoft 365 Copilot, both with declarative agents (which recently added support for MCP servers) and Copilot Studio.
We’re going to use .NET to implement our MCP server, Azure App Service to host it and Azure API Management to easily enable authentication using Microsoft Entra. While we could add authentication directly to our .NET application, using Azure API Management provides several advantages: centralized authentication across multiple APIs, built-in rate limiting, and the ability to manage authentication policies without redeploying code
For the sake of this demo, we’re going to build a Flights MCP server, which exposes flight information to clients. Agents can use this MCP server to get information about available flights, routes, airports, etc. For the sake of simplicity, however, we won’t return real-time flight information, but just mock data that will be embedded in the server itself.
Let’s get started!
Setting up the MCP server project
I won’t spend too much time on the basic setup of the .NET project, since we already covered it when we talked about building a MCP server for Copilot Studio. Even if that post is a bit old, the steps are still valid and the SDK still works in the same way when it comes to build a MCP server which uses HTTP as a transport protocol. Since that post, the default MCP protocol for remote servers changed from SSE to Streamable HTTP, but the .NET SDK abstracts this detail: now, when you set up the MCP server using the HTTP transport, it will use Streamable HTTP by default.Streamable HTTP allows the server to send responses incrementally using chunked transfer encoding, which is ideal for long-running agent operations that need to stream results back to the client
The first step is to create a new ASP.NET Core Web API project. You can do this using the .NET CLI:qdvbv
| |
Next, we need to add the necessary NuGet packages for MCP. You can do this by running the following commands:
| |
Now we can start building the code needed to search and retrieve flight information
FlightService.cs
This class implements the logic that is used by the MCP service to return flight information. The service offers 4 methods:
| |
For the sake of simplicity, the flight data is loaded from a JSON file which is included in the project. Here is how a sample flight looks like:
| |
This JSON data is mapped with an equivalent C# class called FlightData:
| |
The four methods of the service are implemented simply by filtering and searching the in-memory list of flights. For example, this is how the SearchFlights method is implemented:
| |
This method is taking a FlightSearchRequest object as input, which contains the search criteria (origin, destination, date, etc.), and returns a list of Flight objects that match the criteria.
The other methods follows the same pattern, so I won’t include them here. You can find the full code of the FlightService class in the GitHub repository.
FlightsTool.cs
Now that we have the FlightService class implemented, we can take advantage of the .NET MCP SDK to expose the methods we built as MCP tools. Since we have implemented all the flight search logic in the FlightService class, our MCP tools will simply need to call the corresponding methods. However, we need to wrap them with some special attributes provided by the .NET SDK to explain, using natural language, the role of the tool and its parameters. This is a critical step, since these information will be used by the LLMs to understand how to use the tools.
The first attribute is the [McpServerToolType] one, which we need to apply to the entire class, as shown below:
| |
To use the FlightService inside the MCP tools, we inject it through the constructor. The .NET dependency injection system will take care of providing an instance of the FlightService when the MCP server is started.
Now we need to start adding the tool methods. Each method needs to be decorated with the [McpServerTool] attribute, then we’re going to use the [Description] attribute to provide a natural language description of the tool and the input parameters. For example, this is how we expose the SearchFlights() method that we implemented as an MCP tool:
| |
As you can see, we are simply creating a new FlightSearchRequest object using the input parameters, then we call the SearchFlights() method of the FlightService class and return the results.
However, the attributes we have added describe in details the role of the tool and its parameters: it’s used to search flights given a series of parameters; some of them are optional; the origin parameter can be an airport code or a city name; the departure date should be in a specific format, etc.
Again, like for the FlightService class, the other tool methods follow the same pattern, so I won’t include them here. You can find the full code of the FlightsTool class in the GitHub repository.
Program.cs
Finally, to turn our ASP.NET Web API project into an MCP server, we need to modify the Program.cs file to set up the MCP server and register our tools. The first step is to register in the dependency injection system the FlightService class, so that it can be injected into the FlightsTool class:
| |
Next, we need to add the MCP server to the ASP.NET pipeline and register our FlightsTool class as an MCP tool:
| |
Please notice an important part of the registration: we must specify the transport protocol, in this HTTP, using the WithHttpTransport() method. This is crucial, especially when we want to enable authentication, since the authentication middleware will be applied to HTTP requests. It’s important for us also because, at some point, our goal will be to use this MCP server with platforms like Microsoft 365 Copilot and Copilot Studio, which supports only HTTP transport for remote MCP servers.
Finally, we need to expose the MCP server endpoint in the ASP.NET pipeline:
| |
This means that our MCP server will be available at the /mcp endpoint of our ASP.NET Web API.
That’s it! Now we have a basic implementation of the MCP server. If you want, you can easily test it with Visual Studio Code with GitHub Copilot:
Press F5 in Visual Studio or Visual Studio Code to run the server locally.
In Visual Studio Code, open the GitHub Copilot panel and, in the chat interface, set the conversation type to be “Agent”.
Click on the Tools icon in the same box.
When the command palette opens up, you will find three icons in the Configure Tools toolbar. Click on the first one, with the MCP logo, which tooltip is Add MCP Server.
Choose HTTP as the transport protocol and enter
http://localhost:5213/mcpas the MCP server URL. This step will create a mcp.json file with the following entry:1 2 3 4"flights-mcp": { "url": "http://localhost:5213/mcp", "type": "http" }You should see a toolbar displayed over the name of the MCP server. Click Start, after a few seconds you should see that the server is running and that there are 4 tools available.
You can test that the MCP server is really working as expecting by ask to GitHub Copilot a question like:
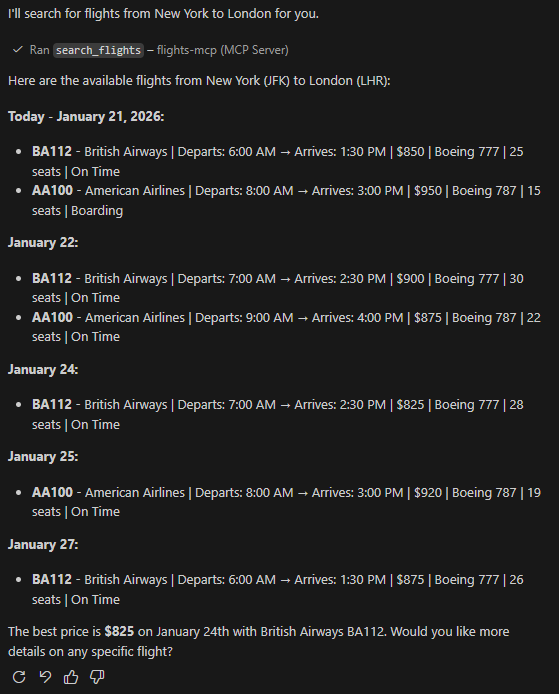
1Find me flights from New York to LondonIf everything works correctly, the agent will realize that it needs to use the Flights MCP server to complete the task, so it will ask the permission to connect to it. Once you approve, you will see a list of flights which matches what we have in the mock data of our MCP server.
Adding OpenAPI support
The next step is to add an OpenAPI definition for our MCP server. This is needed because Azure API Management requires an OpenAPI definition to understand our API surface. Since we’ll use APIM to enable authentication, having this definition is crucial. .NET has a few packages and helper that greatly simplifies the generation of OpenAPI definitions, so we can take advantage of them, but we’ll need to supply anyway a custom implementation. This is because the .NET helpers are able to automatically generate OpenAPI definitions only for standard HTTP operations (GET, POST, etc.), but MCP servers use a single endpoint that exposes multiple tools, so we need to manually describe the tools in the OpenAPI definition.
First, let’s add the necessary NuGet packages:
| |
Then, inside the Program.cs file, we need to add the following code before builder.Build() is called:
| |
This code is a bit verbose, but it simply adds an OpenAPI document transformer that customizes the OpenAPI definition for our MCP server. It adds a new path for the /mcp endpoint and describes the available tools and their parameters.
The code addresses also a compatibility issue. Azure API Management doesn’t support OpenAPI 3.1 type arrays (like ["integer", "string"]), which the .NET OpenAPI generator sometimes creates for query parameters. We need to add a schema transformer to convert these type arrays to single types
Now, if we run our MCP server locally, we’ll be able to see the OpenAPI definition at http://localhost:5213/openapi/v1.json.
Publish the MCP server to Azure App Service
Let’s publish now our MCP server to Azure App Service. This is the first deployment step before we can enable authentication using Azure API Management. Open the Azure portal and create a new Azure App Service instance:
- Click on Create a resource and search for Web App, then click on Create.
- Choose your subscription and create a dedicated resource group (for example, rg-flights-mcp)
- Give it a meaningful name
- Choose Code as publish target
- Pick .NET 10 (LTS) as runtime stack
- Choose Linux as Operating System
- Choose a region close to you
- Under Pricing plans, pick an existing App Service plan you might already have or create a new one. For testing purposes, the free tier (F1) should be enough.
Once the App Service is created, we can publish our MCP server to it. You can do this directly from Visual Studio Code:
- Right-click on an empty space in the Explorer panel and select Deploy to Web App…
- Log-in with your Azure account if prompted
- Select the subscription where you created the App Service
- Select the App Service you just created
- Confirm that you want to deploy the project (this will overwrite any existing content in the App Service)
- Wait for the deployment to complete
Now that the project is deployed, we can test it by navigating to https://<your-app-service-name>.azurewebsites.net/mcp in the browser. You can find the URL in the main page of your Azure App Service in the Azure portal.
You should see the following message:
| |
This is good news! It means that our MCP server is up and running. The error message is expected because the /mcp endpoint requires a valid MCP session to be established through a POST request with the appropriate headers. We need a valid MCP client to test it properly.
The easiest way to test it is to use, again, Visual Studio Code with the GitHub Copilot extension. Go back to the mcp.json file that was previously created and replace the localhost URL with the URL of your Azure App Service, so that it looks like this:
| |
If you press the Start link which is displayed over the MCP server entry, you should see after a few seconds that the server is properly running and that there are 4 tools available.
If you click on the tools icon in GitHub Copilot chat box, you’ll find the flights-mcp server in the list and, if you expand it, you’ll see the 4 tools, which are matching the 4 methods we exposed in the FlightsTool class.

Finally, if you really want to be sure that the MCP server is working correctly, you can try to ask the same question:
| |
GitHub Copilot will realize that it needs to use the Flights MCP server to complete the task, so it will ask the permission to connect to use the search_flight tool.
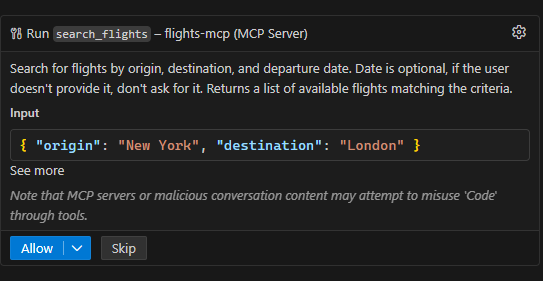
After pressing Allow, you will get a list of flights matching the criteria.
Securing the MCP server with Microsoft Entra
It’s now time to secure the MPC server using Microsoft Entra. The first step is to register our MCP server as an application in Microsoft Entra. This will allow us to manage the authentication and authorization for our MCP server.
- Go to the Azure portal and navigate to the App registrations section.
- Click on New registration to create a new application.
- Give it a meaningful name, like Flights MCP Server.
- Choose the appropriate supported account types. For this demo, we’ll choose Accounts in this organizational directory only, but you make the application also multi-tenant if you want to allow users from other organizations to access it.
- Click on Register to create the application.
Now we have to tweak a few things.
Expose an API
Next, we need to expose an API for our MCP server application. This will allow clients to request access tokens to call our MCP server. Click on the Expose an API section in the left menu, then click on Add a scope. In the dialog that opens up, we need to set the following values:
- Scope name:
access_as_user - Who can consent?: choose Admins and users
- Admin consent display name: set Access Flights MCP Server
- Admin consent description: set Allows the app to access the Flights MCP Server on behalf of the signed-in user.
- User consent display name: set Access Flights MCP Server
- User consent description: set Allows the app to access the Flights MCP Server on your behalf.
- State: Enabled
Then click on Add scope to create the scope.
Now, under Application ID URI, click on Add a URI and set it to api://<client-id>, where <client-id> is the Application (client) ID of your MCP server application. This will be used as the audience (aud) claim in the access tokens. By default, it will be automatically set with the proper client id of this application.
Protecting the MCP server with Azure API Management
We’re going to leverage Azure API Management (APIM) as a way to easily enable authentication using Microsoft Entra. APIM provides a simple way to add an authentication layer in front of our MCP server without having to modify the server code itself. Additionally, we can easily expose the endpoints we need to manage the full Entra authentication flow.
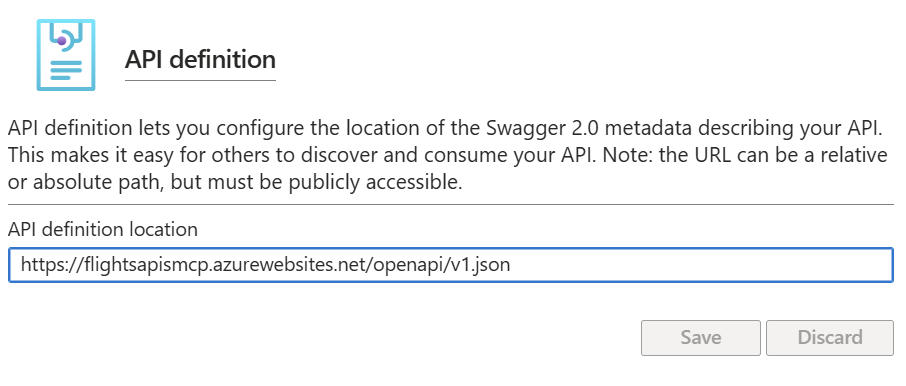
As the first step, go to your Azure App Service and head to the section API -> API definition.
In the API definition location field, you need to provide the URL of the OpenAPI definition we created earlier. This is available at https://<your-app-service-name>.azurewebsites.net/openapi/v1.json.
Now go to the section API -> API Management. Under API Management, click on Create new and move forward with the creation of a new API Management instance. You can choose the free tier (Developer) for testing purposes.
Once the APIM instance is created, select it under the API Management section of your Azure App Service. Under API, leave the Create New option and make sure to check the option Use OpenAPI specification.
The Azure portal will create a new APIM configuration with the APIs described in the OpenAPI definition. However, we need to tweak a few things to enable authentication.
To double check that you did everything correctly, go to the APIM instance you just created and click on the APIs section in the left menu. Click on the API that was created and move to the Design tab. You should see the /mcp endpoint listed there.
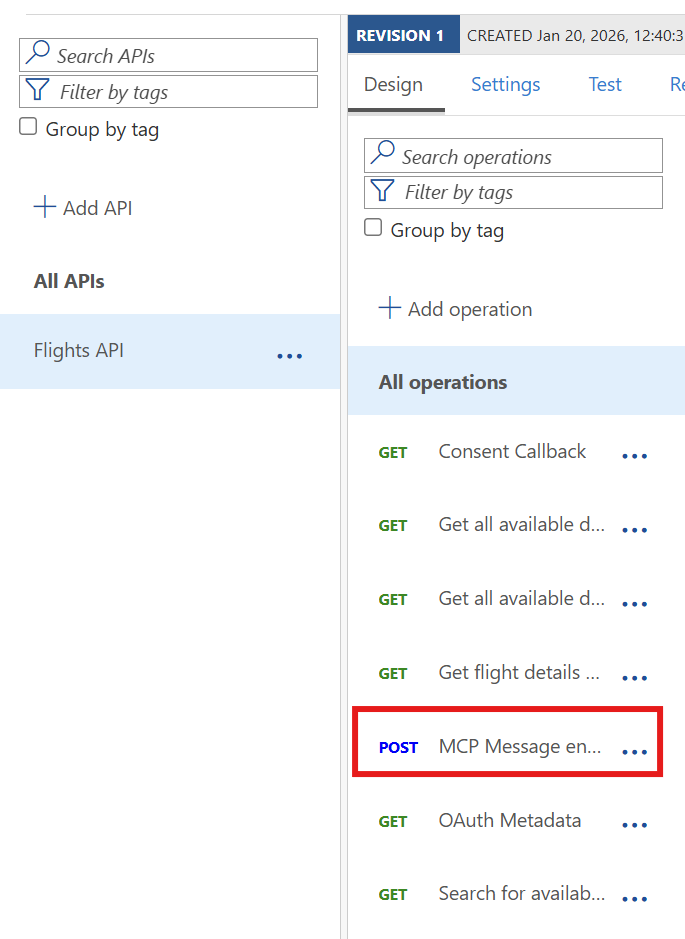
In the screenshot above, you can see other endpoints than the
/mcpone. This is because the sample server published on GitHub exposes the same MCP functionality both through the MCP protocol and through standard REST endpoints. In your case, you should see only the/mcpendpoint.
Validating the Entra tokens
The first step is to add a policy to validate the access tokens issued by Microsoft Entra. This will make sure that, if the request doesn’t have a valid token, it will be rejected. To do this, go to the APIs section of your APIM instance, then select the API that was created for your MCP server. Click on the Design tab, then select the All operations option.
APIM policies are applied in four stages: inbound (before forwarding to backend), backend (when calling the backend service), outbound (before returning to client), and on-error. For authentication, we only need to modify the inbound stage to validate tokens before any requests reach our MCP server
Click on the Policy editor icon in the Inbound processing box to edit the policies, which are represented in XML.
APIM simplifies Entra authentication through a dedicated policy designed for this purpose. This is how it looks like:
| |
The <base /> and <set-backend-service /> tags are automatically added by APIM:
- The
<base />tag indicates that the default inbound policies that we applied to all the operations should be applied. - The
<set-backend-service />tag configures the backend service where APIM will forward the request to. In our case, it’s the MCP server hosted on Azure App Service.
We need to add the <validate-azure-ad-token> policy, which will validate the access tokens presented in the Authorization header of incoming requests.
You need to replace your-tenant-id with the tenant ID of your Microsoft Entra instance, and your-client-id with the Application (client) ID of your MCP server application. You can find both of them in App registration under Microsoft Entra ID in the Azure portal.

This policy will validate the access tokens presented in the Authorization header of incoming requests. If the token is valid, the request will be forwarded to the MCP server; otherwise, a 401 Unauthorized response will be returned.
As next step, in order to be compliant with the MCP specification, we need to make sure that, if the authentication fails, we return a header named WWW-Authenticate with the URL where it can find all the information to access the protected resource. We can do this by adding a policy in the <on-error> section of the policy editor:
| |
Now we need to enable the endpoints which are needed to support the OAuth 2.0 authorization code flow and that tell to clients how to properly authenticate.
Supporting the oAuth 2.0 authorization code flow
The other step is to expose the endpoints needed to support the OAuth 2.0 authorization code flow. When a client application (like an agent) needs to connect to a service protected with OAuth 2.0 protocol, it looks for the necessary endpoints to start the authentication flow under the /.well-known/oauth-authorization-server path of the API.
When the API is called, it returns a JSON payload like this:
| |
Thanks to these information, a client who wants to authenticate against our MCP server will be able to discover the authorization and token endpoints to use.
One of the best features of APIM is that we can add new endpoints to our APIs without having to code them. To add the /.well-known/oauth-authorization-server endpoint, go to the APIs section of your APIM instance, then select the API that was created for your MCP server. Click on the Design tab, then click on the + Add operation button.
Set the following properties:
- Display name: OAuth 2.0 Authorization Server Metadata
- Name:
oauth-authorization-server - URL: GET -
/.well-known/oauth-authorization-server
After the operation has been created, click on it and open the policy editor for the Inbound processing section. Here, we need to add a policy that returns the JSON metadata we saw earlier. This is how the inbound policy looks like:
| |
Remember, also in this case, to replace your-tenant-id and your-client-id with the actual values of your MCP server application registration.
Notice how we have removed the <base /> tag from the policy, which means that the inbound policy we have assigned to all the operations won’t be applied here. This is important, since the endpoint that provides the OAuth 2.0 metadata must be publicly accessible without authentication.
The second endpoint we need to add is the one we have included in the WWW-Authenticate header we created before. This endpoint provides metadata about the protected resource and is located at /.well-known/oauth-protected-resource. To add it, repeat the same steps we did before to create a new operation with the following properties:
- Display name: OAuth 2.0 Protected Resource Metadata
- Name:
oauth-protected-resource - URL: GET -
/.well-known/oauth-protected-resource
Then, open the policy editor for the Inbound processing section and add the following policy:
| |
Thanks to this policy, when a client calls the /.well-known/oauth-protected-resource endpoint, it will receive a JSON payload that describes the protected resource and the authorization servers that can be used to access it.
Securing the App Service
There’s one last step to do. Right now our APIM is properly protecting the MCP server, but the Azure App Service is still publicly accessible. To avoid that, we need to configure the Azure App Service to accept requests only from the APIM instance. To do this, go to the Settings -> Networking section of your Azure App Service. Here, we need to add a new rule that allows traffic only from Azure services.
- Under Inbound traffic configuration, click on Enabled from all networks near Public network access.
- Change it to Enabled from selected virtual networks and IP addresses
- Under Main site, set Unmatched rule action to Deny
- Click Add to add a new rule
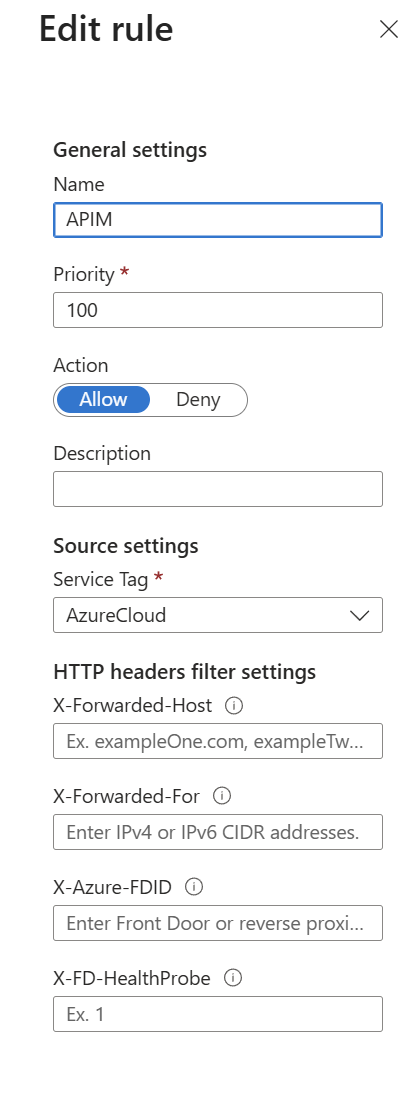
- Configure it in the following way:
- Name: Allow APIM
- Priority: 100
- Action: Allow
- Type: Service Tag
- Service Tag: look for AzureCloud
- Click on Add rule to create the rule
- Click on Save to apply the changes
Now, to verify that everything is working correctly, try to access the Azure App Service URL directly in the browser: https://<your-app-service-name>.azurewebsites.net/mcp. You should see a 403 Forbidden error, which means that the Azure App Service is properly blocking direct access. However, thanks to the rule we have created, Azure services (like our APIM instance) are still allowed to access it.
Testing the job
We are ready to test the job we did. The easiest way to do that is by using Visual Studio Code with the GitHub Copilot extension, just like we did before. However, Visual Studio Code (like any other application which wants to access our MCP server) behaves like a client and, as such, it needs a dedicated application registration in Microsoft Entra to be able to request access tokens. We need to register a new application in Microsoft Entra with the proper permissions to access to the MCP server we have just protected.
- Go to the Azure portal and navigate to the App registrations section.
- Click on New registration to create a new application.
- Give it a meaningful name, like Flights MCP Client.
- Choose the appropriate supported account types. For this demo, we’ll choose Accounts in this organizational directory only, but you can make the application also multi-tenant if you want to allow users from other organizations to access it.
- Click on Register to create the application.
Now move to the Authentication section and click on Add Redirect Uri. We must add the redirect URI that Visual Studio Code will use to receive the authentication response. Choose Web and add the following Redirect URI:
| |
There’s a second one we need to add, but need to add it manually in the manifest because it’s based on the HTTP protocol (instead of HTTPS) and, as such, the UI will block us. Under Manage, click on Manifest and look for the section web - > redirectUris. Add the following URI to the list:
| |
This is how it should look like:
| |
Now we need to make is to authorize this client to call the MCP server. Under Manage, move under API permissions, then:
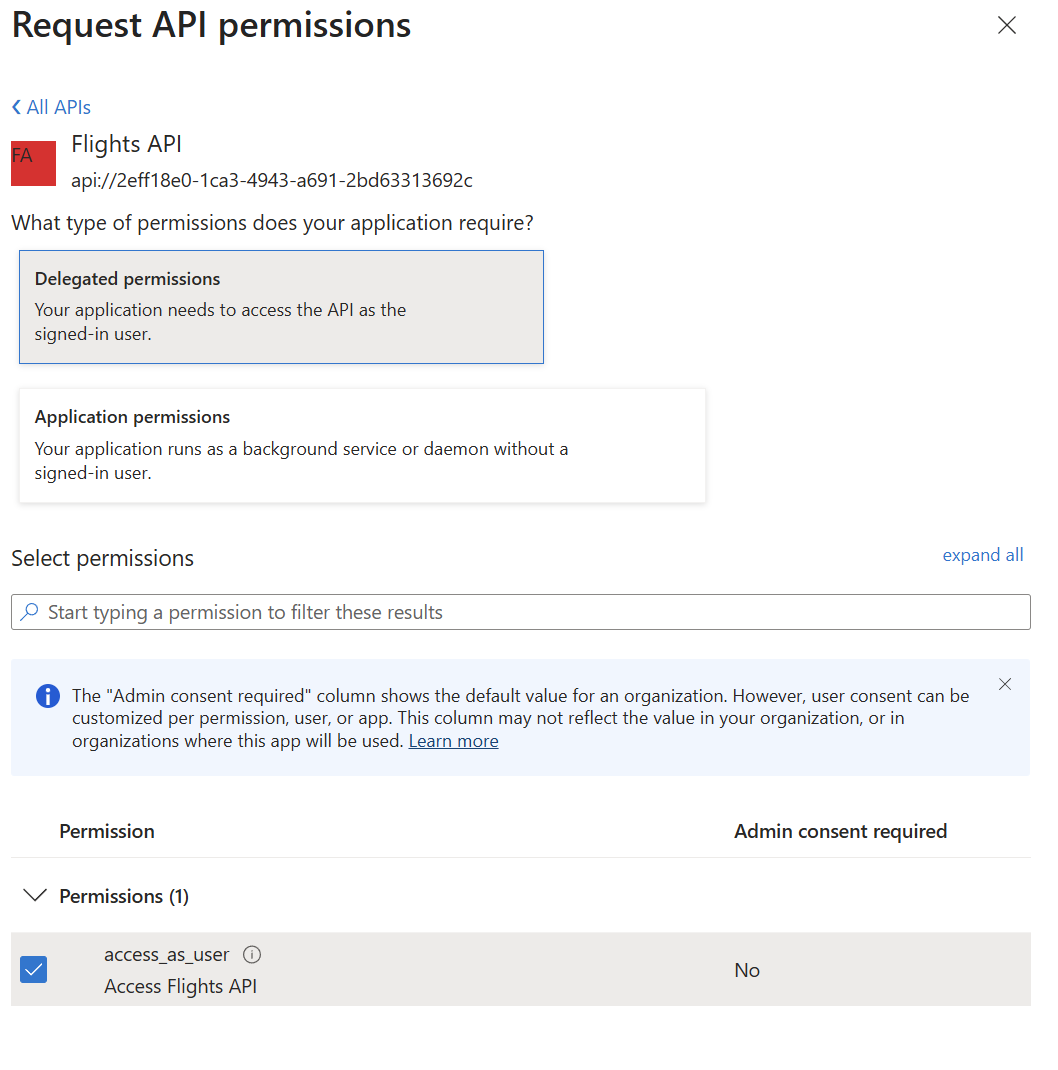
- Click on Add a permission
- Choose APIs my organization uses
- Search for Flights MCP Server (which is the name of the first app registration we have created)
- Under What type of permission does your application require?, choose Delegated permissions.
- Under Permissions at the bottom, check access_as_user and click Add permissions.
The last step is to create a client secret that we’ll have to provide to VS Code:
- Go to Certificates & Secrets.
- Click on New client secret.
- Give it a meaningful name and choose an expiration.
- You’ll be redirected to the page, where you’ll see the client secret in clear under the Value column. Make sure to note it down because, after you’ll move away from this page, the secret will be hidden forever.
Now go back to the Overview page and take note also of the Application (client) ID; we’ll need it in a moment.
Setting up Visual Studio Code
Head back to the mcp.json file we have created before, click on Stop above the MCP server entry to stop it, then restart Visual Studio Code.
Now open it again on the mcp.json file and start the server. At first, Visual Studio Code will show a message to communicate that the MCP server doesn’t support Dynamic Client Registration. This is expected. Just click on Copy URIs & Proceed.
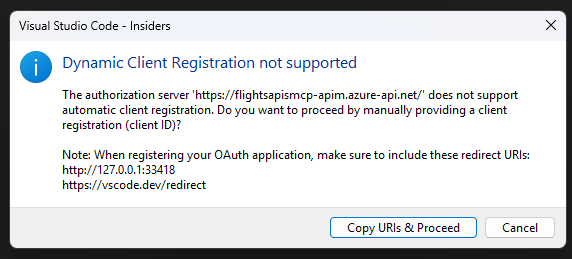
Visual Studio Code will ask for the client id of the application to use to access the MCP server. Here, paste the Application (client) ID of the Flights MCP Client application registration we have just created.
Make sure to not confuse the two app registration. The one you need to use now is the Flights MCP Client app we have created just now, not the Flights MCP Server app we created at the beginning.
Then, it will ask for a secret. Provide the one you have just created for the Flights MCP Client app.
After that, VS Code will ask you to authenticate. Click on Allow. It will open a browser on the authorization endpoint of Microsoft Entra, which has been retrieved by the APIM instance using the /.well-known/oauth-authorization-server endpoint we created earlier.
Log-in with your Microsoft Entra credentials and then, once you see the success message, authorize the browser to go back to Visual Studio Code. You might be prompted to perform a second login. Complete the authentication flow when prompted—this second login verifies your identity for the MCP server access.
If everything works correctly, now you should see the MCP server running and with 4 tools available. This time, however, the server is protected with Microsoft Entra authentication.
Again, if you want to be sure that everything is working correctly, you can try to ask a question like:
| |
GitHub Copilot should prompt you to call the MCP server and, after approval, it will return a list of flights matching the criteria.
We did it!
Wrapping up
In this article, we have seen how to create a simple MCP server using .NET and ASP.NET Web API. We have also seen how to publish it to Azure App Service and how to protect it using Microsoft Entra and Azure API Management. In this post, we tested the agent using Visual Studio Code with the GitHub Copilot extension, but you can use any other MCP-compatible client to interact with the server. In the next posts, we’re going to take a look on how we can consume it from the Microsoft 365 Copilot ecosystem. Stay tuned!
You can find the complete source code of the MCP server on GitHub.